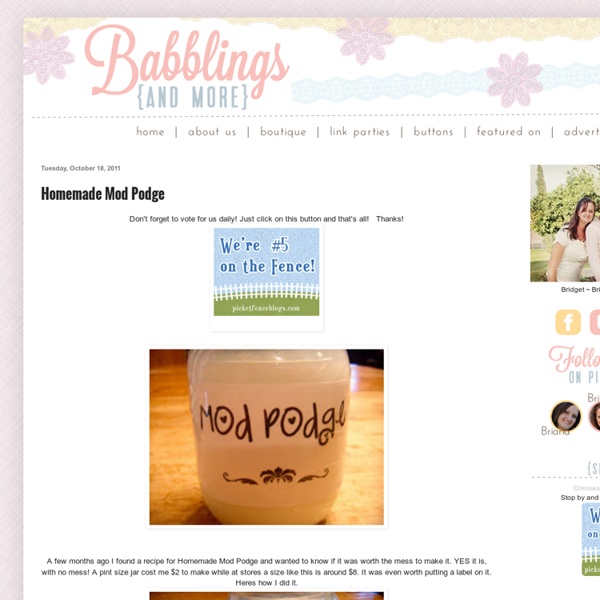
background preloader

Homemade Mod Podge

Homemade Mod Podge
Don't forget to vote for us daily! Just click on this button and that's all! Thanks! A few months ago I found a recipe for Homemade Mod Podge and wanted to know if it was worth the mess to make it. Put a strip of masking/packing tape directly on your jar so that you can take it off later easier. Stick the sticker label on the tape. Tape over the label so that it will be semi-waterproof. Mod Podge in a Pint Jar (matte) Fill jar half way up with white glue (like Elmers) Then fill jar up with water. Shake Well. This is a 50-50 mixture glue/water. It will have a Matte finish. If you would like a Glossy finish, add 1 TBS of clear varnish. Shake it! If you have tried it with the varnish, we would love to hear how it went. See it for yourself how it works. Disclaimer: If you are wanting to do a long term or permanent project, the original Mod Podge may work better since they do add additional ingredients that make the finish last longer.

38 Ideas to Use Google Drive in Class August 11, 2014 This is the third post in a series of posts aimed at helping teachers and educators make the best out of Google Drive in classrooms. This series comes in a time when teachers are getting ready to start a new school year and hopefully will provide them with the necessary know-how to help them better integrate Google Drive in their teaching pedagogy. The two previous posts featured in this series were entitled consecutively "New Google Drive Cheat Sheet" and "Teachers Visual Guide to Google Drive Sharing". Today's post covers some interesting ideas and tips on how to go about using Google Drive in your classroom. This work is created by Sean Junkins from SeansDesk. Google Docs

Craft: Valentine's Day Wall Art I loved how my Valentine's Day garland and wreath looked so I decided to make another Valentine's Day decoration. In our living room we have a big blank wall that is patiently waiting for us to finish the wall art we plan on hanging. I decided to use that space and try to make a simple, cheap wall art. Supplies: Card stock, pattern to print (I did sheet music), scissors, tapeCost: $0 (I already had all of the supplies) I started off by printing off sheet music. Then I found a heart shape that I liked (via google images). I cut out the hearts by hand - I'm very jealous of people with cricuts or other similar machines that do it for you. :-) I had originally planned on just taping the hearts to the wall (I was going for very simple wall art) but decided it might look neat if the hearts stood a little bit off of the wall. Does that make sense? I printed the outline with the folding lines (light grey) onto card stock and cut them out. Then I taped them to the backs of the hearts. All done!

Melted Crayon Canvas Art Bless me Internet, for I have sinned. It's been....eh...a really long time since I've blogged. Back in May, my son caught pink eye. Not a big deal, as lots of kids get pink eye and live to tell the tale. Oh yes, we've been busy here. We seem however, to finally all be well and mended. A few weeks ago while browsing Pinterest I came across a melted crayon art project that looked simple and beautiful. Using two boxes of Crayola crayons (64 count) The Boy and I picked out our favorite colors in each, in some cases doubling up on our favorite hues. It's been warm here for the past few days, but not nearly hot enough to melt the crayons by leaving them in the sun, so I found my old hair dryer which hasn't seen proper use in over two years and set it to the highest setting. It didn't take too long for the crayon wrappers to turn shiny from the heat and melting waxy goodness. My son was thrilled with how beautiful the rainbow art turned out. Happy to be back, Simple Mama

DIY Crafts, Projects And Handmade Gift Ideas - Craftbits.com Topology Möbius strips, which have only one surface and one edge, are a kind of object studied in topology. Topology developed as a field of study out of geometry and set theory, through analysis of such concepts as space, dimension, and transformation. Such ideas go back to Leibniz, who in the 17th century envisioned the geometria situs (Latin for "geometry of place") and analysis situs (Greek-Latin for "picking apart of place"). Topology has many subfields: See also: topology glossary for definitions of some of the terms used in topology, and topological space for a more technical treatment of the subject. History[edit] Topology began with the investigation of certain questions in geometry. Modern topology depends strongly on the ideas of set theory, developed by Georg Cantor in the later part of the 19th century. For further developments, see point-set topology and algebraic topology. Elementary introduction[edit] Topological spaces show up naturally in almost every branch of mathematics.

the little lovebirds happy wednesday. i thought i'd share a little project on the blog today. i don't share {or do} a lot of diy's, thanks to my busy schedule. however, yesterday i was feeling awfully crafty- and the leisure summertime allowed me to create something fun. i totally stole this idea from one of my best friends, and would link it to her blog if she had one. it's time to get your craft on, and create a fun, inexpensive and adorable calendar! "call me a thief": that title relates to the fact, that i made this project for a grand total of $3. {pretty impressive, right? what you will need: 1. paint samples {usually free! 2. a lovely picture frame! 3. dry erase marker. 4. of course you will need the essentials: scissors and glue. instructions: 1. simply pick out your paint samples and colors. i chose to do an "ombre" look, however mixed colors are darling too! 2. trim to the size you want your boxes. 3. paste onto a solid white piece of paper the size of your frame. 5. ta-da!

Wood&Faulk | Documents of experiments, style and craft. Fun with Foam Printing - Easy Tutorial I loved this idea because not only can you recycle these horrid polystyrene containers, but the process is really simple. You could even use tracing paper and trace your design so you don't even need to be able to draw. You could make a whole series of cards like this or just a colorful print to hang on your wall and cheer up the place. Materials needed: Foam or polystyrene container pencil paint or ink small roller 1. 2. 3. 4. 5. Happy printing! Original image courtesy of themetapicture

Chaos theory A double rod pendulum animation showing chaotic behavior. Starting the pendulum from a slightly different initial condition would result in a completely different trajectory. The double rod pendulum is one of the simplest dynamical systems that has chaotic solutions. Chaos: When the present determines the future, but the approximate present does not approximately determine the future. Chaotic behavior can be observed in many natural systems, such as weather and climate.[6][7] This behavior can be studied through analysis of a chaotic mathematical model, or through analytical techniques such as recurrence plots and Poincaré maps. Introduction[edit] Chaos theory concerns deterministic systems whose behavior can in principle be predicted. Chaotic dynamics[edit] The map defined by x → 4 x (1 – x) and y → x + y mod 1 displays sensitivity to initial conditions. In common usage, "chaos" means "a state of disorder".[9] However, in chaos theory, the term is defined more precisely. where , and , is: .

DIY Canvas Prints I LOVE the look of canvas prints…but, I haven’t been able to persuade my frugal little self to actually pay for them. Then, along came this idea. It was inspired by my super crafty sister in law. She’s amazing, really. And after seeing what she did with her family photos…I thought to myself : “I wonder if you could wrap your own photos onto canvas? Here is what you will need: -CANVAS 2″ smaller on each side than your actual photo. -PHOTO 2″ larger on each side than your canvas. -WOOD GLUE (make sure it’s the white wood glue…NOT the yellow stuff!!) -TEXTURE CREAM or CR TEXTURE COATING If you are in Utah (SLC area) you can go in and purchase a 6oz jar of texture cream for $8.95 at The Wood Connection. -FOAM ROLLER I have used two different kinds of rollers for my canvas’s. STAPLER any old stapler will do…just a good old home/office use stapler Instructions: Squeeze the wood glue onto the canvas. Be sure to go all the way to the edge of the canvas with the glue. It should look similar to this:

Bottles Full of Light The other day, I wrote about attempting to drill through glass and I finished up the project this weekend. I think it turned out beautifully — I love the idea of bottled light! These would be pretty by a wintery window or under an entry table. I like the way the gold paint makes the bottom of the bottles look misty and glow-y, even during the daytime. I’ve got a ton of images and DIY instructions below if you’d like to try this too. I started with these apple juice bottles from Whole Foods. Next, I used my handy scraper tool to take off the label. Once the bottle was clean and label free, it was time to drill through the glass. [UPDATE: Hah! Next we painted. I used a disposable sponge brush and Liquid Leaf paint — but any metallic enamel paint should work. Once the paint was dry (it dries very quickly), we started stuffing the lights in. And that’s it! This is another project as a True Value Blog Squad Member.

How to make gift bags from newspaper When I bought something at a store recently, the clerk handed me my purchase in a bag made from a newspaper. I liked it very much and had to make some more—thus today's DIY recycled newspaper project: gift bags made from the Wall Street Journal. You can vary the dimensions, of course, but here's what I used to create a bag that's 5" tall, 4.5" wide, and 3" deep. Stack two sheets of newspaper on top of each other. This will be a two-ply bag for extra sturdiness. Cut out a rectangle that's 15.5" wide and 8.25" tall. Fold a flap 1.25" down from the top. Cut two pieces of cardstock or chipboard to 4.25" x 1", then glue them on the widest two panels just under the top fold. Put glue on the outside of the 0.5" tab and bring the left-most panel over to form the body of the bag, aligning the cut edge of the panel with the folded edge of the flap. Upend the bag so the 2" flap is now up. Put glue on both flaps and fold them inward to form the bottom of the bag.

Infinite [Internet Encyclopedia of Philosophy] Working with the infinite is tricky business. Zeno’s paradoxes first alerted philosophers to this in 450 B.C.E. when he argued that a fast runner such as Achilles has an infinite number of places to reach during the pursuit of a slower runner. Since then, there has been a struggle to understand how to use the notion of infinity in a coherent manner. This article concerns the significant and controversial role that the concepts of infinity and the infinite play in the disciplines of philosophy, physical science, and mathematics. Philosophers want to know whether there is more than one coherent concept of infinity; which entities and properties are infinitely large, infinitely small, infinitely divisible, and infinitely numerous; and what arguments can justify answers one way or the other. Here are four suggested examples of these different ways to be infinite. This article also explores a variety of other questions about the infinite. Table of Contents 1. a. b. How big is infinity?

Related: