
DIY Orange Bracelets Because I’m thinking orange this week I thought I’d share a couple DIYs that pre-date this blog. The bracelet above is one I did over a year ago and it’s really simple to make. The chain was from Michaels and I used embroidery floss to wrap two lengths of it together…. that’s it! It also reminds me of the project Honestly WTF posted a few months ago – they’re both takes on the same general trend. This one is made from Indian glass beads wire-wrapped to a chain. Tagged as: bracelets, diy, jewelry, orange
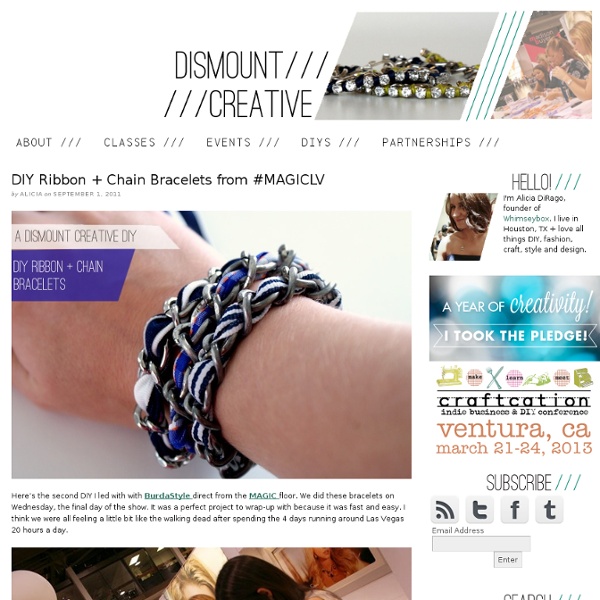
DIY Ribbon and Chain Bracelet I love big bracelets and I cannot lie! This DIY ribbon and chain bracelet looks so awesome worn either alone or stacked with all your other faves. Its a great addition to your accessories for Summer. The pinks and green on this bracelet add a fresh look to all your Summer whites and also looks great with denim. 20 inches of large chain40 inches of half inch wide ribbon5 Large beads6 Small rosesNeedle and threadBeading needleHot glue Step 1 Using your beading needle thread your ribbon through your needle and weave it through your chain. Step 2 Next you will glue your beads to your chain. Step 3 Using your needle and thread, sew your beads to your chain. Step 4 In between your beads you will add your small roses. Now wrap your bracelet around your wrist and tie with a bow! Also shown the Minaudiere with Golden Horse. This bracelet lends itself to a lot of customizing. Things have been a bit crazy around our house lately, as were getting ready to move.
Wednes-DIY: Feather Hair Clips There’s no question, we love the feather hair clip trend. It’s a great way to add a unique touch to a simple outfit and they are perfect accessories for summer festivals (like Outside Lands this weekend!). I love the elegant and intricate ones I’ve been seeing around the web, and for today’s DIY project our Roosevelt field MIT, Kristina, shows you how to make your own feather hair clip! Once you get the hang of it this is something you can definitely experiment with, adding additional feathers or other elements like beads and charms. What you need: Two feathers of your choice, jewelry chain, 3 pieces of jewelry wire and a hair clip. (You can find fake feathers at arts and crafts stores.) Step One: Wrap wire around both feathers, leaving a little room at the top. Step 2: Use the remaining wire on each feather to wrap around chain in any place you want! Step 3: Take the rest of the jewelry wire and stick through the top of the chain. thanks for sharing Kristina!
Chan Luu Single Wrap Macrame Bracelet Chan Luu bracelets are just so cool! What's great about them is that they use simple macrame techniques to produce different results, this time with the addition of beads! This tutorial adds on to my previous Square Knot Friendship Bracelets, but utilizes the beads in a different way; on the outside of the knots as opposed to the inside. What you get is a totally different result! Step 1: Gather materials. Needed are 3mm glass gemstone beads, cotton thread for knotting, scissors, tape, and a bead and crimp for closure. Step 2: Start the knots. Once you have a couple of square knots, take either side of the thread and add beads to these threads. Take two beads right up to the last knot. Make a square knot, making sure the beads are caught in the knot and lie right on either side of the center thread. Step 2: Continue this method. Once you have gotten one square knot set, continue to knot in this way, until your bracelet is as long as you need. You're finished!
Sumo's Sweet Stuff: .:Tutorial Tuesday–Braided Chain Bracelet:. So are you ready to learn how to make these babies? My friends and I have been on a bracelet kick lately, so this was just one more to add to the bangles adorning our arms. I wasn’t lying when I said they are easy. Here’s what you need: - embroidery thread - crimping tool - rhinestone chain (found at Wal-Mart) - chain - jump rings - alligator clasps Take your rhinestone chain out of the package. Put an alligator clasp on a jump ring. Attach your rhinestone chain, regular chain, and embroidery thread to the jump ring. I used a straight pin to secure the clasp and jump ring while I was braiding. And that’s it! It’s so easy, you can whip another one real quick, too. I decided to make a couple of plain rhinestone bracelets to go with all my other bracelets, too. Combine your new bracelet with some of your other bracelets, and make a statement! I’m loving the different styles and colors of bracelets and cuffs, aren’t you? Do you think I have a career in hand/forearm modeling? Linking up here:
Got 2 Minutes? Make A Bracelet! I spotted these on Pinterest, but couldn’t find a tutorial (mostly just lots of links that didn’t go anywhere or were from somewhere in the UK and I was NOT paying international shipping for one You know why there’s no tutorial? Because even a monkey could make one. Get some ribbon clamps (I picked mine up locally at Robert’s on 50% off day, so I think I paid $1 for enough for 3 bracelets) and a tape measure. Cut a piece of tape measure to fit your wrist. I did about 7”. Wear it with dorky sewist (it’s better than sewer, remember?) What’s your favorite super quick and easy project you’ve made lately?
Better instructor; MOI! I am a very visual person, I don't know if it comes with being creative, but give me an image of something and I'll figure out how to do it. Give me a text on the other hand, PuhH it will not be solved. I have recieved some feed-back from readers not quite getting how I made the Wrap bracelet from this post. So for one; I promise to do my best explaining the DIYs more thoroughly, second; here back by popular demand (hahaha): detailed descriptions as to how to make the wrap bracelet. 1. You will need 50 inches of cotton thread (I am using brown), fishing or beading line abt 50 inches, (this is for a bracelet that will wrap 3 times around my wrist (which is small)), one button, beads and as always scissors. 2. Ok, I will admit the start is a bit tricky. 3. 4. 5. 6. 7. I hope this makes it easier ;)
Braided Chain Bracelet The latest jewelry trends seem to consist of mixed media - fabric or ribbon weaved in and out of chains of all different colors and thicknesses. I loved this braided bracelet by Aurélie Bidermann; strands of thread at incorporated into a curb chain, so that the chain is essentially the third strand of the braid. This particular bracelet is $385 on net-a-porter.com ... here's the S&P way, for much cheaper! Inspiration: Supplies: - Thick curb chain (I used brass chain from Michael's, $2.99) - Embroidery thread, of your color choice(s). - Clasp, charms, jump rings - Jewelry pliers, clear nailpolish 1) Measure a length of chain that will fit comfortably around your wrist. For the sake of this tutorial though, I separated the strands - let's clall them Red/Purple and Blue/Purple! 2) Tie the strands together, then string Blue/Purple under & through one end of the chain. 3) Red/Purple goes over Blue/Purple, then under and through the chain. 5) Then Blue/Purple under and through the chain....
Perfect Summer Bangle Here's a fun tutorial on how to make a message bangle that's one-of-a-kind, done in the sun, waterproof and weatherproof. Even after several trips to the beach, it won't fade or wash off! Essentially, it's the Perfect Summer Bangle. Used in this tutorial: Inkodye Red Prepare. Transcribe. Perfect. Pour. Brush. Wipe. Wrap. Tape. Expose. Develop. Cut. Reveal. Wash. Enjoy. Stones and Leather Stones and Leather. When I become a rockstar someday, that’s what I’m going to name my band. And I am going to wear this: I have seen these pop up in a few places this season, but what finally sparked my interest was that a coworker of mine was wearing one the other day. She confessed to paying $28 for hers. Now if you’re here reading this, I’m going to assume that like me, you find paying $28 to be freaking crazy when you can do it yourself. What you’ll need: 24 inches of leather cord for a single-wrap braceletRound beads. This bracelet took me an hour, but that was for two reasons: 1) I had to play with it a little to figure out how to make it, and 2) I had a little mishap with my thread. Doh. First, tie a knot in the end. Now, secure your end somewhere – you can tie it to a pillow and work on your lap, or I just taped mine to the table since that’s where I work. Now, snug it up nice and tight to your knot. Now, it doesn’t matter which side you do this from, but string a bead.