background preloader

Secrets of the No-Sew Rag Rug

Secrets of the No-Sew Rag Rug
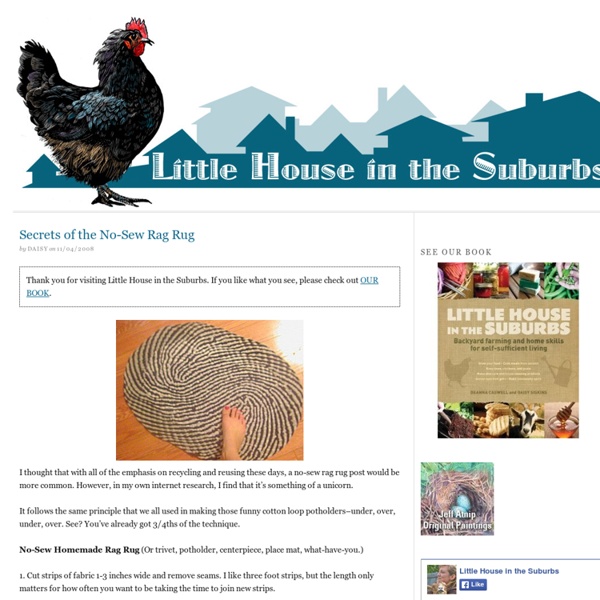
Thank you for visiting Little House in the Suburbs. If you like what you see, please check out OUR BOOK. I thought that with all of the emphasis on recycling and reusing these days, a no-sew rag rug post would be more common. However, in my own internet research, I find that it’s something of a unicorn. It follows the same principle that we all used in making those funny cotton loop potholders–under, over, under, over. No-Sew Homemade Rag Rug (Or trivet, potholder, centerpiece, place mat, what-have-you.) 1. 2. 3. 4. 5. Depending on your material, your rug may not want to lie flat if you turn it too quickly, so you may not get to tuck EVERY strand into the original braid. 6. 7. You can’t see, but there’s SIX strips now. Intermission: WHEW, this is way harder to explain than it is to do! Let’s also pause to learn how to join (slip-knot) strips to each other: Cut a hole in the ends of both strips you want to join. Back to our regularly scheduled tutorial… 8. 9. 9. 10. Ivory Like this: Related

French Desk Set: Basket Liners I adore being organized. Actually ... I adore dreaming about being organized. Take note that this project uses a ¼" seam allowance rather than our site standard ½". Any Sewing Machine (we recommend the Janome 2160DC) 1 yard of 45" wide fabric or ¾ yard of 60" wide fabric PER BASKET: we used Moda's French General in Rouenneries Roche Tournesal for the large basket and Moda's French General in Rouenneries Roche Texture for the small basket 2 yards ½" cotton twill tape: we used off white One or more straight-sided baskets: we found ours at Michael's All-purpose thread in colors to match fabricsAll-purpose thread in contrasting color for topstitchingSee-through rulerFabric pencilIron and ironing boardScissors or rotary cutter and matStraight pins Measure your basket Measure the width of the front (the back will be the same measurement). Measure the base. Optional handle opening Measure the opening width and height. Final measurements Height: 6¾" = 12¼" (formula described above) Tags:

Pouf rayé DROPS au crochet, en double ”Eskimo DROPS ESKIMO UNI COLOUR (50g) 2.15 EUR DROPS ESKIMO MIX (50g) 2.45 EUR DROPS ESKIMO PRINT (50g) 2.65 EUR DROPS ESKIMO TWEED (50g) 2.65 EUR DROPS ESKIMO DEGRADÉ (50g) 2.65 EUR DROPS ESKIMO UNI COLOUR (50g) 2.75 CHF DROPS ESKIMO MIX (50g) 3.15 CHF DROPS ESKIMO PRINT (50g) 3.40 CHF DROPS ESKIMO TWEED (50g) 3.40 CHF DROPS ESKIMO DEGRADÉ (50g) 3.40 CHF DROPS ESKIMO UNI COLOUR (50g) 3.55 CAD DROPS ESKIMO MIX (50g) 4.10 CAD DROPS ESKIMO PRINT (50g) 4.45 CAD DROPS ESKIMO TWEED (50g) 4.45 CAD DROPS ESKIMO DEGRADÉ (50g) 4.45 CAD Les catalogues DROPS 152-155 sont arrivés en magasin, au prix de 1.25 € l'unité - sans besoin d'acheter de fil ! Cliquez ici pour voir la collection DROPS printemps été 2014 Les experts DROPS en tricot et crochet travaillent également à plein temps sur de nouveaux tutoriels vidéos adaptés à cette collection ! - Des petits prix DROPS et votre garantie de qualité Diagramme(s) Besoin d'aide ?

Fused plastic sandwich wraps | Chica and Jo As brilliant an invention as disposable zip-top baggies are, they are potentially very wasteful as well. How many of them do you think we’ve thrown away this year just from lunch sandwiches alone? Ugh, I don’t even want to think about it! Instead, I want to show you how to make a reusable sandwich wrap that not only replaces zip-top bags, but it even recycles some of those pesky plastic shopping bags. And if being “green” by recycling and reusing isn’t reason enough to make these, how about this — we’re going to make them crazy cute with personalized sayings! The first step is to make some sheets of fused plastic. Okay, have you practiced enough to be confident with the process? Now sandwich the layers between two large pieces of parchment paper. If you don’t have parchment paper, you can use regular white paper (make sure there’s no ink on it) or blank newsprint paper, but parchment paper really works a million times better. Here’s where things are gonna get fun. You got that?

Hier, j'ai fait: le logement Mä halusin kissoille olkkariin jonkun pikku pesän, kun nuo on aina tunkemassa itteensä lattialle jääneisiin pusseihin ja laukkuihin. Tai maton alle! Arvatkaa montako kertaa oon meinannut potkaista matossa olevan rutun suoraksi ja tajunnut silleen puoli sekunttia ennen potkua että ruttu ehkä sisältää jotain. Ostin tuossa jokin aika sitten Snurresta matonkudetta kissanpesä mielessä. Mutta olipa jotenkin hankala projekti! EDIT: the pattern also in english at the end of the post! ohje Materiaalit: matonkudetta reilu 1kgvirkkuukoukku nro 8. Koko valmiina noin 37cm x 37cm leveä ja 20 cm korkea, suuaukko 15cm x 11cm Virkkaa 3 kjs ja yhdistä lenkiksi piilosilmukalla. 1. krs: virkkaa lenkkiin 8 kiinteää silmukkaa2. krs: virkkaa 2 ks jokaiseen ks:sään = 16 silmukkaa3. krs: *virkkaa 1 ks, virkkaa 2 ks yhteen ks:sään* toista koko kierros = 24 silmukkaa4. krs: *virkkaa 2 ks, virkkaa 2 ks yhteen ks:sään* toista koko kierros = 32 silmukkaa Virkkaa sitten suuaukko: Huom! How to NOTE! Ai niin. -hanne

Transitions Yoke Cardigan (Becky's Knitting Patterns) Yarn: Queensland Collection Maldive (99yds/91m) shown in Wild Oats; 12 skeins; or any aran weight yarn. Needles: US 6/4.0mm circular 24"/60cm and 16"/40cm. With #6 24" needle, cast on 84 sts. (For a higher neckline, cast on fewer stitches, but be sure the circle will meet around your neck.) Row 1-2: Knit.Row 3: Knit, increasing 12 sts, evenly spaced. 96 sts.Row 4-6: Knit.Row 7: Knit, increasing 16 sts, evenly spaced. 112 sts.Row 8-28: Continue in this manner, alternating the increases on the 3rd row and then the 4th row after. 196 sts.Row 29, 37, 39, 45, 47, 49: Purl.All other rows: Knit. You will have continued your evenly spaced increases throughout all above instructions. Now, continue in stockinette stitch with increases until yoke is large enough to fit around your bust and each arm, with desired ease. Cast on 5 stitches at each underarm and join fronts to back, creating one piece for the body and leaving two sections, one for each sleeve on waste yarn. Sew on 8 buttons.

Trapilho: un panier carré cette fois ! (Tuto inside) | Crealididom Encore une pelote à ma disposition, envie de réitérer l’opération mais cette fois-ci un petit panier carré pour ranger des chaussettes, des barrettes, des colliers, des bracelets, des collants, des mouchoirs…. Le choix ne manque pas. Étant donné le succès de cette nouvelle matière, je vous ai fait également un tuto. Si vous constatez des erreurs, n’hésitez pas à m’en faire part. Le fond du panier : Avec du trapilho ou de la laine se crochetant en 10, monter 11 mailles en l’air en formant une chainette. Piquer le crochet dans la 9ème maille en l’air de la chainette et réaliser une maille serrée. Tourner votre travail (le crochet dans votre main droite et les mailles dans votre main gauche si vous êtes droitière, nous crochetons toujours de droite à gauche) Faites une maille en l’air et continuez en réalisant une maille serrée dans chaque maille serrée du rang précédent jusqu’à la fin du rang. Les côté du panier : Nous allons désormais monter les côtés du panier.

Turquoise 2010: Ottoman Slipcover Put your feet up and ponder this age-old question: what's the difference between a footstool and an ottoman? Besides the fact that an ottoman sounds way fancier than a footstool, the only real differences are: 1) an ottoman is always upholstered (footstools needn't be), and 2) sometimes an ottoman has another job: large ones fill in as coffee tables and hollow ones can open up and act as storage boxes. Our ottoman was a favorite kitty perch and had definitely seen better days. Why buy new when you can make a simple cover? Sew4Home sewing to the rescue! Before: kitty-ravaged ottoman in need of rescue. This project is a bit more advanced, but as usual, we've included detailed step-by-step instructions and lots of photos. Crisp white cotton duck is paired with striking Joel Dewberry Sunflower accents to give our ottoman a bright and cheerful look. Any Sewing Machine (we recommend the Janome DC2011)Adjustable zipper footPiping foot (optional) Squaring the fabric Create the accent panel loop

En rond #2 - Petite Pimprenelle C'est LE fil de cet été à n'en pas douter et depuis quelques semaines, j'avais deux gros cônes qui m'attendaient bien sagement, sans que je sache vraiment quoi en faire. Evidemment, l'idée au départ était de copier lamentablement des objets convoités, mais un peu chers, comme ceci ou ceci. Et puis, je dois avouer que je suis une petite joueuse ; j'ai vu ce billet et je me suis dit, qu'histoire de me faire la main, j'allais commencer par un petit objet ... En une soirée ce fut plié et je suis ravie de mon nouveau panier. Panier tuto by Mimosette, Trapilho blanc de chez Véritas (environ un demi-cône voire moins pour un petit panier, soit un coût de moins de 5 euros par panier), crochet 12 (aïe ça fait bobo) Un deuxième est déjà entamé, car j'ai déjà trouvé mille collections qui ne demandent qu'à s'y installer : Les vernis ne seraient pas contre. Les colliers non plus. Même la jeune génération a tenté une intrusion.

Crazy Cat Hat Author Brenda K. B. Anderson Introduction You know the look on your cat's face right before it tears through the room, stalking it's invisible prey? P.S. Materials List Materials: One skein (no more than 150 yards) of Lion Brand Homespun yarn in "Edwardian". Finished Size This hat will fit a tween, teen, or adult with a head circumference of up to 22". Gauge To make a gauge circle swatch, work rounds 1-6 of hat pattern. Notes Abbreviations and terms used in this pattern: Ch = chain Dc = double crochet Hdc = half double crochet sc = single crochet st(s) = stitch (stitches) Sc2tog = single crochet 2 stitches together. Sl st = slip stitch Tr = triple or treble crochet The back bump: This is also known as the back, backside, or butt of a chain stitch. Magic Ring: Most of the pieces in this pattern start out with a magic ring. The Pattern Directions: The top of the hat is crocheted in a spiral, starting at the top center. Make Hat Base: Round 1. Round 2. 2 sc into each st around (12 sts). Row 22. Row 23.

Zpagetti party ! - Laine Depuis quelques semaines vous avez certainement remarqué une certaine fébrilité sur les réseaux sociaux, chaque fois que l’une ou l’autre montrait un petit bout de fil ou plutôt de grosse maille - comme un tee-shirt en pelote - qu’elle était en train de crocheter ou tricoter. Les unes demandaient "mais qu’est-ce que c’est que ce truc ?", les autres disaient avec des tremolos dans la voix " j’en veux, dis-moi où tu l’as trouvé", et nous ici on était très heureux d’avoir fait partie des quelques "happy few" à qui DMC avait fait tester le produit pour recueillir vos avis. Aujourd’hui, il est temps, non seulement de lever le voile, mais également de vous raconter la création de ce fil et vous offrir la possibilité de gagner l’un des dix kits offerts par DMC en répondant aux questions posées à la fin de ce billet. C’est quoi ce Zpagetti ? Zpagetti est donc issu du recyclage de tissus haut de gamme. Ce que j’ai fait avec : Et un petit headband tressé pour ma Princesse.

Kodachrome Curtains - Updated! Now with lampy goodness! - HOME S So, it's been a while since I've made anything Craftster-worthy, but my husband and I busted out the Dremel tool a few days ago and we made this: It's a pair of curtains made out of old Kodachrome slides! I'm really interested in photography, and will buy old cameras in antique and thrift stores in order to develop film that's inside of it. From time to time, I'll find collections of old slides and will buy those, too. Last fall, driving back from vacation, we stopped at an antique store outside of Kansas City and I found a box of a ton of old slides, mostly Kodachrome, from the 50s and 60s. I hate the idea that these pictures would just be resigned to the garbage or something, and wanted to display them (besides just scanning them in and putting them on Flickr - here's a link to my old found negative/slide collection, though, if you want to check that out: ). Then I connected them all together with chainmail rings.

Le monde de Sucrette MADE: TUTORIAL: Heartbreaker Valentines Who said valentines were only red and pink? In bright colors, these Heart Breaker Valentines work great for boys and girls. So get out your scissors and stapler, because today, you’re tearing up my heart….. Each valentine is stapled together to create a pouch full of secret candies. Skill Level: AnyNeeded: * colorful paper* computer printer* stapler/staples* scissors* candy Start by printing this template from your computer.Two options….1) You can find the PDF file HERE. I chose to print on bright colored paper so the Heartbreakers work for both boys and girls. Another option: print to white paper and let the your kids color the hearts themselves: Most of all, make sure your kids check out what you’re doing. Staple around the outside of each heart, leaving an opening at the top of the heart for inserting candy (or, use your sewing machine to sew around the edge…though it might be more difficult to sew it shut. Then, stuff them with your favorite candy! or big hands to do:

Toutes à nos crochets

Related: