
Utiliser un arduino comme programmeur ISP - KubuntuBlog. Bootloader. (redirected from Main.Bootloader) Learning Examples | Foundations | Hacking | Links What's a bootloader?
See this page for an explanation of what a bootloader is and why we're using one. Not using a bootloader If you want to use the full program space (flash) of the chip or avoid the bootloader delay, you can burn your sketches using an external programmer. Burning the Bootloader To burn the bootloader, you'll need to buy an AVR-ISP (in-system programmer), USBtinyISP or build a ParallelProgrammer. Make sure you have the right item selected in the Tools | Board menu. Bootloading an Arduino Mini Here are some instructions on bootloading the Mini, thanks to Gian Pablo Vilamil.
It still doesn't work! Windows XP may be polling your parallel port and disrupting the bootloader burning process. [HKEY_LOCAL_MACHINE\SYSTEM\ControlSet001\Services\Parport\Parameters] "DisableWarmPoll"=dword:00000001 See this forum thread for details. Versions of the bootloader How does it work? Source Code. Arduino DVM with LCD Display. A Digital Voltmeter (DVM) is one of the first things you need if you're building electronics projects.
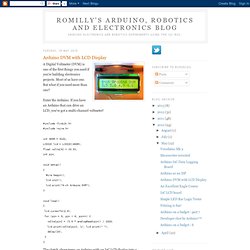
Most of us have one. But what if you need more than one? Enter the Arduino. If you have an Arduino that can drive an LCD, you've got a multi-channel voltmeter! #include <lcdi2c.h> #include <wire.h> int ADDR = 0x21; LCDI2C lcd = LCDI2C(ADDR); float volts[4] = {0.0}; int pin; void setup() { Wire.begin(); lcd.init(); lcd.print("4-ch Arduino DVM"); } void loop() { lcd.cursorTo(2,0); for (pin = 0; pin < 4; pin++) { volts[pin] = (5.0 * analogRead(pin)) / 1023; lcd.print(volts[pin], 1); lcd.print(" "); delay(10); } }
Portail francophone de l'arduino : Robotique, Bidouillage et hacking matériel » Cours 1: Introduction à l’architecture ATMEL AVR. Dans cet article, nous vous proposons une petite introduction à la programmation d’une très célèbre famille de microcontrôleurs d’Atmel. Est le terme utilisé par Atmel pour désigner le cœur du processeur et la famille de microcontrôleurs les implémentant. La est d’ailleurs basée sur l’architecture des microcontrôleurs Atmel Atmega, mais nous allons découvrir cette plateforme en dehors de l’aspect Arduino, avec ses propres outils de développement. Portail francophone de l'arduino : Robotique, Bidouillage et hacking matériel » Tutoriel 1 : L’arduino LCD Keypad Shield. Arduino on a prototype board. Arduino is a great prototyping platform and most of you probably know already about it.
If not, check out the Arduino pages and the Arduino playground and dive into it. A couple of month ago I ordered my first Arduino board. It was one of the Diecimila revision. As I often try something on my breadboard, I found out, that it can get troublesome to connect the Arduino with the breadboard over and over again. Others found that out as well and have solutions for that. So what to do if these boards are far away across the ocean and it is holiday season everywhere? Gather components Luckily I had most needed components laying around. ATmega8, 16MHz, 8kB flash memory, 1kB sram memory2 x 0.1u capacitors2 x 22p capacitors16MHz crystal10k resistor1k resistorred 3mm LEDbutton6 pin header for ISP3 pin header for serial communicationprototyping boardUSBtoRS232 converterISP programmer All components can be bought for about 4.50€, without the ISP programmer and the USBtoRS232 converter.
Schematic Fuses. Perfduino: Build Your Own Arduino Microcontroller! This how-to takes you through all the steps of making your own arduino on a perfboard or perfduino!

Arduino microcontrollers are great for learning about physical computing and are very useful for rapid prototyping. Arduino’s simple programming language makes it a favorite of hobbyists and diy-ers around the world. Because arduino boards range in price from 30 to 70 dollars, it can be very cost effective to make your own. This lets you customize the layout of the board and brings down the cost so you can embed your perfduino in a final iteration project without losing your precious professionally made arduino board you had to wait so long for by the mailbox. The perfduino in this tutorial is designed to closely mimic the original arduino functionality without any specific project layout in mind. Step 1: Materials! These are the materials you will need to make your perfduino: Arduino EMF detector. Collin's Lab: Electronics Tools.
Playground - LCDVoltmeter. Arduino Voltmeter. I’ve been experimenting on ADCs alot recently and I suddenly thought of doing this small experiment.
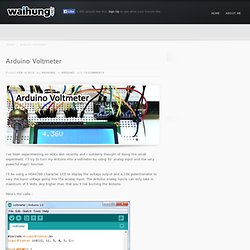
I’ll try to turn my Arduino into a voltmeter by using its’ analog input and the very powerful map() function. I’ll be using a HD44780 character LCD to display the voltage output and a 10k potentiometer to vary the input voltage going into the analog input. The Arduino analog inputs can only take in maximum of 5 Volts. Any higher than that you’ll risk burning the Arduino. Here’s the code : That’s what I love about Arduinos, it is really really simple to program. I’m starting to like the Arduino Nano and I find myself using it more often than my Uno. Without further ado, this is a video showing how the code works : Thanks for reading. Build Your Own Arduino. Setting up an Arduino on a breadboard has become a process I have grown to love.
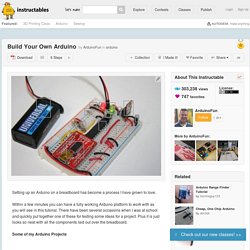
Within a few minutes you can have a fully working Arduino platform to work with as you will see in this tutorial. There have been several occasions when I was at school and quickly put together one of these for testing some ideas for a project. Plus it is just looks so neat with all the components laid out over the breadboard.