
Tie-Dyed Easter Eggs. Welcome to SPRING.

Well, not really. In Louisiana one day it's 80 degrees and the next day it's freezing rain. What's going on mother nature! I figured everyone was tired of seeing winter crafts so I am bringing a little bit-o-spring strait to your beautiful eyes! I have been playing around with tie-dye and eggs lately and I wanted to show you this fun tie-dye technique. You will need: *Lots-o-love I simply love these colors. Everything needed for this project are likely to already be in your cabinet. If you are not familiar with the one step tie-dye, this is everything that comes in the packet. When you get your bottles fill them with water to the black line. The first step is to add a little vinegar to a paper towel. Color Easter Eggs With Kool-Aid. Silk Dyed Easter Eggs. These are gorgeous!

You will not believe the detail. Seriously the most beautiful Easter eggs I have ever dyed. And I am posting this now so that you still have time to find your silk before this Easter. And yes, I know this has been done several times by several people including Martha. Aluminum Foil Technique (Easter Egg Decorating) This photo originally appeared in FamilyFun Magazine Total Time 1 hour Ages all-ages Wrapper for leftovers, craft material, alien mind-reading shield.
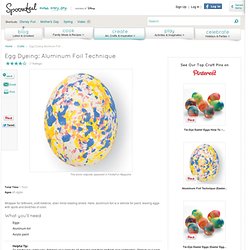
Here, aluminum foil is a vehicle for paint, leaving eggs with spots and blotches of color. What you'll need Eggs Aluminum foil Acrylic paint Helpful Tip: To get the fun under way, first boil your eggs for 15 minutes and then let them cool completely. Imprinted Easter Eggs. Every Easter, as long as I can remember, my Grandma dyed the prettiest leaf and floral imprinted Easter eggs!
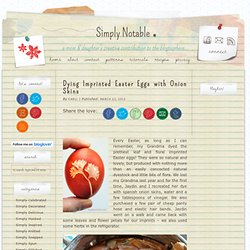
They were so natural and lovely, but produced with nothing more than an easily concocted natural dyestock and little bits of flora. We lost my Grandma last year and for the first time, Jaydin and I recreated her dye with spanish onion skins, water and a few tablespoons of vinegar. We also purchased a few pair of cheap panty hose and elastic hair bands. Jaydin went on a walk and came back with some leaves and flower petals for our imprints – we also used some herbs in the refrigerator. We first skinned about 10 spanish onions and placed the skins into a medium sauce pan along with about 4.5 cups of water and 2 tablespoons of white vinegar.
We placed our leaf and/or flower petals onto the raw eggs and wrapped them tightly in a small piece of nylon securing both ends with elastic pony tails. Easter Egg Artistry. Look what we’ve hatched up – a variety of keepsake eggs for putting in baskets or using as decorations throughout the house.

Some are adorned with bits of lace; others are painted with speckles, dainty flowers or glistening butterflies. Note: For most of the following decorated eggs, it will be necessary to use blown eggs. To blow an egg, allow egg to reach room temperature. Use an awl or a large darning needle to make a small hole at each end of the egg.
Blow out the insides. DIY Video Game Eggs - The Super Mario Bros. Easter Egg Tutorial is Fantastically Geeky. Dyed Eggs & Easter Egg Tree. Click picture to see a larger view When leaves sprout on trees, you know it’s spring.

And when colorful eggs grow on miniature trees, you know it’s Easter! This delicate Easter decoration is fashioned from painted tree branches that are adorned with dyed, paint-spattered eggs. It’s very easy to make, even if you’ve never attempted a craft project. 37 Adorable Easter Egg DIYs. Easter: "Faux Pysanky" & Norwegian Easter Cookies.
Making more "faux Pysanky" was not on my calendar!

But I had so much fun making the marker Pysanky when I was playing with different ways to decorate brown eggs for Easter, that I just HAD to blow out more eggs to make more. I have shared a few tips below - but first.... Norwegian Easter Cookies! Baking cookies wasn't exactly on my calendar either, but while reading the current issue of "Sons of Norway" magazine, I noticed a cookie recipe that reminded me of a Norwegian cookie recipe I had been saving to try for three years! Norwegian Christmas Cookies are featured on Epicurious. The cookies are delicious! And the recipe makes about 10 dozen so you will have cookies to celebrate May Day too! But bake these cookies about three weeks ahead! Zentangle Inspired Pysanski Eggs. Combining Pysanski with Zentangle inspired designs!

I loved the idea! Wish it had been mine! Pysanky - Ukrainian Easter Eggs. I have made Pysanky since I was about 5 years old.

I continue the tradition with my own kids and this year the Grade 3's will be making their own as well. UPDATE: You can see the eggs they made at the end of my latest post here. Here is a step by step tutorial on the simple design they will be attempting. Pysanky supplies are readily available both at Michaels and on the web. Why not start your own Easter tradition by making Pysanky. Pysanky is a form of Batik done on eggs. These eggs will not be edible. Make up your dyes as per the packet instructions. I keep all the jars together in a plastic rectangular container so I can move them around quite easily. Take your egg. We are going to divide the egg off for the design. I work on top of a thick foam sheet (you know that foam that they have for kid's crafts...they have 1/4 inch thick sheets).
Starting at the top of your egg draw a line all around it lengthwise dividing it in half. Now run a line in the middle of the egg all the way around.