
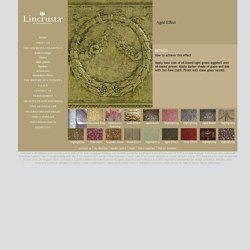
Modern Masters Reactive and Tarnishable Metal Paints. When it comes to choosing an aged metal effect for a do-it-yourself project, high-end decorative finish or large architectural specification, Modern Masters Metal Effects® has you covered!

Our focus on modern-day specialty decorative coatings combined with the ancient art of patinization has made Modern Masters the world leader in water base aged metal finishes. These metallic paints are made from real brass, bronze, copper and iron metals that may tarnish, or deepen in colour over time. These products will react with our Patina Aging Solutions creating real oxidised metal surfaces. They can be used directly onto metal surfaces. This paint system usually requires 3 or 4 component products to create the desired metal effect finish: Primer, Reactive Metallic Paint, Aging Solution and Permacoat Extreme varnish (this is not necessary on the copper and Bronze finishes). Lincrusta - Collection. How to achieve this effect Apply base coat of oil-based light green eggshell over oil-based primer.
Apply darker shade of glaze and dab with lint-free cloth. Finish with clear gloss varnish. How to achieve this effect. Teal / Duck egg Cushion Covers. Rise Hall stencils from The Stencil Library. Buy from our range of Rise Hall stencils online. Page 1 of our Rise Hall stencil catalogue. View topic - Lime Plaster with Stencil. Crinkle Paper Painting: Fun, Easy, Gorgeous Results. Crinkle paper painting: fun, easy, gorgeous results!

Crinkle paper painting, or often called tissue paper wall painting, is a decorative painting technique that you'll fall in love with. This technique gives your walls depth, texture, and interest. You'll truly transform a room by using this faux painting technique. Did I mention it's inexpensive too? What is crinkle paper painting? Crinkle paper painting is a faux painting technique achieved by applying layers of crinkled tissue paper to a wall of wet paint, then painting over the tissue paper with another coat of paint. Tools and Materials for Paint and Tissue Paper Technique Drop cloth or other floor protectionBlue painter's tapeSeveral packages of white tissue paper- according to wall sizeLatex paint in your choice of color, eggshell finish works bestPaint tray3/8" paint rollerChip brush (or a used paintbrush, but be absolutely sure it is clean!) Vanessa Webb - Specialist Paint Effects Welcome. Gold Leaf Supplies - Premier stockists of art materials, gilding supplies and sign writing products.
How to Use Varnish As a Faux Wall Technique. Painting - How to Do a Stippling Technique. Hi, my name is Donnalynne Lefever and now we are going to move on to the next technique which is stippling.

Before me, I have a couple different tools that come in really handy. These are stippling brushes. Obviously, one will cover more territory than the other one. There is a big difference with the brushes. They do make a very refined look of a stipple. The newer option for stippling is a towel and it actually works really pretty cool. So, once you get this, all it is. So, anyway, I am going to show you now the difference with doing it with a towel. So, anyway, with the towel as smooth as possible, watch out for the edges here. Crown Molding. FROTTAGE TUTORIAL _____ Step-by-step instructions for frottage _____ Illustrated Tutorial ______ from www.painting-effects.co.uk. Spunky Real Deals: Annie Sloan White Washed Floors {Updates} A lovely reader named Linda contacted me asking for photos of the finished Annie Sloan White Washed floors.
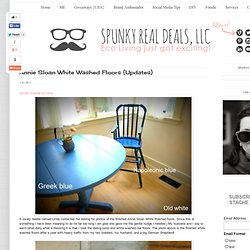
Since this is something I have been meaning to do for far too long I am glad she gave me the gentle nudge I needed:) My husband and I say to each other daily what a blessing it is that I took the daring jump and white washed our floors. The photo above is the finished white washed floors after a year with heavy traffic from my two toddlers, my husband, and a big German Shepherd! Far left you see the finished white washed floors, the middle portion has the old white but is unsealed, and the far right is what it looked like before the white wash{pretty gruesome}. See my Annie Sloan White Washed Floors post HERE for the step by step How-To. *Crucial TIP: Before any application your floor must-be as clean and as dry as possible. Collection. Lour from www.painting-effects.co.uk. How to install a centrepiece. Step 1 - Decide where you would like to have the centrepiece located. Hold the centrepiece to the ceiling and mark around the outside edge with a pencil.
Step 2 - Using a nail probe within the marked area, find the ceiling joist. Using a galvanised or rust proof nail or screw fasten the the centrepiece to the joist through the lashes in the centrepiece. Do not rely on only adhesive to fix the centrepiece to the ceiling. If you want to have a light fitting through the centrepiece, simply drill the hole for the wires and thread them through. When installing a light fitting you must make sure it is securely fastened to the ceiling joist and not just the centrepiece. Once the light fitting has been installed fill the perimeter in the same way as filling joints and mitres as described below. Filling joints and mitres Mix a small quantity of plaster in water until you have a milk consistency.
Colour. Painting. How to install a cornice. Positioning and fixing the cornice Step 1 - First ensure the surface you will be fixing the cornice to is clean, dry and flat.