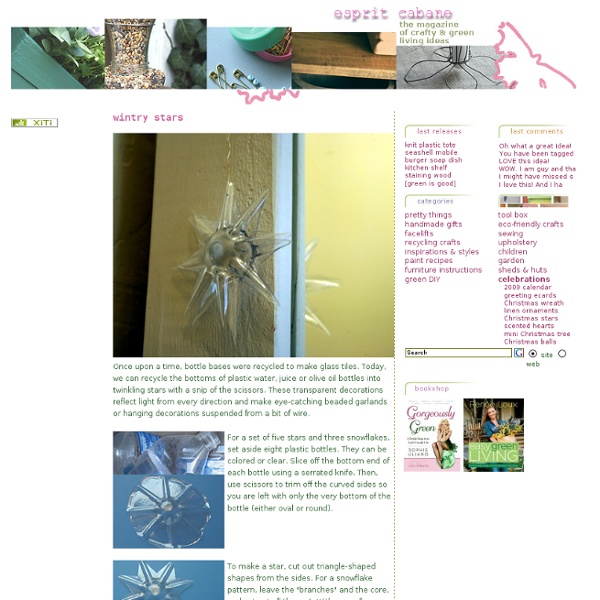
Recycled PET Bottle Christmas Stars
Once upon a time, bottle bases were recycled to make glass tiles. Today, we can recycle the bottoms of plastic water, juice or olive oil bottles into twinkling stars with a snip of the scissors. These transparent decorations reflect light from every direction and make eye-catching beaded garlands or hanging decorations suspended from a bit of wire. For a set of five stars and three snowflakes, set aside eight plastic bottles. To make a star, cut out triangle-shaped shapes from the sides. For a hanging ornament, cut out two identical stars and hang them back to back. For a garland, start with a long piece of string (at least 1.5 m).
Recycled champagne cork St. Patrick’s Day earrings tutorial
I’ve done lots of crafts with regular wine corks and even included some Champagne corks in my designs. Recently I thought why not create some really green earrings from these mushroom shaped corks? There was a cross design on the corks I had but you can easily make these with any champagne corks if you follow this easy tutorial. Great for parties and definitely a conversation starter! You will need: Champagne corks Craft knife or X-acto knife Drill with small bit Small awl or nail Small paintbrush Green acrylic paint 2 inch head pins Fish hook ear wires Jump rings Green E size seed beads Needle nosed, and round nosed pliers Fine sand paper Heavy corrugated cardboard to protect your work surface Optional green sequins and sequin pins 1. 2. 3. 4. 5. 6. 7. 8. Note: Come back to visit Make it easy crafts for more easy Champagne cork earring tutorials with other seasonal designs soon.
Recycled Christmas Tree, how to make recycled Christmas ornaments
All the decorations on our tree are made from things you would usually throw away. For example, the garland is made from plastic packing "peanuts" strung together on thread. We've cut out the pictures from old greeting cards, punched a small hole in the top, and added a ribbon. Use your imagination and see what ornaments you can make from things you would normally throw away. Each year, 25 million extra tons of trash is generated between Thanksgiving and New Years in the U.S. Recycling Homepage
Christmas ornament with popsicle sticks, an easy project for kids!
Make a God's Eye ornament out of popsicle sticks, an easy project for kids! You will need: 2 popsicle sticks OR anything remotely like a stick Yarn or string We have made God's Eyes using twigs from the yard, popsicle sticks, toothpicks (using string instead of yarn). You can hold the sticks together with your hands while you start winding the yarn, but for small fingers, you might want to glue them together (in the shape of a cross) and leave to dry overnight before wrapping. Loop about 6 inches of yarn and hold against the back of the top stick. As a finishing touch, tie several strands of yarn or ribbon to the bottom stick. We experimented making these with lots of different materials. HISTORY / ORIGIN OF THE GOD'S EYE: The Huichol Indians of Mexico and the Aymara Indians of Bolivia weave bly colored yarn on a simple frame of crossed sticks to make a design called "Ojo de Dios" or "Eye of God".
Festive Stars made from Recycled Drinks Cans
November 1st, 2011 I’m preparing for a couple of craft fairs (details coming soon) at the moment and decided to have a go at making some Festive decorations by recycling some drinks cans I’ve been collecting. I found this tutorial the other day and thought I could adapt it to me own needs. So here goes… What you will need: - Empty drinks cans - Scissors - Craft Knife - Ball point pen or an embossing tool with a fine point - Sharp pointy thing – not sure what the name of this tool is! Step One First you need to get a star shape printed onto paper or card and cut out. Step Two Next you need to cut the tops and bottoms off your drinks can and give the insides a good clean – I used a craft knife to do this as well as scissors – be careful of sharp edges! Step Three Put a bit of sticky tape (rolled up) onto the back of your cardboard star and stick this to the silver side of your can and draw around it – I use my sharp pointy tool to do this but you could also do it with a fine permanent marker.
Recycled Glass Ball Ornaments: Donnamarie Walker
from week ending 12/6/98 Design and Instructions by Donnamarie Walker Supplies for Glitter Ornament: 1 Glass Ball Ornament 1/4 wide double stick tape or sheet of double stick tape Iridescent Glitter, color of your choosing Small bowl For Stained Glass Ornament: 1 Glass Ball Ornament Gallery Glass Leading-Black Gallery Glass Paints-Assorted Colors For Both Ornaments: Bleach Q-tips Laces Ribbons Silk Roses Directions 1. 2. 3. 4. 5. 6. 7. 8. Happy Crafting!!! back to home page
Pop Can Snowman
You will need: 1 cleaned, dried aluminum soda can 1 sheet of white construction paper or printer/copier paper 1 full sheet of newspaper Masking tape White paint Fiberfil or quilt batting Scrap fabric Wrap the entire can with the white construction paper. Using the full sheet of newspaper, form it into a ball and, using the masking tape, tape it to the top of the aluminum can. (This will form the head.) Cover the rest of the newspaper ball with masking tape. Paint the taped newspaper ball with the white paint. Cover the white body of your snowman with the Fiberfil. Buy or make a construction paper hat for your snowman. Your snowman is ready to display! Contributed by Roberta, isewg@email.msn.com
Related:
Related:


