Free Clothes Patterns
Posted on | October 9, 2008 | 7 Comments I originally became interested in patternless sewing, many years ago, because I had a hard time finding patterns in my size. Nowadays, patterns in large sizes abound. Nonetheless, I still love my pattern free sewing. These patterns generally of three types. One type requires you to take your measurements and draw up the pattern yourself.
DIY Criss-cross headband
My addiction to insanely simple DIYs continues. I threw this together today and thought I'd share:) 1. Take a long strip of fabric (preferably some type of stretchy fabric) 2.
For teachers - Templates
<div class="cdOLblEmRed cdSearchResultsMargin">Warning: This site requires the use of scripts, which your browser does not currently allow. <a href=" how to enable scripts.</a><br/></div> All Products Word
Tutorial ~ Hanging Fabric Baskets Or Pockets
I know I say this every time, but I am so excited about this project! The possibilities are endless! And they are so easy – I am going to have baskets hanging all around my house in a weeks time. I am using these above my sewing desk to hold all my notions and patterns. First I will show you how to make them, then I will tell you all the ways I think you could use them…then you can tell me all the ways I never thought of!
bird nest necklace}
I have been seeing a lot of bird nest jewelry around lately. They are beautiful and I love the trend so I thought I would try making my own. These turned out to be really easy to make and require just a few simple supplies. This necklace would make a lovely Mother's day gift, which just happens to be coming up this weekend!
Macarons
Just can’t help for not sewing these sweet little macaron coin purses when one of Craft Passion’s Facebook fans showed them to me. Thanks to XYZZhandmade for her inspiring handmade and some tutorial links in Japanese, this, this, this and this. No, I can’t read Japanese but I can guess from the pictures on how to sew it. Here is the English version of tutorial on how to sew this macaron coin purse where I have added more details in the sewing.
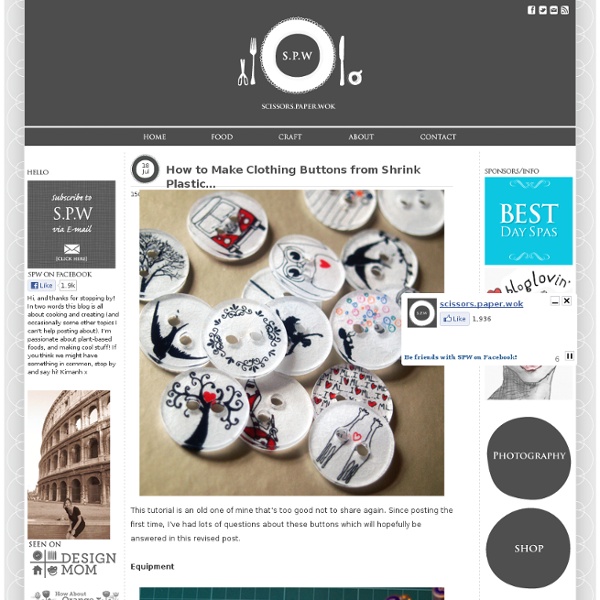
DIY Shrinky Dinks for Adults
Here’s a cool DIY that puts the shrinky dinks you used as a child to good use! Why should kids have all the fun? All you need to get started is shrink plastic (google for sources), a pair of scissors and stamps to apply your design. I’d love to give it a try with bracelets! June Gilbank of PlanetJune has the full tutorial available on her website. Visit PlanetJune for the full tutorial!
autumn leaf bouquet
I don’t know what it’s like in your neighborhood, but when I step outside here in Oakland, I sense it right away: Fall is in the air! I’m lucky enough to have a few turning trees on my street, so I don’t miss out entirely on the brilliant autumn colors I remember from growing up in NH. Speaking of brilliant autumn colors, I’m thrilled to share this stunning maple leaf rose bouquet DIY from a fellow Kate — clay, fiber and paper artist Kate Hust. Kate first learned how to make these a few years ago from a retired art teacher in her community, and now they’ve become an annual tradition when fall rolls around. Her instructor taught her to wrap the leaves really tight, so they looked like rose buds, but Kate has modified the technique a bit to suit her own tastes: She likes to find the really big leaves and make them with large open “petals.” She’s clearly perfected the craft, and I’m so happy that she’s decided to pass the tradition on to us.
Rick Rack Rosettes
A friend gave me this flower ring and necklace, when she handed them to me I thought they were porcelain–there’s a very vintage feel to them. From a distance you really can’t tell that they’re made out of rick rack! Yes, rick rack! She shared how to make them with me, and now I’m sharing with all of you readers! The wow of the rosette comes from a few simple steps!
DIY: Wearable words
When I was looking around for tutorials on making paper beads, I found some really striking "book beads" and accessories, now collected in this post. I understand (after all the browsing) that you can make really durable "beads" easily ... very little time, skill or money required. Woohoo! Who doesn't need more jewelery? (UPDATE 6/12: See the follow up post for more wordy accessories)
pattern drafting
You need 1 18″ reversible nylon closed zipper2.5 yds. of shell fabric, 60″ wide1.5 yds. of liner fabric, 60″ wideCoordinating thread1 roll of kraft paper or pattern-making papper1 tracing wheel On a sheet of kraft paper, draw a straight line about 2″ from the edge along the length. In the middle of this line, mark point 1.
Finger Knitting How-to
You know how I just wrote about how I like getting a handmade gift more than just about anything. Well, this is anything. Sitting on the couch on a lazy Sunday, knitting with my kids . . . that beats gift-getting for sure. It is a gift itself. We just sat there side-by-side, for about an hour, feeling the warmth from each other’s bodies, listening to music from my computer and basking in each others company as the sun streamed through the windows.
Death By Oreo Cupcakes
They are probably the best Oreo cakes I have ever tried. A lot of cake's that I have experimented with before are like a vanilla cake with bits of Oreo in them, which didn't really give them enough Oreo flavor. But these were a lot better. I used a dark chocolate fudge cake mix instead of just a regular chocolate cake mix, which went really well with the cookies and gave the cakes just a little more flavor. So, in this recipe there is Oreo's in the cake, in the frosting, and at the bottom is a Oreo surprise.