background preloader

Star Box

Star Box
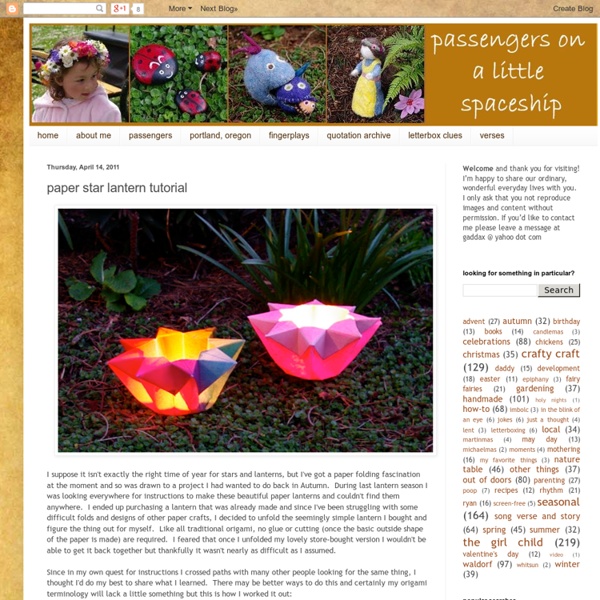
I suppose it isn't exactly the right time of year for stars and lanterns, but I've got a paper folding fascination at the moment and so was drawn to a project I had wanted to do back in Autumn. During last lantern season I was looking everywhere for instructions to make these beautiful paper lanterns and couldn't find them anywhere. I ended up purchasing a lantern that was already made and since I've been struggling with some difficult folds and designs of other paper crafts, I decided to unfold the seemingly simple lantern I bought and figure the thing out for myself. Since in my own quest for instructions I crossed paths with many other people looking for the same thing, I thought I'd do my best to share what I learned. Begin with a 12" square of paper to end up with a lantern that is about 7" across when complete. (Feb., 2012 edit: A video tutorial of this project can now be found here.) For crisper creases and to help fold thicker card stocks, try using a bone folder. Related:  crafting

Can Calendar happy april! normally this would be an odd month to introduce a new calendar into your life, but this handy little guy is perpetual, which means “good anytime”, forever and always. we ran across something similar at a thrift store a while back and thought it would be an easy, and super customizable project that could be made using little more than an empty peanut can and some paper. we’ve provided some downloadable templates, but you could mix it up with all sorts of fun font and color combinations. In addition to the rotating strips for day of the week, month of the year, and date, we thought it would be fun to add an option for mood as well. this being april 1st and all…we had to go with “nutty”. have fun!derek & lauren CLICK HERE for the full project instructions after the jump! here’s what you’ll need: -empty can of nuts (the template is for a 6.5 oz can that is 3.5” tall and has a 3” diameter.) 1. clean your empty can thoroughly. 2. download and print both calendar pdf files.

Schoolhouse-Shaped Gift Box Images and text by Amy Christie for Design Mom. The school year is ending and it’s time for last-day-of-school parties, and gifts for teachers, coaches, librarians and school bus drivers. I’m sure this (free!) Remember this house gift box from Christmastime? By the way, Design Mom readers are just the best ever! Let’s get to making these cute things! Supplies: - Printable school house template — download for free: white, red or yellow - Scissors - Cutting blade - Double-sided tape - Ruler & scoring tool Print the school house gift box template. If you desire, use the cutting blade to remove the window panes and around the bell. With the ruler and scoring tool, score the house template on all the dotted lines. Fold on the newly scored lines. Add a piece of double-sided tape to the small tab and connect it with the other side of the house, as seen above. Fold the bottom flaps in and use double-sided tape to hold it closed. Fill the box with a few small treats, a small gift or a thank you note.

Flapping Paper Butterfly I had a baby so I’ve invited some fave guests to take over for me while I spend time with the little guy. Today’s post is from super crafter and cute mom, Amelia of The Homebook. Growing up, I had an aunt who lived in Canada. Every year for my birthday she’d send me a card and a fancy little gift. I made my butterflies into Monarchs, but you could use different materials to create any sort of colorful butterfly. Materials: You’ll need heavy cardstock, 24 gauge wire, silicone rubber bands (I found mine in the hair aisle at Walgreens) needle-nose pliers, scissors, tape, a paintbrush, a black marker, and a white ink pen. Step 1: Measure and cut your wire. Step 2: Find the center of the longer wire. Step 5: Find the center of the shorter wire, and wrap it around the base of the paintbrush. Step 8: Draw the shape of your wings and cut them out. Step 11: Tape each wing to the body of the butterfly. Thanks for the chance to finally figure out how these darned things are made, Melanie!

erik’s recycled wine bottle torch this clever outdoor diy idea comes from erik anderson of gerardot & co.- a creative branding and design agency in indianapolis. erik was kind enough to share a fantastic project that turns an everyday bottle into a modern backyard tiki torch. i love the way these torches look and am dying to find a backyard to use these in- too bad the closest thing we have is a 2×2 foot fire escape. but for those of you with yards, i hope you’ll enjoy this project from erik. click here for more info on the project and click here to check out erik’s work at gerardot & co. thanks, erik! CLICK HERE for the full project instructions after the jump! [****Safety Note: This is for outdoor use only. Tiki brand recommends that the wick never be set higher than 1-inch, and I recommend that you exercise the same discretion and common sense that you would with any small open flame.*****] Recycled Wind Bottle Torch 1. Helpful Tools: Channellocks, adjustable wrench, hacksaw, power screwdriver, and a funnel The Hanger 1.

DIY Solar Jar Do you love these solar jars? photo: Solutions catalogue I do too but at $20/pop plus shipping they are pretty pricey. I saw this cute idea for making a solar jar here and wanted to try it. I found this jar at Goodwill and knew it would make the perfect solar jar-it was already frosted and only $1.97! I just needed to find a solar light. I found this individual light at Ace Hardware for $4. It easily popped apart and I just put it into the jar. The tutorial says to mount it to the top of the jar but I didn't do that. I may have to flip it over from time to time to make sure the solar cell is getting charged. It looks even better when it gets really dark out but then my photo wouldn't have come out. I like how it turned out,even though it doesn't have the same amber glow as the inspiration jars. Linking up with:

Aquascaping Is Underwater Art Unlike Anything You’ve Ever Seen | Fill The Well Like Fill The Well on Facebook! You may have never heard of aquascaping, but to many people it’s a very serious art. The International Aquatic Plants Layout Contest holds an annual competition that ranks the best of aquarium design, and the results are phenomenal. Here are some of the entries that showcase the incredible underwater landscapes that contests have designed using their expertise in art and biology. “Forest Scent” by Pavel Bautin “Pale Wind” by Takayuki Fukada “Whisper of the pines” by Serkan Çetinkol “Verve!” “Way to heaven” by Dmitriy Parshin “Wild West” by Stjepan Erdeljić By Georgi Chaushev By Francisco Wu By Long Tran Hoang “Pilgrimage” by Shintaro Matsui If you liked this, please share:

House-Shaped Gift Box By Amy Christie I’m so pleased with this little project! I collaborated with Jordan of Polkadot Prints to design a darling house-shaped gift box that is as easy as pie to put together. Simply print off the free template, cut it out and double-side tape it together. Fill it with a few small treats and your gift-giving list is done in a flash! Supplies: -Printable house template -Scissors -X-acto blade -Double-sided tape -Ruler & scoring tool Print the house gift box template. If you prefer, use the X-acto knife to cut out the window panes. With the ruler and scoring tool, score the house template on all the dotted lines. Fold on the newly scored lines. Add a piece of double-sided tape to the small tab. Connect it with the other side of the house, as seen above. Fold the bottom flaps in and use double-sided tape to hold it closed. Add a piece of tape to the backside of the wreath and stick it in place. Fill the box with a few small treats or a small gift. Give to all! P.S. — We love making gifts!

Origami Butterfly by Akira Yoshizawa - tutorial Today is the 101st birthday of Akira Yoshizawa, the great origami master and the father of the modern origami. You have probably noticed that Google marked the occasion with a special origami doodle created by Robert Lang! Why not celebrate the event by making your own origami butterfly?! Here is a step-by-step tutorial for a 3-d variation of a classic butterfly by Akira Yoshizawa (first spotted on Nick Robinson’s blog), enjoy! UPD. Tags: Akira Yoshizawa, Animals Skill Builder From light theremins to toothbrush timers the 555 timer is an extremely versatile component, for beginner and advanced projects alike. We've previously shown how to drive DC, servo, and stepper motors with simple 555 circuits. Now with our latest Weekend Project, MAKE Technical Editor Sean Ragan re-imagines the 555 as the brain of an all-in-one controller he calls the Dial-a-Speed: One Motor Controller to Rule Them All. Watch how he put it together: The stacking and layout of this build is both challenging and incredibly rewarding. We're still wowed by its design. The possibilities of the 555 are many. I love working with 555 timer. We'll be showing how to apply the potential drive of the Dial-a-Speed in another upcoming Weekend Project, but for now if you have your own 555 stories to tell, share them in the comments below or email us at weekenedprojects@makezine.com.

Floating Taper Candles I think it’s fair to say that I have a “thing” for candles. I like em. I like lighting them, looking at them, smelling them. I like em. You know those people who hoard candles and stick them in every possible cupboard and drawer? A few months ago, many months ago now that I think about it, I showed you how to make your own floating candles. At the time I was doing the tutorial on floating tea lights, I started working on another kind of floating light. When you drop a taper candle into a vase of water it (being made of wax) tries to float and because it’s bum end has more wax (which wants to float), the bum end tries to float up to the top. You need candles, washers, and thumbtacks. Just scrape the bottom of your candle so it’s perfectly flat on the bottom of it isn’t already. Cough. Why post it then? However, I should add that to remedy this, all you would have to do is buy washers that are bigger than the base of the candle. But I also believe in superpowers.

Polymer Clay Tutorials: Candle Holder Crafts One of our most beautiful polymer clay tutorials is this lily of the valley flower which we molded onto a votive glass candle holder. This votive glass candle holder would make a lovely homemade gift for Mother’s Day. Overall, this is a pretty quick and easy craft project to do. So if you have been looking for some unique candle craft ideas, then try this easy lily of the valley candle holder. Polymer Clay Tutorials: Candle Holder Crafts Materials for Polymer Clay Tutorials: Candle Holder Crafts What You Will Need: Green polymer clayVotive glass candle holderFloral wire (32 gauge) Wire cuttersStraight pin or needle20 Pearl beads (1/4" wide)Acrylic sealerHot glue gunOptional:Green Pearl ExPaintbrush Instructions for Polymer Clay Tutorials: Candle Holder Crafts Begin by rolling a ball of clay that is about 1/3 as wide as the base of your candle holder. Next, roll out another ball of clay. The next step is to make the pearl flowers. Now make three more of these "flower sprigs". Peg Says: EP Says:

Sweet Gift Boxes With Printable Patterns Sweet gift boxes for holiday with printable patterns More patterns for making gift boxes Beautiful gift boxes for holiday We continue gift boxes with templates for processing gift boxes. look and choose for themselves the interesting patterns of boxes, print out and make out their presents beautifully. Valentine gift box with heart shape Flower gift box Purse gift box pattern Star gift box Wedding gift box Coin gift box Read more: Visit link →

Related: