background preloader

Aluminum Can Ornaments

Aluminum Can Ornaments
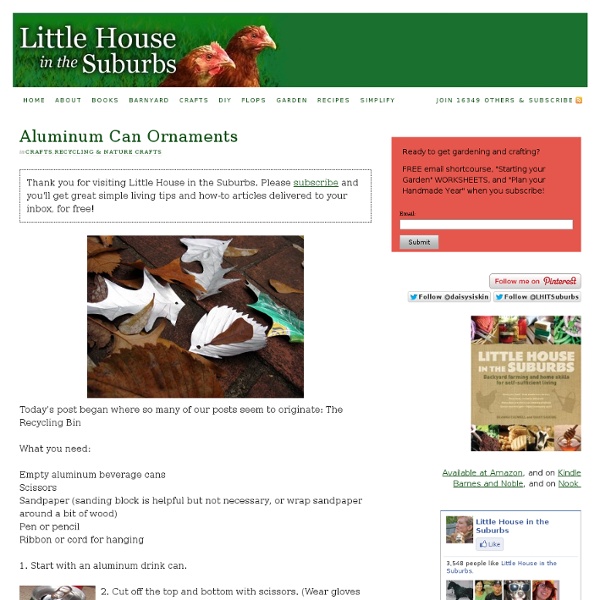
Thank you for visiting Little House in the Suburbs. Please subscribe and you'll get great simple living tips and how-to articles delivered to your inbox, for free! Today’s post began where so many of our posts seem to originate: The Recycling Bin What you need: Empty aluminum beverage cans Scissors Sandpaper (sanding block is helpful but not necessary, or wrap sandpaper around a bit of wood) Pen or pencil Ribbon or cord for hanging 1. 2. 3. 4. 5. 6. 7. PS: Welcome Stumblers: Thank you for dropping by! Other Posts that went crazy on StumbleUpon:Making Soap from Kitchen Grease Secrets of the No-Sew Rag Rug

Make-up Magnet Board We all know with craft blogs that original ideas are often hard to come by, we find ideas we love and make them our own but we didn't come up with the idea ourselves. I feel like I've finally done something original here and I'm excited about it. I'll show you the finished product and then explain. Behold my Make-up Magnet Board. I have a friend who is beautiful and stylish and has always loved make-up but recently took a course that intensified her love. The basket was a mess and I was overwhelmed with all my choices never knowing what to use, digging through to see what I had and find what I wanted was a pain. I painted it (The hard way, with a brush instead of spray paint. I went to the hardware store and picked up some metal and had them cut it to fit inside my frame. Here comes the brilliant part though. Here's the stash of eye shadows we're talking about (I've even added a couple since this picture). Next I wanted a place to store my brushes and liners though.

Upcycled sweater boots (w/mini tutorial!) What do you get when you mix a cheap pair of flats, an old sweater, and lots of hot glue? Sweater boots!! Yay! I started with this: chopped off the sleeves, turned it inside out, and formed it to my foot. Hot glued it to a shoe, like so... flipped it right side out, and cut the bottom off the sweater to make a cuff.. Embroidered it.. Sewed it into a cuff that would flip out over the boot.. And now you have...Sweater boots!! Of course, they're not really meant for cold weather wear, but they'd be perfect in the fall or tromping around the house I'm really quite proud of these. Metal Flowers Picture Tutorial I am just in love with my metal flowers!! Love making them in all different sizes and shapes. Getting better at each time! So many ways you can use them. Hope the picture tutorial will help you make some pretty ones too! Enjoy! Using a scrapbook brad, secure your flowers together. After this project, I end up with a lot of soda can bottoms. Found a way to use some of them by making this upcycle project!!

make grow gather - Posts - summercraft: simple decoration for paper lanterns Surely last holiday season, you saw those mini gingerbread houses that perch on the edge of your mug of hot chocolate? The ones that made your heart break a little with the utter genius and cuteness of the idea? Well, meet Megan of Not Martha. I have long admired her talent and creativity. We have a bunch of paper lanterns left over from our wedding reception and I had been planning on hanging them around our deck this summer. Here is a picture of one by night and by day next to a lantern that I used as the base. Do you remember that craft we did as kids where you twist a small square of tissue paper over the eraser end of a pencil, dip it in glue, and stick it down to paper plate to decorate a valentine or a holiday wreath? What you'll need: - Glue sticks or a glue gun (if you have one, lucky person). - Sheets of colored tissue paper cut into approximately 6-inch squares, no need to be exact here. - Three objects with round, flat ends that range from 2 to 1 inch in diameter. Notes: 1.

A Year of Flowers Card set in a Bucket Handbag or Purse Box (new template) P.S. I have to take a day off (Friday) but if you're bored they should have a new video on Scrapbook lounge TV (every Friday) :O) Here's where the beaded sunflower from Melanie's beautiful A Year of Flowers stamp set ended up. I wanted to turn it into a note card gift set. I love how the sunflower stamp looks natural but still so perfectly round that you can make a round tag from it. To see how to make the sunflower please see this tutorial. About the Box Template: There are 5 templates altogether A) Three templates for a box that's a bucket styled purse or handbag. They are intended to save papers, so you can make the box from cardstock, but use more expensive (and thinner) designer papers to create a decorative front panel piece with donut-like circles for handles. The templates are generally designed to work with any hole punch that is 1 1/4 inch or bigger (but you can use any means to cut the holes for the handles, even scissors, and there is a template with no holes linked up too.)

How To Make A Punched Tin Dragonfly Several requests have arrived from the blogiverse for a tutorial for making a punched tin and bead dragonfly. So here it is! NOTES before we start: ** Wiring on the wings is a bit tricky and I have done my best to make the process clear. ** And keep in mind that attaching the wings to the body with wire is optional. However, I have come to prefer using wire to attach the body to the wings. ** Your dragonfly will be very happy in your garden as garden art as long as you use aluminum pop cans for the wing material and polymer clay such as Sculpey for the body beads. To create the wings, refer to my tutorial for punched tin butterfly wings. FYI - the wing span of this particular dragon fly is 7 1/2" because I am using rather large beads for the body. After drawing paper patterns for the upper wing and the lower wing, trace them onto the aluminum you have chosen to use. I use roof flashing most of the time; however, recycled pop cans and disposable aluminum pie tins work well also. 1. 2. 3.

t-shirt pom poms | Craftaholics Anonymous Learn how to turn old t-shirts into pom poms! T-shirt Pom Poms are so much more durable than tissue paper ones. And I think they look loads better! got an old tee or two {or 20!} Supplies t-shirts, 1 per pom pomscissorscardboard use round objects to trace circles onto cardboard to make 2 templates like those shown above. i used a roll of tape and my camera lens cap…. the diameter of the outer circle is 6.5″ and the diameter of the inner circle is 2.5″. you can play around with different template sizes to get different sized pom poms. cut your t-shirt into 1/2″ strips. i only used from the arm pits down on each shirt. . take one strip and one template and place strips as shown close to the inner circle. sandwich the strip by putting the other template on top. take a fabric strip and place on cardboard with the end even with the outer edge. wind around the template as shown. pull the strip tightly so that it stretches the material. when you get to the end of the strip….

Fused Plastic Gift Bags-with tutorial! - OCCASIONS AND HOLIDAYS Trying to get a head start on Holidays? How about Handmade-REUSABLE-DESTASHED gift bags =) This is my first tutorial EVER so please bare with me. Here are my Christmas ones. Step 1: Gather all your materials. Step 4: After you bend your creases where the highlighter marks were, you need to cut. Step 6: This is the bottom of the bag. Step 8: Optional of course. BE CREATIVE and enjoy!

Cadres originaux en récup canette - Mes bidouilles Ma nouvelle envie de moment ... la récup et les canettes... J'ai réalisé 3 cadres pour trois fois rien... Il faut : - des petits cadres en bois - 2 ou 3 canettes par cadre - une agrapheuse murale - un cutter - un ciseau - un amoureux qui adore boire des canettes... Et voilà ce que cela donne : Trés bientôt je vais recouvrir un petit meuble... Commentaires sur Cadres originaux en récup canette 16 Headband Tutorials | Croq Zine - The Blog As a busy mom of three little boys, I don’t always have time to do my hair. (Like, never, actually! I try to sneak in sessions with my flatiron while the boys are distracted with a cartoon… IF I have to leave the house. Notes from a very red kitchen just hosted a Headband Tutorial Roundup, and there were some super headbands represented! The roundup was full of inspiration, but this rose and pearl headband by Whitney was one of my favorites. This scrappy leather headband by Missie Krissie is super cute, too! Other Headband Resources: I loved this Braided Headband tutorial when I saw it a few months ago, by Cakies (shown above) I loooved this yarn braided headband when I saw it a few months ago at EvaForeva (don’t you just LOVE the styling of the pic, too?) I like this lovebird headband at Crafty Bitch. This vintage applique headband at Ruffled is just gorgeous! Unique rolled felt headband at Blue Cricket Designs How about this pretty recycled t-shirt headband over at Zakka Life?

Recycled Plastic Tub Luminary This homemade project shows you how to make your own luminary using recycled plastic drink containers. What you need Plastic container from any soft drink powder Any fabric that is light Tacky glue Tea-light candle Instructions Wrap the fabric around the container from the top to the bottom. Glue the fabric starting at the start and at the end. You will have some fabric at the top. Glue the fabric to the inside. Put a tea-light inside of the container. At night whenever you want light, the container will illuminate any room. DIY bolso con anillas Aunque me parece un DIY muy complicado al menos con las explicaciones podéis intentar hacerlo Victorian Stencils 1/15clover.jpg 2/15corner.jpg 3/15corner2.jpg 4/15cornerflower.jpg 5/15fern.jpg 6/15fleurdelis.jpg 7/15flips.jpg 8/15Flower.jpg 9/15letterhead.jpg

Related: