
Easy Portrait Softening In Photoshop - Tutorial. This tutorial will walk you through some really easy portrait softening techniques that can be applied in Photoshop or Photoshop Elements.
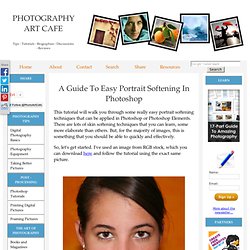
There are lots of skin softening techniques that you can learn, some more elaborate than others. But, for the majority of images, this is something that you should be able to quickly and effectively. So, let's get started. I've used an image from RGB stock, which you can download here and follow the tutorial using the exact same picture. I have made a few other edits to the image already, to prepare it for this stage (colour correction, cloning, curves, dodging and burning). 1. 2. Choose the amount of blur you wish to use. 3. 4. 5. I like the way softening skin in Photoshop both softens the skin and, by way of contrast, effectively sharpens the eyes - without doing any actual sharpening!
6. 7. Let's take a quick look at the before/after images (quite subtle in this example): Tracing Shapes « Vectorportraits.com. First right click on this image and save it on your desktop and open it on Photoshop Duplicate the current layer by pressing CTRL+J then go to Image>Adjustment>Posterize.
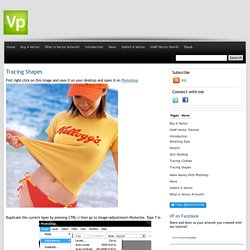
Type 7 in the levels input box. The posterized layer will serve as a guide to the shades of color that we need to trace. The higher the level of posterizing you use the more realistic your vector will look but it will also be more difficult to work on. Now press F to go into fullscreen mode, this will make tracing shapes easier. Click on the background layer to activate it then press P to select the pen tool, using the above image as a reference click on the starting point.
You may notice that I intentionally placed a node outside the picture, you don’t have to worry about this because any nodes outside the picture will not show and will not affect the vector. Continue tracing the shape until you have something like the image below: What we are doing here is to trace first all the skin parts. Superb Skin Airbrush Technique. Eye Sharpening - Photoshop Tutorial - 416 Studios. With this tutorial you can create amazing, bright eyes within minutes.

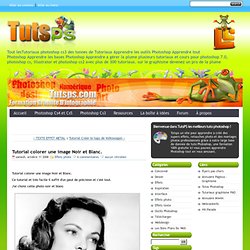
First retouch, adjust levels and do all necessary colour corrections on your image. With a Lasso Tool (L) select the eyes (hold Shift key to add to selection). Hit Ctrl+J to copy selection to a new layer. You can copy the whole layer instead of selecting eyes but applying the filter to the large area like this may take a while on slower computers. Use Smart Sharpen filter on the eyes, the choice of right settings will depend on the size of your file. Add a layer mask to the sharpened layer, then using a white soft brush on 50% bring back paint only iris’ and pupils to expose the sharpened eyes. Using levels brighten the whole picture and then copy mask from previous layer to select only eyes by holding Alt while dragging the sharpened mask (“layer 1” in the pic) onto the “levels 2” layer. Reduce opacity of the colour layer to make the eyes look more natural.
And voilà, the image is ready. Styleway + - Stylisme et Mode - Logiciel de dessin industriel, logiciel de dessin technique - logicieldessin.com. Styleway + - Stylisme et Mode - Logiciel de dessin industriel, logiciel de dessin technique - logicieldessin.com. Tutorial colorer une image Noir et Blanc. Tutorial colorer une image Noir et Blanc.
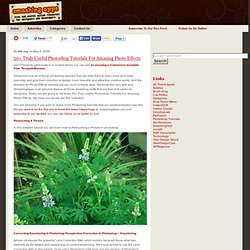
Ce tutorial et très facile il suffit d'un peut de précision et c'est tout. J'ai choisi cette photo noir et blanc On va commencer par sélectionner le visage avec l'outil plume Nous allons sélectionner le visage Puis vous créez un nouveau calque passer le mode de fusion en couleur prenez l'outil pot de peinture (G) et remplissez le visage avec la couleur #fce9d7 Vous allez avoir à peu près ce résultat La même chose pour les vêtements, choisissez une couleur adéquate avec l'environnement du travail et une opacité de 23 % Ensuite sélectionnez les lèvres ouvrez un nouveau calque puis remplissez le avec la couleur #c7302f passez le calque en mode couleur.
Passons maintenant aux yeux créer un nouveaux calque passer le mode de fusion en couleur sélectionnez la zone souhaiter et avec l'outil de remplissage ajouter la couleur aux yeux dans ce tuto j'ai choisi un bleu gris #76969c et voila le résultat. Vintage Clouds. Vintage CloudsReviewed by Denny Tang on Jun 9Rating: Preview of Final Results {articlead} Vintage Clouds Photoshop Tutorial Step 1 As usual, start by opening any photo into Photoshop.

Step 2 Create a selection of the sky. Google Image Ripper - safely and easily search Google image results without all the hassle! (NOT associated with Google) Photography with a Splash of Imagination by Iain Crawford. Best Photoshop tutorials - Light Effect On A Model. Retouche photo en ligne. Smilart Fan Studio Online Photo Editor. Virtual Makeover, Makeup, Skin Care, Hairstyles, Beauty & Fashion, Product Reviews & Coupons.
Picasa Albums Web - sabrina sab. One account.

All of Google. 50+ Photoshop Tutorials. Don't Forget to participate in a contest where you can win an amazing e-Commerce template from TemplateMonster.
Designers love all of those photoshop tutorials that can help them to learn more and more everyday and give them direction to design more beautiful and attractive creative works. And the demand for Photo Effects tutorials are too much in these days.