
Adafruit's Raspberry Pi Lesson 4. GPIO Setup. The diagram below show the pins on the GPIO connector for a Raspberry Pi Version 1 (which is what existed when this tutorial was released) Version 2 has pin 27 replacing pin 21 but it otherwise the same As well as supplying power (GND, 3.3V and 5V) all the GPIO pins can be used as either digital inputs or outputs.
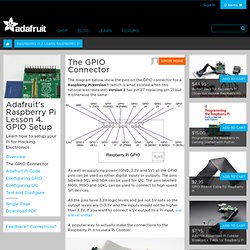
The pins labelled SCL and SDA can be used for I2C. The pins labelled MOSI, MISO and SCKL can be used to connect to high speed SPI devices. All the pins have 3.3V logic levels and are not 5V-safe so the output levels are 0-3.3V and the inputs should not be higher than 3.3V. RPi Projects. Back to the Hub.

Community Pages: Tutorials - a list of tutorials. Learn by doing. Guides - a list of informative guides. Make something useful. Projects - a list of community projects. Tasks - for advanced users to collaborate on software tasks. Datasheets - a frambozenier.org documentation project. Near Field Communication - Physical Computing with Raspberry Pi. Difficulty: advanced This tutorial will have you make a coil for NFC and connect it up to your Pi.
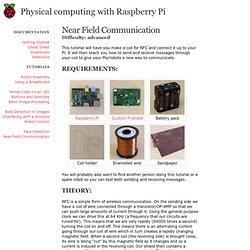
It will then teach you how to send and receive messages through your coil to give your Pis/robots a new way to communicate. You will probably also want to find another person doing this tutorial or a spare robot so you can test both sending and receiving messages. NFC is a simple form of wireless communication. On the sending side we have a coil of wire connected through a transistor/OP-AMP so that we can push large amounts of current through it. Documentation - RFID/NFC 13.56 MHz shield for Raspberry Pi tutorial.
Tutorial Index Introduction RFID (Radio Frequency Identification) is a technology that uses electromagnetic fields to identify objects in a contactless way; it is also called proximity identification.
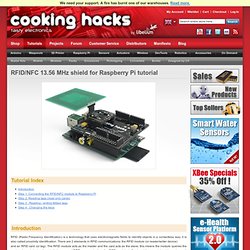
There are 2 elements in RFID communications: the RFID module (or reader/writer device) and an RFID card (or tag). The RFID module acts as the master and the card acts as the slave; this means the module queries the card and sends instructions to it. In a normal RFID communication, the RFID module is fixed and the user takes his card near it when he needs to start the interaction. Ingredients: Cooking Hacks offers Mifare® Classic 1k cards tags, stickers and key rings along with the RFID/NFC module for Arduino.
Difficulty: Medium - USB RFID + Python + Pub-Sub (MQTT)
Tutorial – Adafruit NFC/RFID on Raspberry Pi #piday #raspberrypi @Raspberry_Pi. August 3, 2012 AT 10:47 am Tutorial – Adafruit NFC/RFID on Raspberry Pi @ The Adafruit Learning System Interested in adding some NFC fun and excitement to your Raspberry Pi?
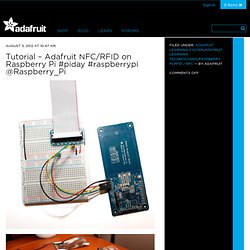
You’re in luck! One of the big advantages of Linux is that it includes a large number of stacks that have been developed by the open source community, and you get to take advantage of all that hard work simply by using or installing the right library. NFC is no exception here, with libnfc having been around for a quite some time – in fact, it’s the original reason the NFC Breakout was developed! PN532 Breakout Board. Adafruit offers a NFC breakout board which is also packaged as a full kit including a mbed & other parts to get you started.
Wiring it up¶ First of all pinheads need to be soldered on the board's main connector as well as on the two jumpers' location. The board's NFC controller (PN532) can either be configured for serial, I2C or SPI communication. The stack is currently configured to use SPI so the jumpers need to be configured accordingly: SEL0 off and SEL1 on. Now the relevant pins must be connected to the mbed. Test¶ This program demonstrates how to transfer data between a phone application and your mbed. The default pin mapping for this program is the following but you can change it in the MuNFC constructor's parameters.
Load the program, reset the mbed and approach you Android NFC phone! Getting GPS to work on a Raspberry PI « Peter Mount's Blog. One of the tasks I want to use a Raspberry PI for is to take over the duties of an existing ITX based linux box running my weather station.

Now in theory that should be pretty simple as the current setup uses pywws to connect to the station and as that’s written in python it should work. Now the Raspberry PI has no onboard Real time clock – which means it needs to use an NTP server to get the time when it starts. Usually you would use the default settings and allow the PI to connect to thenet for it’s time.
Now this is fine if you have a working net connection but what if you are not connected to the net? You might be in the field running the PI on batteries. As the other projects I have lined up for it is to connect my Meade LX200GPS telescope to the local network or to work with my (in prototype) radio telescopes so having an accurate clock is going to be required. Now the obvious solution here is to use GPS as a time source. The hardware. Tutorial: Créer un serveur web complet sous debian - #1 Apache. Voici un nouveau tutorial qui vous sera sans doute utile si vous venez d'installer la distribution linux Debian (Ou Ubuntu) sur votre serveur.

Introduction Objectif de ce tutorial L'objectif du tutorial est d'obtenir un serveur linux debian permettant d'héberger et de gérer vos sites web PHP / MySQL à distance, uniquement avec un accès SSH. Voici les différentes parties du tutorial qui seront divisées en 5 billets: Pré requis Pour réaliser ce tutorial, vous devrez au préalable avoir des connaissances en ligne de commande linux (Au moins les commandes basiques: cd, mkdir, mv ...). Disposer d'un client SSH (Comme Putty), d'un client FTP (Comme FileZilla), et bien sûr de votre serveur avec une Debian fraichement installée. Vous aurez aussi besoin d'au moins un nom de domaine pointant sur votre serveur. configuration de Debian Ca y'est on entre dans le vif du sujet. Tutoriel pour débuter avec le Raspberry Pi - Blog benji1000.net. J’ai reçu cette semaine mon Raspberry Pi, et j’ai décidé de faire un petit guide pour ceux qui, comme moi, débutent avec cet engin !
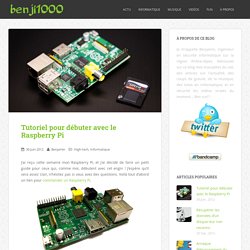
J’espère qu’il sera assez clair, n’hésitez pas si vous avez des questions.