
Raspberry Pi and Arduino Connected Using I2C - Oscar Liang. With Raspberry Pi and I2C communication, we can connect the Pi with single or multiple Arduino boards.
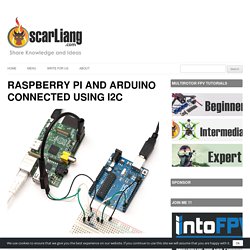
The Raspberry Pi has only 8 GPIO’s, so it would be really useful to have additional Inputs and outputs by combining the Raspberry Pi and Arduino. There are many ways of Linking them such as using USB cable and Serial Connection. Why do we choose to use I2C? One reason could be it does not use your serial, USB on the Pi. Given the fact that there are only 2 USB ports, this is definitely a big advantage. In this article I will describe how to configure the devices and setup Raspberry Pi as master and Arduino as slave for I2C communication. In the next article I will be doing some Voice Recognition, if you are interested see here Raspberry Pi Voice Recognition Works Like Siri The Raspberry Pi is running at 3.3 Volts while the Arduino is running at 5 Volts. Remember though that if other I2C devices are added to the bus they must have their pull-up resistors removed. i2c-dev Install I2C Tools. Pure Pi: Control custom stompbox effects on a Raspberry Pi with a smartphone - All.
MrArkwright/cmidid-kerneldriver. Ravelox/pimidi: Raspberry Pi RTP MIDI. RPi audio software repository. Auto Install Remote Control for Raspberry PI (X11VNC) for non-Geeks. This is only for non-geek people to easily set up their Pi for remote control It is only tested/works on a clean install and not after a lot of fiddling has been done Following on from previous success with my auto-install samba (Windows Networking ) I hope that this script will provide a simple way of installing x11vnc which give you full remote control over the normal Raspberry Pi standard desktop.
This is very useful when you want to power your Pi off batteries and stick some wheels on it and turn it into a robot vehicle. To install, run LX Terminal and copy and paste the following code: wget -O isx11.sh and then press enter to download the installer Once it has finished downloading, type the following and follow the instructions: sudo bash isx11.sh At the end, you need to reboot your Pi and then you should be able to use a VNC program on another computer (I use TightVNC myself) to connect and control and view your Pi Good luck. Liste_de_distributions_linux_et_unix_optimisees_pour_raspberry_pi [Swissraspberry.ch]
Cette liste recueille les systèmes d'exploitation expressément optimisés pour Raspberry Pi Débutants Distributions officielles Raspbian - La distribution officielle à base Debian/ARMusername/password: pi/raspberry Arch linux optimisé pour Raspberry piusername/password: root/root RISC OS est un système d'exploitation crée à Cambridge, par Acorn: sa première version remonte à 1987 Certains de ses développeurs étaient à l'origine même du processeur ARM Distribution à base Debian axée multimedia ou Media Center XBian est une distribution Linux communitaire basée sur XBMC ( Porting non officiel) pour Raspberry pi Distribution optimisé pour l'utilisation multimedia ou Media Center Une distribution pour audiophiles (équipée du logiciel de lecture audio libre MPD) Image optimisée pour le streaming audio proposant un serveur Spotify et AirTunes Distribution à base Debian ARM avec Openbox Window Manager et certains logiciels multimédia préinstallés Distributions orientées usage professionnel.
![liste_de_distributions_linux_et_unix_optimisees_pour_raspberry_pi [Swissraspberry.ch]](http://cdn.pearltrees.com/s/pic/th/distributions-swissraspberry-111304377)
Mediacenter "TV" - VDR sur RASPBERRY PI : installation et configuration. Historique du document : 08/04/2014 : première version diffusable ⇒Les firmwares disponibles avec la distribution Raspbian ne sont pas suffisants pour le fonctionnement de certains démodulateurs USB.
Voici comment ajouter les firmwares manquants : rasp$ wget rasp$ mkdir FW rasp$ cd FW rasp$ tar xjvf .. rasp$ sudo cp * /lib/firmware ⇒A ce niveau vous pouvez contrôler que l'interface TNT USB est reconnue. Rasp$ tail -f /var/log/syslog ⇒Connectez le démodulateur USB TNT, et vérifiez sur la console que le périphérique est bien détecté et activé (des lignes devraient défiler). Nov 5 19:53:08 brandt3 kernel: [ 7.930065] DiB0070: successfully identified. Mediacenter "TV" - VDR sur RASPBERRY PI : installation et configuration. Resources - Teach, Learn, and Make with Raspberry Pi.