
Galaxy Nails Tutorial. I was really excited to do this galaxy nails tutorial because they are so unique and personal to the artist doing them. There's no right or wrong! So bearing that in mind, this is more just "guidelines" than a tutorial because there is a million and one way to this style of nails! In this tutorial I used Sinful Colors in Ciao Bella (which I seem to use for every look on this site, I love it!) With a coat of Sinful Colors Frenzy over it for the base. I also used Sally Hansen Extreme Wear in White On, Sally Hansen Insta-Dri in Mint Sprint, Beauty UK in Black and Lilac Girl, and for the glittery top coat I used Wet n Wild Fast Dry in Party of Five Glitters. Tips & Tricks When you're sponging, less is more. Get Inspired! Back to Tutorials Still have some questions? Copyright 2012 Lisa Bailey © Nail-Art-101.comAll Rights Reserved. Watermelon Nails Tutorial. Cute Blueberry Nails. Cute Apple Nails. Make Your Own Nail Dotting Tool.
Puzzle nail art tutorial. Nail Art Tutorials. Rainbow Nails Tutorial. Rainbow nails were my choice for day 9 of the 31 day nail art challenge.

I wanted to do some cute, simple rainbows arching across my nails. Mostly so I could follow people around saying "Double rainbow all the way across my nails. Oh my god! " If you don't have a brush a nail art pen or a toothpick should work just fine.Wait between doing each line to avoid the colors blending into each other.I don't have dotting tools, so to do the clouds I used a small, round stud earring. It worked perfectly! The finished product Back to Tutorials Still have some questions? Copyright 2012 Lisa Bailey © Nail-Art-101.comAll Rights Reserved. Untitled. Untitled. Untitled. Untitled. Untitled. Untitled. Untitled. How To Make Your Own Nail Polish In Any Color.
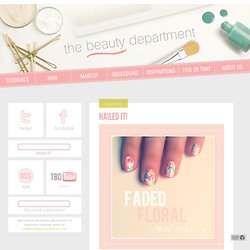
Faded Floral Manicure. Photos + post design by Kristin Ess Who doesn’t love a soft, faded floral pattern?
IHaveACupcake. Beyond Pink Polish: A Rainbow of Nail Colors. 12 Amazing DIY Nail Art Designs Using Scotch Tape. Follow the Trend With Colorblocked Nails! Why not try it out on your nails instead?
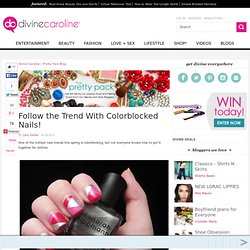
You can keep it simple within the same color family or go bold and crazy—whatever suits your mood! Step 1: Get Your Supplies Together To start, make sure you have all of your supplies handy. For this manicure, you will need three different nail polishes (make sure that at least two of them are thick enough that they can cover the base color), Scotch tape, and a fast-dry topcoat like Seche Vite. For this manicure, I used two colors from the new Minnie Mouse Collection by OPI, If You Moust You Moust and The Color of Minnie, along with my favorite silver nail polish, Stardust by Deborah Lippmann. Step 2: Paint a Base Color Start with your favorite basecoat and paint your nails the base color. Step 3: Start Taping Next, pull off a small piece of Scotch tape (you won’t need more than an inch at a time) and put it against your hand and pull it off several times until most of the stickiness is gone.
Its because I think too much: Galactic Manicure. I loved how my glittery gradient mani turned out so much that I decided to do a variation on it, using the night sky as my inspiration!
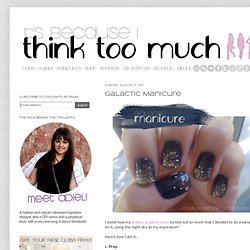
Here's how I did it: 1. Prep I grabbed deep navy, silver glitter, and gold glitter polish along with my favorite top coat. Tutorial: Easy Sponge Gradient. Happy Sunday! Today, I wanted to show you guys how I did the Tropical Gradient from earlier this week. It's very easy and I like that it has that seamless look. You'll need: -two or more polishes. Here, I've used Zoya Sooki and Zoya Arizona* -disposable cosmetic sponge wedges -nail polish remover and qtips for clean up. DIY Drippy Nails. We were immediately inspired the moment we saw bare nails with blood-like, drippy polish accompany Prabal Gurung‘s spring collection at New York Fashion Week.
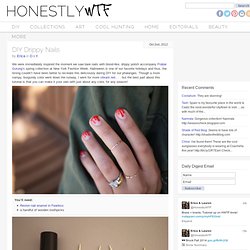
Halloween is one of our favorite holidays and thus, the timing couldn’t have been better to recreate this deliciously daring DIY for our phalanges. Though a more vampy, burgundy color went down the runway, I went for more vibrant red . . . but the best part about this tutorial is that you can make it your own with just about any color, for any season! You’ll need: Dip the toothpick into the nail polish bottle so that the tip collects a round bead of polish. Place the bead of polish on a bare nail and drag it upwards, creating a tapered line. Create two to three more tapered lines, re-dipping the toothpick into the polish each time.
Reload the toothpick with polish and drag a line across the tip of the nail. Repeat the steps on the other nine fingers and voila, you’re done!! (all images by HonestlyWTF) Okay, I admit it. Nail Art is just totally Cool. If you find yourselves in one of those situations when you have absolutely crap-all to do, attempting some nail art is probably a good idea. I do declare that there are a few rules however! 1) Nothing too fancy. This is not a trend to be taken too seriously but you don’t want it to look like something threw up all over your nails either. If you can do a basic French manicure, I’d stick to something similar to the image above. How to "TIE DYE" your nails tutorial. Newspaper Nails. A few weeks ago I shared in this post that I learned how to do this amazing thing called "newspaper nails.
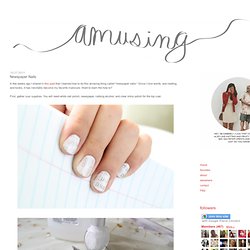
" Since I love words, and reading, and books, it has inevitably become my favorite manicure. Want to learn the how-to? First, gather your supplies. You will need white nail polish, newspaper, rubbing alcohol, and clear shiny polish for the top coat. Step one: Grab some newspaper and cut it into pieces big enough to cover your nails. Nails. Creative Nail Style Pictures, Photos, and Images for Facebook, Tumblr, Pinterest, and Twitter. Galaxy Nails. Sneakers. IndigoNova1. Mermaid Nails. Share this image.
