
Money Smart Nail Art - you don't need expensive tools to produce great nail art! - Lucy's Stash. Follow the trail of all things nails, brought to you by Hannah. Today I have some more Halloween nail art, as promised.
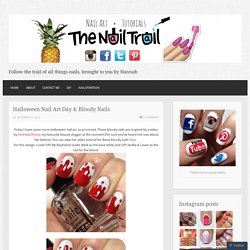
These bloody nails are inspired by a video by AndreasChoice, my favourite beauty vlogger at the moment (I’m sure you’ve heard me rave about her before). You can view her video tutorial for these bloody nails here. For this design I used OPI My Boyfriend Scales Walls as the base white and OPI Vodka & Caviar as the red for the blood. Nailery Australia - Nail Art, Acrylic Nails, Gel Systems, Files, Tips, Tools, Brushes - (Powered by CubeCart) Top 10 Most Wanted Nail Art Tutorials. Trends in the nail art industry are changing day by day.
As the new season approaches the new adjusted manicure tutorials are coming out. There is nothing you can do, but follow the movements. If you’re one of those brave girls that are not afraid to experiment with nails, then we’re sure that you’ve tried to style your nails by yourself many times before. But sometimes you can simply get lost without a clear idea about your next nail manicure, especially when the completely new season is here.
NAILED IT! Photos + post by Kristin Ess If you’re a fan of pretty shiny things, you’re going to love our first spring mani of the season.

We all know everything looks better dipped in gold, so we thought this should do the trick. I decided to use gold leafing sheets to accent the corners of these turquoise nails. You Nailed It! 8 Nail Polish Crafts. Nail polish, we all have it in our homes and probably in more colors than we care to admit.
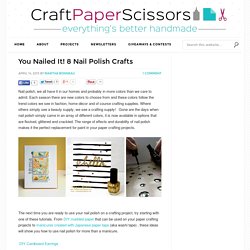
Each season there are new colors to choose from and these colors follow the trend colors we see in fashion, home décor and of course crafting supplies. Where others simply see a beauty supply, we see a crafting supply! Gone are the days when nail polish simply came in an array of different colors, it is now available in options that are flocked, glittered and crackled. The range of effects and durability of nail polish makes it the perfect replacement for paint in your paper crafting projects. The next time you are ready to use your nail polish on a crafting project, try starting with one of these tutorials. DIY Cardboard Earrings A fun way to upcycle cardboard scraps into fun earrings Painted Paper Bead Tutorial Need a necklace to go with the earrings you just made?
MANI MONDAY (DOUBLE FEATURE!!) Hot date this Valentine’s day?
Perhaps you want to try this mani! And even if you’re flying solo or hanging with friends, this manicure is bestie approved and the combination is really fun. Fully inspired by a pair of Louboutins– it’s like looking at them from the bottom. The subtle hint of animal print + rich red = a fun, flirty vibe! TOOLS: cheetah print nail stickers (used OPI + Sephora in this tutorial), reinforcement stickers, red nail polish, clear top coat. Style Guru: Newspaper Nails. Devilishdesigns: Optical Illusion Tutorial. BEAUTY DIY.
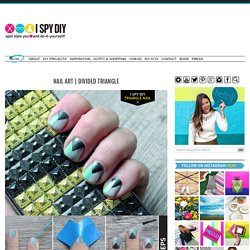
Dots & Delicate Rings. Silver Stripe. Divided Triangle. Hope everyone had a fantastic Thanksgiving!
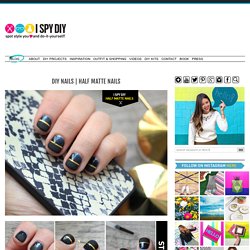
I no longer am able to fit into my jeans after the heaps of mashed potatoes consumed, so I am going to distract you with pretty nails! I was sporting this mani for a bit, but wanted to change it up (the magic of gels is you can wipe off your top layer, and start fresh on your grey canvas). Half Matte Nails. The weather has turned cold and I have officially transitioned to dark nails for the winter months.
I have been dying to try the gold version of my striping tape, and thought it would be perfectly paired with black and blue. To add more differentiation between the two halves, I tried out my new Flatte polish by Knock Out. I love the final effect! Even better, with the KO Flatte topcoat, you can turn any color into matte. Halfmoon Shimmer. As you probably can tell, I am a bit enamored with nail art!
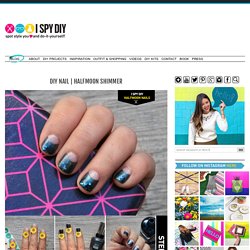
There is something is so fun about having fancy nails, and I love that they are constantly a conversation starter! So when U by Kotex said they were giving away a free Sally Hanson Manicure Nail polish with every purchase at Target, and asked me to come up with a DIY mani, I was happy to oblige. I have wanted to try out a halfmoon style for a while now, and fell in love with this oil spill looking color. Pink & Red Color Block. Currently crushing on my new personalized Kipling bags!
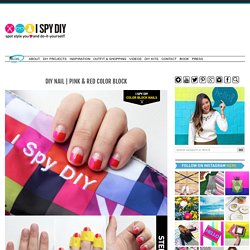
They are perfect for storing my ridiculous amount of nail polish, one pouch for for every color family. Inspired by the pink and red combo (one of my favorite color pairings) I created a little color block nailart. I love the subtle difference in hue on the half-nail. Get the steps after the break… Brush Strokes. Taking a cue from Chanel’s Spring ’14 art themed collection, I set out to mimic the runway with a paintbrush inspired nail art design.
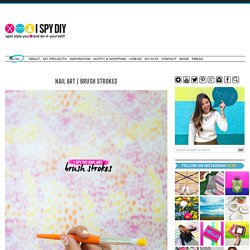
One of my favorite things to do is peruse paper stores, looking for new prints and patterns. I instantly fell in love with this print, and wanted to emulate on my nails in an on-trend way for the Spring. The best part of this nail art is that straight lines are not encouraged! The pointed Q-tips I used were the hero of this DIY creating the prefect brush stroke (and minimal brush clean up!) Steps and supplies after the break… Prep Your Nails: Before painting the base coat and color, start by prepping your nails.
What you need: Sally Hansen Triple Shine Top CoatTriple Shine Nail Polish in Pixie Slicks, Flame On, Lemon Shark, and Play KoiHard as Nails Xtreme Wear in Rock Chic Pointed Q-Tips Sally Hansen Nail Board All supplies can be found at Target. Technicolor Triangles. Now that it’s Summer, I thought it would be the perfect time to amp up the color on my nails! My last nail art was a bit more forgiving when it came to straight lines, but don’t fret, it’s simple to make sharp angles using electrical tape. First, it’s important to prep your nails. I had an unfortunate trip to the salon, where my cuticles were cut by someone who was a little too snip happy, so I have been trying more at home manicures.
I like my nails short, so I start by filing them even and rounded. Then I push back and carefully trim cuticles.