
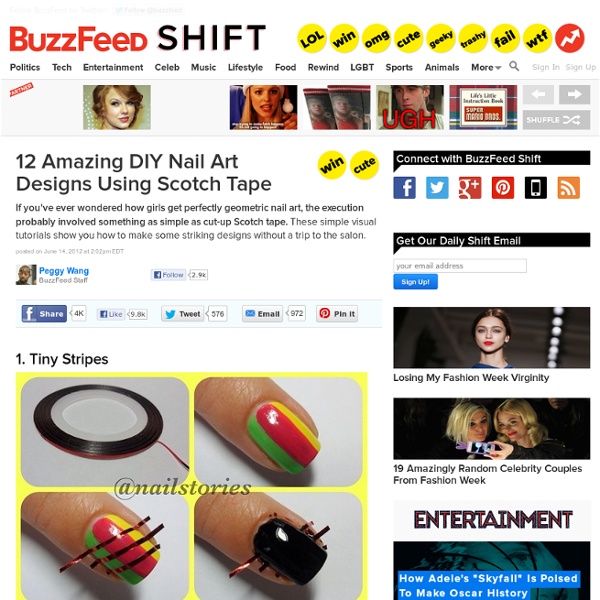
http://www.buzzfeed.com/peggy/12-amazing-diy-nail-art-designs-using-scotch-tape
Related: Pretties!KITCHEN BEAUTICIAN: HOMEMADE LIP STAIN photos + post by amy nadine, graphic design by eunice chun For those of you concerned about what chemicals we’re putting in and on our bodies, you can’t get more natural than this homemade berry lip stain! We love it because it adds the perfect “just-bitten” hint of color to fake that Snow White luscious lip! Here’s how to do it yourself: INGREDIENTS: 3 Blackberries (for their bright berry color), 1 Raspberry (for its feminine pink color), 3 Pomegranate Seeds (for their vibrant red color), 1/2 teaspoon edible oil (I used Extra Virgin Olive Oil), a small Bowl + Spoon (or mortar + pestle if you have them), Fork or Sifter to drain, small 5-gram Pot/Jar with screw top from any craft store
DIY Marbled Glassware When graphic designer and artist Joanna Bean Martin shared with us her technique for marbling the bottoms of glassware with nail polish, we couldn’t wait to try it ourselves. Who knew it would be such an easy way to add color and pattern to your next tablescape or party? Remember, the brighter and bolder colors you use, the more the glasses will radiate and glow. Have fun! You’ll need:flat bottomed glasswarevariety of colorful nail polishclear nail polisha disposable plastic containernail polish removerpainters tapetoothpicks Mask off the bottom of the glass with painters tape.
The Muppet Man Project Hey all, since Halloween is just around the corner I thought I'd share the steps I took to make my "Animal Head Mask". I have added a wee list of all the items I used to achieve this - feel free to use your creativity to adapt them to create the perfect mask for you. *Edit - Thanks for all the comments so far! When I started making this mask for our drummer's 21st birthday I never knew it would be so well received. Considering making another 3 - a bit of a tribute to "Dr. Teeth and The Electric Mayhem". DIY Dry shampoo has been a MUST HAVE in my daily hair care routine for the past three years. I’ve gone through countless spray cans of different brands (Psst!, Tresemme, John Frieda, Garnier, Oscar Blandi, Batiste…to name a few), spending way too much for very little product.
Top 10 Movies for Fashion Inspiration - College Fashion We all have those nights when we feel like just curling up and watching a movie by ourselves or with our girlfriends. So why not kill two birds with one stone and get some fashion inspiration while you’re at it? These 10 fashionable movies are some of my favorites for their fun and unique takes on style. So sit back, relax, and enjoy the eye candy! Fashion Movies DIY Rosemary Foot Soak & Olive Oil Scrub So I got this crazy thought, that it might be nicer for me (and my fellow gym-goers) if my feet got a little extra attention. You know, every once in a while. I find it really challenging doing anything to my feet during winter, since they're tightly shoved into boots all the time anyway.
15 DIY Hacks for Scarves I've always been a huge fan of repurposing things in the name of fashion. From using a zipper for a headband or thumbtacks on shoes, I just can't help myself. I've got to say, though, out of all the things I love to refashion, scarves are my favorite. Maybe it's because they are just huge hunks of pretty fabric, there are many ways you can use, decorate, and wear scarves that are a bit out of the ordinary.
Retro Disney Wedding Inspiration · Styled Photo Shoots I’m pretty sure there’s a little child in all of us who get excited when a Disney film comes on the TV. I personally can’t think of a much better lazy Saturday afternoon movie than Sleeping Beauty, The Little Mermaid or Beauty & the Beast! Come on, admit it, you’re with me right? So you can imagine my girlish elation when this retro Disney inspired bridal shoot landed on my desk. “Whilst spending a fun filled day at Disneyland and watching all the young couples hand in hand in the place where dreams come true, the inspiration just came to me”, explained florist Jacqueline of J Morgan Flowers.
Ten minute no-sew recycled t-shirt bag! Tutorial time! I got a gig teaching a recycled t-shirt project at the library a few months ago, with a request for a recycled tee bag – the only bags I’d made from tees in the past had required sturdy sewing, and I didn’t want hand-sewing to be the only thing holding the bottom closed in a class version of the bags, so I started brainstorming about some kind of hand-sewing-friendly or no-sew bag idea…. and here’s what I came up with! The simplest version of these bags is great for smaller tees, or the more light-weight kind of girl-tees – just turn the bottom of the shirt into a drawstring and tie it closed! As you can see, even with a not huge tee, this will still leave a significant hole in the bottom of your bag, but for purposes like grocery shopping, this size hole shouldn’t really matter… But to make smaller holes, just make more than one of them!
Worst Beauty Trends Getty Images (3) From 60s beehives to 80s big hair to the spray-tan abusing 00s, the worst beauty trends of the past 50 years. Corbis Old-school Coppertone billboard encourages tanning. Getty Images Rainforest Lip Butter Recipe This creamy, moisturizing lip butter is made with some of the most beneficial skin care ingredients that the rainforest has to offer. Rich Cupuacu Butter, nourishing Acai and Maracuja Oils are blended with natural Beeswax and Andiroba Oil to create a soft, conditioning lip treatment. Mango Flavor Oil adds an exotic aroma to this recipe, but if you prefer an all natural balm, try using 1/2 teaspoon of your favorite Mint Essential Oil in its place. Rainforest Lip Butter Makes about 5 Ounces, enough to fill about 15 1/4 oz. Slider Tins. Ingredients 1/2 ounce Maracuja (Passion Fruit) Oil 1/2 0unce Acai Berry Oil 1 ounce Andiroba Oil 2 ounces Cupuacu Butter 1 ounce Beeswax 1 teaspoon Mango Flavor Oil
DIY - Tutorial - How to make a leather bow cuff bracelet You will need : - A piece of leather, approx. 22cm x 10cm (approx. 8.7" x 4") - Scissors - Leather glue or super glue - Thread - A snap button 1. Cut an oval piece of leather, approx. 22cm x 10cm (approx. 8.7" x 4"). You can make it longer or smaller, depending on the size of your wrist.