
Paper Filigree Snowflake Gallery. I've switched over to using acid free paper and glue to make my paper filigree snowflake ornaments now. I figure there's no sense in putting this much work into something that might fall apart in a few years, and with practice, they're starting to get pretty enough that I'm planning to make quite a few of them. In my search for paper that will hold up over time, I was looking for archival quality paper, but there wasn't much available that wasn't too thick, or too yellow. I visited all sorts of art, craft, scrapbook, and office supply stores in my paper quest, but the pickings were pretty slim for archival paper in shades of silver and white, so I went with mostly acid free paper and will see how it holds up.
The pictures don't show it very clearly, but the snowflake above on the right has both white and off white, and it adds an interesting antique look, or at least I thought so until my kids mentioned the old joke about not eating the yellow snow. You Asked For It: The Duct Tape Push-Up Bra. I learned this little lesson from a couple of Washington, D.C. drag queens back in my plus-size modeling days.
What you will need duct tape scissors a towel/ or sweater breasts First, and I cannot stress this enough. You must use your own rack. Barring that, use that of a willing friend. The best taped plans gang aft a-gley, as our friend Bobby Burns would say, when you try to lift and separate a stranger’s sweatermeat. Secondly, unless you want your “crowning glories” to pop off like pen caps (is that creepy sounding? Also, you should probably stretch first. Tear two pieces of duct tape long enough to wrap across your torso from side to side. Tear two pieces of duct tape long enough to stretch from the underarm to the middle of the chest. Fluffyland Craft & Sewing Blog. September 25th, 2010 A few weeks ago, I received an intriguing email.
Crochet. Weaving. Dying. Knitting. Checkered Alphabet Index of Free Charts To Individual Letters For Cross-Stitch or Filet Crochet Adaptable for Other Needlework. Checkered Alphabet Index of Free Letter ChartsFor cross-stitch or filet crochet, adaptable for other needlework.
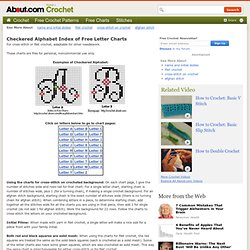
These charts are free for personal, noncommercial use only. Examples of Checkered Alphabet: Click on letters below to go to chart pages: Using the charts for cross-stitch on crocheted background: On each chart page, I give the number of stitches wide and rows tall for that chart. For a single letter chart, starting chain is number of stitches wide, plus 1 (for a turning chain), if making a single crochet background. Initial Pillow: When made with yarn in filet crochet, a single letter will make a nice size for a pillow front with your family initial. Both red and black squares are solid mesh: When using the charts for filet crochet, the red squares are treated the same as the solid black squares (each is crocheted as a solid mesh).
To determine finished size of filet crochet piece: Each letter chart page has instructions for filet crochet. Paint Moss Graffiti - Step-by-Step Guides for Offbeat DIY Projects. WhatTheCraft.com – Your one-stop destination for D.I.Y. tutorials, tips, and supplies.
The Secret Law of Page Harmony. “A method to produce the perfect book.”
The perfect book. This is how designer-genius Jan Tschichold described this system. Not the ok book, nor the pretty good book, but the perfect book. This method existed long before the computer, the printing press and even a defined measuring unit. No picas or points, no inches or millimeters. And you can still use it. The Secret Canon & Page Harmony Books were once a luxury only the richest could afford and would take months of work to be brought to fruition. And they were harmoniously beautiful. The bookmakers knew the secret to the perfect book.
So elegant is this method of producing harmony that a few designers saw to rediscover it. They found the way to design a harmonious page. There’s a dance to all this Let’s look at this dance, shall we? And here it is with them (using the Van de Graaf Canon and Tschichold’s recommended 2:3 page-size ratio, which we’ll get into next). Craftershock.com.
Build/Make/Craft/Bake: How-to: Hammered flower and leaf prints. Get out the hammer, it's how-to Tuesday and we have some botanical prints to make!
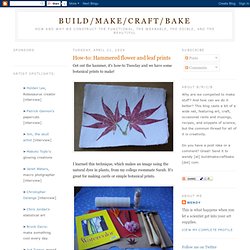
I learned this technique, which makes an image using the natural dyes in plants, from my college roommate Sarah. It's great for making cards or simple botanical prints. Actually, you'll need a little more than just a hammer. Here's a supply list: flowers or leaves to printwatercolor or other rough, acid-free paperselection of hammers (including ball-peen or cross-peen, if possible)hard work surface (cutting board, slab of wood, etc.)paper towelsscissorspentweezers or toothpicksacrylic finishing spray (optional) Start by going on a walk or visiting your garden to find leaves and flowers to work with.
Then set up your work surface. Next, trim any chunky or squishy bits off of the plants and arrange them on your watercolor paper. Cover the plant with 2-3 layers of paper towels. On the paper towels, sketch the borders of the area you'll need to hammer. Peel back the paper towel to check your progress. How to Make Wood Dough. If your kids like playing with dough like Play-Doh or molding clay, they will love making sculptures with homemade wood dough. Homemade wood dough dries to a wood finish and can be sanded down smooth with sandpaper. You can also paint or stain wood dough sculptures. To paint them, you can use any of the homemade paint recipes I have at the bottom of this article. To stain them, you can make a stain by adding 6 drops of food coloring to 1 tablespoon of water.