
Magnetic Periodic Table of Herbs and Spices. I designed this magnetic spice rack after searching fruitlessly for a creative way to display all my spices.
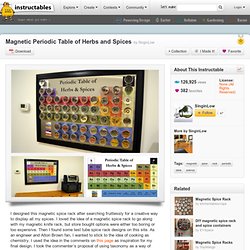
I loved the idea of a magnetic spice rack to go along with my magnetic knife rack, but store bought options were either too boring or too expensive. Then I found some test tube spice rack designs on this site. As an engineer and Alton Brown fan, I wanted to stick to the idea of cooking as chemistry. I used the idea in the comments on this page as inspiration for my final design. I took the commenter’s proposal of using taxonomy as a way of organizing spices and ran with it. For the tines I used these 4oz clear top tins from Specialty Bottle. I had my design printed on vinyl at a local shop, and they applied it to some 403 magnetic stainless steel sheet metal I bought from StainlessSupply.com.
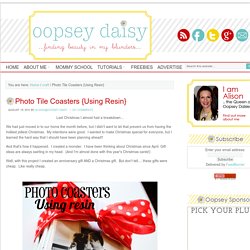
EDIT: WOW! Thanks and enjoy! Purchase the PDF. Photo Tile Coasters {Using Resin} Last Christmas I almost had a breakdown...
We had just moved in to our home the month before, but I didn't want to let that prevent us from having the holliest jolliest Christmas. My intentions were good. I wanted to make Christmas special for everyone, but I learned the hard way that I should have been planning ahead!! And that's how it happened. I created a monster. Well, with this project I created an anniversary gift AND a Christmas gift.
While I was in Utah, my sweet cousin Michelle showed me a couple of projects using resin. Here's how I made these photo coasters... I started out with a trip to Home Depot. Next, I ordered some photos. Only 13 cents a print at Costco! I used a regular old Elmer's glue stick to paste each picture onto the tiles. I won't give a full tutorial on using resin because each product is a little different. After mixing the resin with the hardener, I just poured it on! Then it took them a full 24 hours to harden up! All done! Now these are stinkin' cute!!
Make a momma bird card (or two) I designed these two Momma Bird cards and the downloadable template is available for you to make your own. Perhaps your Momma Bird needs a handmade thank you from her little chick this week? Here's how to put them together: Download the PDF template and print it on heavy paper. Cut out the shapes. These will be your re-usable pattern pieces.Cut a letter size piece of white card stock in half to make two 5.5 x 8.5 inch pieces.
To make the faces: Use a small circle punch to cut a hole in black card stock. Options to simplify for paper savvy kids: Skip the colored background.Don't use pop dots. Mini Memo Book Covers from Larissa at mmmcrafts. - thesoutherninstitute.com. Welcome to The Southern Institute, I'm so glad you're here!

Make sure you stay in the know... subscribe to our newsletter! Today is going to be fun! We have another guest with us who is sharing a great project! Larissa from mmmcrafts is visiting. Have you met Larissa yet? Gotta get some of those shoes! Well, hello Southern Institutioners! So a bit about me. Make a Mini Memo Book Cover I love these inexpensive little 3.25 x 4.5 inch composition books. ), usually for less than a dollar US each. So here’s how to pretty them up with a nice re-usable cover. You’ll need: this templateprinterletter sized card stockscrap of decorative papercraft kniferuler glue (I used Fabri-Tac)optional bradoptional embroidery floss 1) First step is to print the template at actual size on the back of the card stock. 2) Use the provided spine pattern to trace and cut out a spine from a scrap of decorative paper. Then you just trim off the excess with your knife, and the spine is done: 7) Glue the flaps to the tabs.
Matchbox Chest of Drawers. These little matchbox chest of drawers are great for keeping small treasures in or as storage for stamps, buttons or even bugs (for all the boys out there!)

You will need: 3 matchboxes (empty) Patterned paper or plain paper, decorated PVA glue Flexible tape measure or string Ruler Pencil Scissors Craft knife or bradawl 3 split pins (paper fasteners or brads) Extra decorations (optional) What to do 1. Glue the 3 matchboxes on top of each other, making sure all the sides match up evenly. A Law Student's Journey.