DIY Bow tie necklace. Bleach Painting on Textiles D.I.Y. Today Jill of Lune is going to share the next part of our textile printing series, how to paint with bleach.

I love the simplicity of her design and can't wait to try this. Enjoy! Bleach painting is a fun, easy and inexpensive way to play with fabric dying and I know you'll love the results! I chose to create a simple tank with the phrase "We are made of stars" which is adapted from a famous Carl Sagan quote. I hope you enjoy my take on painting with bleach! Supplies Needed: Fabric safe household bleach, inexpensive synthetic bristle paint brush, glass or ceramic bowl, dark colored cotton blend top, a white towel or rag, white chalk, cardboard. Safety: Bleach is toxic, so be careful to keep it safely out of reach of children. 1. There are so many options for bleach painting. TREAD BELT. ReFabulous... it's new again.: Make your own paperback wallet! I wanted to share my tutorial for making wallets out of old paperback books (or any paper media, really.)
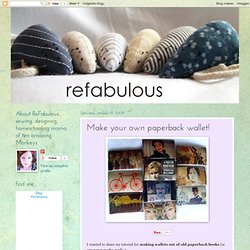
This basic wallet was not my idea... the original link does not work (but here it is anyway.) The original design was flawed, and the wallets ripped the first time you opened them. I changed the design, and made them much, much stronger. My own wallet is over 1 1/2 years in use now, and still going strong. Not bad, huh? (And let me apologize in advance for the book cover I used in the tutorial. Enjoy! Gather your supplies: Make template and cut pieces: **Cut a template measuring 4" X 7" from scrap paper. **I just took a piece of scrap cardstock about 2" long, and 4" wide.
**Now, you can cut out your cover using the template. **Make some folding adjustments to the interior if you need to to get them to fit.
Galaxy shirt. Une bague de dentelle. L’été, quand il fait vraiment chaud, c’est assez difficile pour moi de supporter trop de bijoux.
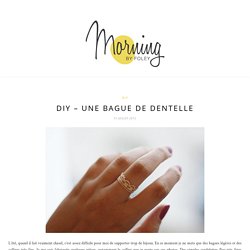
En ce moment je ne mets que des bagues légères et des colliers très fins. Je me suis fabriquée quelques pièces, notamment le collier que je porte sur ces photos. Des simples cordelettes fluo très fines glissées dans une perle métallique en forme de tube (que j’ai acheté dans cette boutique Etsy), c’est tout simple et parfait pour les grosses chaleurs ! Pour la bague, pareil, j’ai eu envie de me fabriquer une bague si lègre que je la sens à peine. Voici les instructions pour la faire à votre tour : Il vous faut : un ruban de dentelleun stylo de la circonférence de votre doigtdu durcisseur textile (on en trouve dans les magasins de loisir créatif comme Rougier et plé)un pinceauune épingle Pour commencer, trouvez un stylo ou un objet qui fasse à peu près la même circonférence de votre doigt.
Placez le ruban autour du stylo, coupez de façon à laisser superposer 5-6mm environ pour fermer la bague. Most gawked all-time. I Could Do That. Longstitch Bookbinding Tutorial for a Leather Journal. The most common type of sewn bookbinding that I often default to, falls into the category of longstitch binding.

It’s really a general categorization for many different methods of sewn binding. People have invented their own patterns and techniques and have probably called it something else as well. Suffice to say, it’s a general way to denote sewing your paper to the cover of your book. I’m sure you’ve noticed journals out there with exposed sewing in the binding in a variety of patterns and designs. They are all technically longstitch binding techniques, but in different patterns. The materials for this project include leather, paper, thread, needle, an awl and cutting device of some sort. Regarding the thread, I’m using a natural linen thread in this example, but you can also use waxed thread sold specifically for bookbinding to prevent knotting up when sewing.
Regarding my little awl, I use it to punch holes in the paper. This is what you see on the outside binding… Related Posts: KNOW AND TELL CRAFTS: DIY LIGHT BOX! I have been working on my photography and to all the other bloggers out there, I want to help!
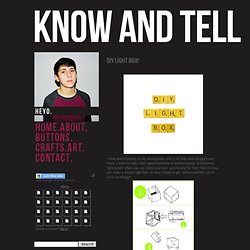
Don't spend hundreds of dollars buying "professional light boxes" when you can make your own practically for free! Here is how you make a simple light box, in only 5 steps to get "picture perfect" pics! ( Click to enlarge) 1.Get a box, preferably square and is sturdy! 2.Cut squares out of the top, left, and right sides. 3.Get about 3ft. of light meshy white fabric and cover the sides you cut out. 4.Cut white foam board to fit inside of the box, there will be a small crease but it really isn't noticeable. 5.Get a nice light or lamp and light over the top of the box, the fabric acts as a filter, evening the light out.
Paint Moss Graffiti - Step-by-Step Guides for Offbeat DIY Projects.
Better than Tiffanys. Have some spare time?