
http://www.arizi.com/apprendre-dessiner-tete-theorique.html
Related: Visage - portrait • starlucas41 • Dessin - Peinture • Dessiner les visages et les cheveuxHow to Draw the Head in 3/4 or Side View A common approach to drawing the head from 3/4 or side view is to use a 2 step construction approach. The first step is to draw a ball for the cranium, followed by drawing the frontal plane and jaw. Below is an example by Andrew Loomis (Fig. 1). This tutorial will introduce a more fluid and gestural approach to drawing the head. The focus is on the major gestures, or “thrusts” as Steve Huston refers to them, and their relationships to one another. We’re also want to keep our lay-in simple, by using geometric shapes. Passionceramique.com Enamel is a mixture of basic raw materials such as silica, soda, potassium caarbonate, borax, ... combined in accordance to ancient formulas. • They are fused at a very high temperature into a colourless material - the frit - very close to cristal. Metallic oxides are added to obtain a rich palette of colours. There are 4 main stages in the making of enamels. First step : THE MELTING-POT • A melting-pot is needed for the fusion of the various materials.
Self Portrail Stencil I am soooo excited about this one. Please do try it, especially you journal artists. It is a lot more fun than you'd think to manipulate images of yourself. How to Draw Hair, Part 1 Looking back at my tutorials on drawing the head, I realized that I covered individual features, but completely left out hair. This tutorial will is split into 3 parts: The Basics, Types of Hair, and a Step by Step drawing. I’ll start this first part of the series with common mistakes that I see all the time. Common Mistakes when Drawing Hair Forgetting about the volumes This is the most common mistake I see from newer students.
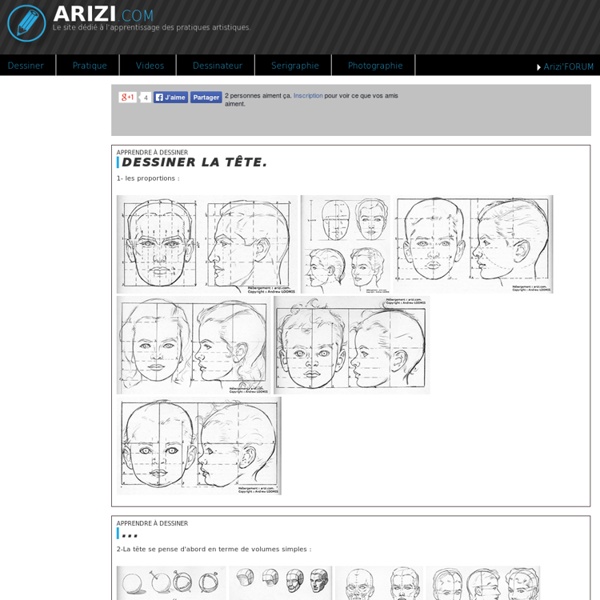
Human Figure Drawing Proportions START WITH A (3 x 4) OVAL. Divide this head like this:The top of the skull.The pupils are in the middle of the head, top to bottom.The bottom of the nose is about 1.5 eye widths from the eye line.1 eye width below the nose is between the lips.1/3 below between the lips and the chin is the chin crease.I started with an oval that fit on my skull's front view. My horizontal center line of the skull dividing the top to bottom is between the pupils. My head is 5 eyes wide not including my ears.
How to Draw Eyes For a video version of this tutorial visit www.proko.com/how-to-draw-eyes-structure This tutorial is a continuation of How to Draw the Head from Any Angle. I will go over the structure of the eye and detailed information on drawing the brow ridge, eyeball, eyelids, eyelashes, iris, cornea, and pupil. The Basic Forms The Eyeball Eyes and Freckles The color pencil drawings of Amy Robins. Artwork © Amy Robins Link via Life is a Danceable Tragedy How to Draw the Head From Any Angle The Basic Forms To draw the head from any angle you must first understand its basic structure. Look past all the distracting details and visualize the underlying forms. This ability to simplify can be applied to the features of the face, but when starting the drawing you could look even further. Ignore even the features and simplify to the most basic form of the head.
How to Draw Lips For a video version of this tutorial visit www.proko.com/how-to-draw-lips-anatomy-and-structure This tutorial is a continuation of How to Draw the Head from Any Angle. I will cover the basic forms of the mouth, some anatomical information, and the key information about the minor planes. At the end, I will show a step by step drawing of the lips. Drawing Hair in Pencil By Maery Drawing hair is hard work. It's complicated, time consuming, and often the results are terrible, and trust me, I speak from personal experience when I say that. So, why bother? I used to skip it all together when drawing portraits, thinking I'd never be able to do it well, so I didn't do it at all.