
5 EDITING HACKS that’ll Transform ANY Landscape PHOTO!! How to Use Curves in Photoshop. (15) Photoshop Elements Perspective Control. Photoshop CC Tutorial: How to Use Perspective Warp! Texture of the Day 2010. Sky Tutorials – Morgan Burks. Unsharp Mask: How Do You Actually Use That Thing? Until recently, if someone said the word “sharpening” to us, we’d whimper and hide under the table.
We mean, what the #$% is a threshold anyway? Well, we finally got fed up with it, so we did some research. And you know what? Sharpening’s actually not that bad, and it makes a HUGE difference on digital images. Applying Textures using Adobe Photoshop Elements. Photoshop Elements - Lesson 8 - Carrenac - Bing video. Trams painterly effect - Photoshop Elements - Bing video. Trams painterly effect - Photoshop Elements - Bing video. How to Change Color of Anything Replace Color Tool Adobe Photoshop Elements 15 14 13 12 11 Tutorial - Bing video. Photoshop: Transform your Photos into Unique, Hand-painted WATERCOLOR Paintings.
How To Soften Edges Of A Photo In Photoshop Elements - Bing video. Photoshop Elements 10: Blur The Background Of A Photo. How to Make A Victorian Silhouette. For centuries, the art of making simple silhouette profile portraits has remained popular.
While traditional Victorian-era silhouettes were often made from intricately cut sheets of thin cardboard, many silhouettes were also painted or drawn. I recall as a child, in fact, using projected light to trace my schoolmates shadows on construction paper, then cutting them out to make our own handmade works of art. Since the digital revolution, however, all sorts of fine techniques—such as the art of the silhouette—have become much simpler to accomplish with simple photographic techniques and a little help from Photoshop. Here’s how to make simple and beautiful silhouettes, which coincidentally can make for an ideal holiday gift! To start, photograph the subject in profile against a light colored background. Opening the profile photo in Photoshop, the first step is to simply select the subject’s head to separate it from the background.
How To Align Layers In Photoshop. Aligning layers is one of the most common tasks I perform in Photoshop, particularly if I’m trying to composite two exposures or subtly different compositions of the same scene.
One approach is simply to move the top layer around, nudging to and fro, until it looks about right, then turning off the layer visibility to check the alignment. This is, not to put too fine a point on it, a terrible approach. But it’s also the way most of us probably got our start, until it occurred to us there must be a better way. That better way, then, is usually opacity. We realize that by lowering the top layer’s opacity to, say, 50% or 75%, we can see through the top layer enough to determine when it is aligned with the layer below. The best way to align layers perfectly and precisely is to set the top layer’s mode to Difference. Think about that for a second: if the pixel turns black, it’s signaling a perfect match between the layer above and the layer below, at least in the location of that pixel.
Photoshop Elements: The Basics with Jason Hoppe. Photoshop Elements: The Basics with Jason Hoppe. Photoshop Elements Background Eraser Tool. Adding Quick Frames, Effects and Textures. Share this Episode Please select a language: Autoplay End of Video Show End Screen Default Quality Adjust your embed size below, then copy and paste the embed code above.
Community Translation Episode available in 4 languages Available Translations: Join the Community Translation Project. How to apply textures in Adobe Elements 10 and other editing techniques. Learn Photoshop Elements 11. Community Translation Episode available in 0 languages Available Translations: Join the Community Translation Project Thanks for your interest in translating this episode!

To get started, please join the Community Translation Project. Straighten wonky buildings with Elements 5. Photomatix HDR photography Tutorial Introduction. Adding textures in photoshop elements - Bing Vidéos. Learn the Basics of Photoshop in Under 25 Minutes. Should You Convert Your Photos to DNG? Our ninja team is poised and ready to send you the secret access to the Freebie Library, where you can frolic and download tons of mega helpful photography resources.

You'll also become a member of our free Explorers Club newsletter, with even more amazing perks. So just pop your email in the field below, and then check your inbox. Better photos are just one quick step away, my friend! Your Privacy is protected. 8 Ways to Get the Selection You Want in Photoshop. Why All the Options?

Photoshop is a mammoth of an application that’s seemingly ripe with redundancy. For any given action, there’s always a handful of different ways to go about it! This is especially true of creating selections, which is an action that Photoshop excels at and has tons of features to support. Digital Scrapbooking HQ Membership - Digital Scrapbooking HQ. French Kiss Collections, photography and design resources and tutorials. As I mentioned in the post earlier this week, Using Vintage French Brushes and Overlays, use layer masks to break up french script brushes and overlays to best suit your image.

Think of the text as a visual enhancement that evokes a vintage feel rather than as an actual message. In the image above, I’ve used this overlay and Photoshop brush. The Overlay and Photoshop brush used in the image. Below is the image with the overlay and brush without using layer masks. Steps not shown: For the Overlay, I have already changed the blend mode to multiply, changed the color to a soft warm gray with a solid color layer with a clipping mask and lowered the opacity.
The image with the overlay and brush without using layer masks. Here’s how the newsprint brush layers looked after I used layer masks. SurveyGizmo - Login - V1. Texture overlay in photoshop elements - Bing Vidéos. 3photoshop.com. Lightroom vs Photoshop Elements. After my “Photoshop vs Photoshop Elements” article, many of our readers suggested a comparison between Photoshop Elements (PSE) and Lightroom would be more useful.
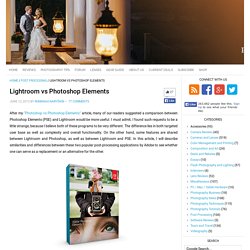
I must admit, I found such requests to be a little strange, because I believe both of these programs to be very different. The difference lies in both targeted user base as well as complexity and overall functionality. On the other hand, some features are shared between Lightroom and Photoshop, as well as between Lightroom and PSE. In this article, I will describe similarities and differences between these two popular post-processing applications by Adobe to see whether one can serve as a replacement or an alternative for the other. Photoshop, PSE and Lightroom Differences. Focus Stacking. Focus Stacking. Using Focus Stacking to Extend Depth of Field. Focus stacking is a powerful technique for extending a photo's apparent depth of field.
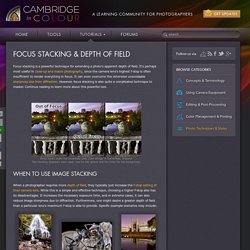
It's perhaps most useful in close-up and macro photography, since the camera lens's highest f-stop is often insufficient to render everything in focus. It can even overcome the otherwise unavoidable sharpness loss from diffraction. However, focus stacking is also quite a complicated technique to master. Continue reading to learn more about this powerful tool. Photo taken under full moonlight atop Clare Bridge in Cambridge, England.Two focusing distances were used: one for the sphere and the other for the background. When a photographer requires more depth of field, they typically just increase the f-stop setting of their camera lens. Gimp tutorial Changing perspective. How to Blur the background of an image in GIMP. How to Brighten Up a Specific Part of a Photo with Virtually Any Image Editor.
Layer Masks. GIMP Tutorial - Layer Masks (text & images) by Pat David is licensed under a Creative Commons Attribution-ShareAlike 3.0 Unported License. Intention Layer masks are a fundamental tool in image manipulations. They allow you to selectively modify the opacity (transparency) of the layer they belong to. This differs from the use of the layer Opacity slider as a mask has the ability to selectively modify the opacity of different areas across a single layer. How to put color back in a black and white picture in Photoshop. Selective Colorization. Text and images Copyright (C) 2002 Eric R. Jeschke and may not be used without permission of the author. Intention In this tutorial I will explain how to convert a color photograph to a B&W one with color restored to selective areas. Canon Digital Photo Professional Tutorial - Tool palette/RAW image (8/19) GIMP 101 Tutorial for Beginners: Learning the Basics 2013. Photography Tips, Essential Skills, Quickly Transform Your Photos, by Karl Taylor.
How to use Gimp - Basics. Picasa » GeeksOnTour.TV. Free Videos: The 5 tutorial videos listed below are free for anyone to watch. To view the rest, we have 96 total, you need to be a member. You can join here. Beginner’s Guide to Picasa, eBook or Print with 27 Videos We’ve divided the Picasa Videos into five categories. This should help you find the lessons you need. From the Camera, to your computer, to the Web – Picasa handles it all.
Then, below, are a list of *all* our Picasa Lessons. Bummer! Picasa’s Creative Kit is Gone. If you click on the button in Picasa to ‘Edit in Creative Kit’, today this is what you’ll see: What was Creative Kit? If you don’t know what Creative Kit was, here are some articles I wrote about the useful tools in Creative Kit that do not exist in Picasa3 proper. Now they don’t exist for Picasa/Google+ users at all! Picasa Tip: Speech Bubble on Your Pictures (put text into a speech bubble right on your picture – using Creative Kit)Picasa Tip: Merry Christmas Photo! (add clipart directly to your picture using Creative Kit)Picasa Tip: Adding Lipstick (using Creative Kit’s ‘FacePaint’ feature to add makeup) Beginner Photography - Courses, Lessons, Classes and Tutorials.
HomeBeginner Photography Course Overview – Syllabus Our beginner photography classes are created to be quick and easy to understand for beginner photographers – even those that feel they are beyond help of being able to understand their camera. Our lessons will help you understand the basics of light and how your eye fixes lighting. Create Color Depth in Landscape Photos - PLP #85 by Serge Ramelli. Exploring Picasa 3.9's Filter Selection - Powerful, Easy & Free. Create Clouds (G'MIC plugin) - GIMP Tutorial. Post-Processing Tips for Beginners.