
Yun based Electricity Monitor with Cloud Support / Temboo and Google Drive. This Instructable shows how to make an Electricity Monitor for your home that utilises some of the key capabilities of the Arduino Yun that make it an Ideal choice for Cloud Enabled sensor projects such as this.

Features : WiFi connection allows continuous monitoring of Power Consumed Utilises TEMBOO for Cloud Support with Google APIs Cloud Support: Writes Power Consumption to a Google Drive Spreadsheet Graphing, analysis etc.. available via Google Spreadsheet A nice feature of the project is that the monitoring is flexible and it's completely wireless (except for the Current Transformer of course), allowing continuous monitoring from a PC or phone and permanent storage on the Cloud. Measured accuracy was 6% (typical), which is excellent for such a simple circuit. Even better accuracy was observed after calibration. Let's Go.... RADiuS easyRadio Advanced Shield for Arduino-compatible Microcontrollers by Rick Winscot. How to make your own Professional arduino sheld. We will be designing the shield in a software called eagle.cad.
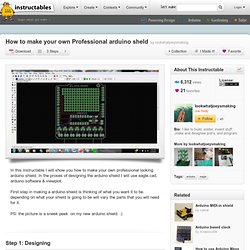
If you don’t have the software already downloaded then here is a link to the website . In eagle.cad you first design your shield with a schematics. If you don’t know what a schematics is there is a really good video on it by Collin . Build Electronic Circuits. In this Arduino shield tutorial I will show you how to create a 4×4 LED matrix Arduino shield.
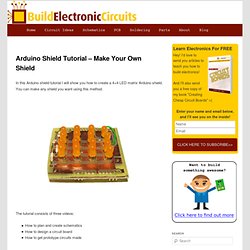
You can make any shield you want using this method. The tutorial consists of three videos: How to plan and create schematicsHow to design a circuit boardHow to get prototype circuits made Planning and designing schematics In this video we start with making a block diagram to get an overview of the project we are about to embark on. We’ll use SparkFun’s eagle library to find a nice template for the shield. Designing the circuit board Designing the circuit board is pretty simple once you have the schematics in place. Ordering cheap prototypes. Shields. Shields are boards that can be plugged on top of the Arduino PCB extending its capabilities.
The different shields follow the same philosophy as the original toolkit: they are easy to mount, and cheap to produce. Xbee The Arduino Xbee shield allows multiple Arduino boards to communicate wirelessly over distances up to 100 feet (indoors) or 300 feet (outdoors) using the Maxstream Xbee Zigbee module. details Motor Control v1.1 The Arduino Motor shield allows you to control DC motors and read encoders. details More Shields For more shields, see this list on the playground. Making Shields. How to make an Arduino shield with Eagle CAD - Tutorial. There are many CAD developed to assist the electronic designers during drawing of PCBs and schematics; often they are integrated in complete suite to project, simulate and realize a whole electronic system.

Besides the many commercial versions, there are also free CADs available. Today we’d like to analyze one of the most diffused and known software: Eaglecad (eagle does not mean the powerful bird but it is the acronym of Easily Applicable Graphical Layout Editor) made by Cadsoft, actually at version 6.2.0. We have chosen this one because, as you know as an Arduino’s fan, the official pcbs and schematic files of the boards are developed and available free of charge to everybody in Eaglecad format; you can find also a lot of libraries and circuits made by famous DIY website (Sparkfun for first) available for free.
Eaglecad is a professional software that have gained a lot of popularity due to the Arduino’s success. . - pcb dimensions not bigger than 100×80 mm; - no more than 2 layers; How to make an Arduino shield with Eagle CAD - Tutorial. Documentation - Raspberry Pi to Arduino shields connection bridge. Article Index Go to Index1.

The Shield. 8 Digital pins.Socket for wireless modules.RX/TX pins.i2C pins (SDA, SCL).SPI pins (SCK, MISO, MOSI, CS). Can be used also as GPIO.8 channel analog to digital converter.Switch to enable external power supply. Get the schematics here Get the Raspberry Pi to Arduino shields connection bridge here. Go to Index2. Go to Index3. There are currently two main Raspberry Pi board revisions.Raspberry Pi Revision 1.0Raspberry Pi Revision 2.0 There are slight differences between this two revisions, so a different version of the arduPi library should be used depending of which board revision are you using. In the revision 2.0 the main changes are: 2 mounting holes added2 pin “reset” header added. 3.1 Identifying your board revision Cooking hacks starter kits include the Revision 2.0 of the board.