
View forum - Arduino. ESP8266 and Arduino IDE - blink example. In this tutorial we will show how to program ESP8266 directly in Arduino IDE.
That's how we will get Arduino simplicity and power of ESP8266. In tihs case we do not need Arduino, just ESP8266 module. For start we will create blink example. We can program ESP8266 native code or use ESP8266 NodeMCU. But there is better way. EDIT: updated manual is available at Arduino ESP8266 IDE. -ESP8266 module -FT232RL FTDI USB to TTL Serial Adapter -1K resistor -LED diode First we download ESP8266 Arduino IDE. Warning: Some versions of FT232 USB serial adapters do not provide enough current for ESP8266. Next we need to change some settings in Arduino IDE. And board (Tools->Board->Generic ESP8266 board). Now we can load program. Here is modified program. When you modify program just press upload button. To see our blink example working connect LED and 1K resistor to GPIO2 pin. In next post we will show how to build sensor with Arduino IDE. See more tutorials at All purpose red LED. ESP8266-01 using Arduino IDE.
I was asked (by member F.G.M.) to create a project using the ESP8266.
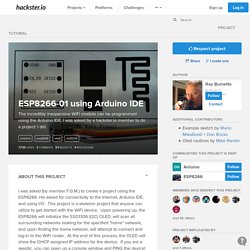
He asked for connectivity to the Internet, Arduino IDE, and using I/O. This project is a skeleton project that anyone can utilize to get started with the WiFi device. Upon powering up, the ESP8266 will initialize the SSD1306 (I2C) OLED, will scan all surrounding networks looking for the specified "home" network, and upon finding the home network, will attempt to connect and log-in to the WiFi router. At the end of this process, the OLED will show the DHCP assigned IP address for the device. If you are a skeptic, you can open up a console window and PING the device! Sketch to log onto my LAN for Internet access Understanding the programming environment Basic Concept #1: The ESP8266 when used with the Arduino IDE becomes just another Arduino Board, in this case a board similar to the Pro Mini - a small board with a serial UART but without USB capability.
Basic Concept #2: Basic Concept #3: ESP8266 Thing Hookup Guide. Favorited Favorite 9 There are a variety of development environments that can be equipped to program the ESP8266.
You can go with a simple Notepad/gcc setup, or fine-tune an Eclipse environment, use a virtual machine provided by Espressif, or come up with something of your own. Fortunately, the amazing ESP8266 community recently took the IDE selection a step further by creating an Arduino addon. If you’re just getting started programming the ESP8266, this is the environment we recommend beginning with, and the one we’ll document in this tutorial. This ESP8266 addon for Arduino is based on the amazing work by Ivan Grokhotkov and the rest of the ESP8266 community. Installing the Addon With the Arduino Boards Manager With the release of Arduino 1.6.4, adding third party boards to the Arduino IDE is easily achieved through the new board manager.
Adafruit HUZZAH ESP8266 breakout. While the HUZZAH ESP8266 breakout comes pre-programmed with NodeMCU's Lua interpretter, you don't have to use it!

Instead, you can use the Arduino IDE which may be more familar. This will write directly to the firmware, erasing the NodeMCU firmware, so if you want to go back to Lua, use the flasher to re-install it In order to upload code to the ESP8266 and use the serial console, you will need a USB to serial converter! Use either an FTDI cable or any console cable, you can use either 3V or 5V logic and power as there is level shifting on the RX pin. Don't forget to visit esp8266.com for the latest and greatest in ESP8266 news, software and gossip! PL2303 USB console cables seem to only work with Windows computers for some reason. The ESP8266 uses a lot of current, so if you're getting flakey behavior make sure you are plugging your console cable into either a motherboard USB port or a powered USB hub. Connect either your console cable or FTDI cable.
Dont forget to update. ESP8266 Arduino IDE HowTo.