
Zbrush 3 Basics - Colors to Texture. ZBrush ZProject Brush. ZBrush ZProject Brush. Zbrush(Tile UV texture on Objects).avi. ZBrush Alpha Texture Loader Plug-In. Zbrush(texture on Objects) Zbrush How To Apply Different Materials and Textures. Zbrush(Material Baking 2).avi. ZBrush Tutorials - MatCap to Texture Map - part 2. ZBrush Tutorials - MatCap to Texture Map - part 1.
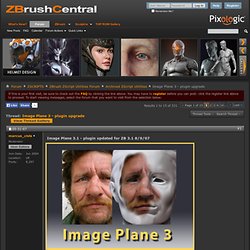
ZBrush Tutorial - Zapplink / Image plane Plugins. How to texture 3D portrait in ZBrush and 3DS_Max Tutorial. Image Plane 3 - plugin upgrade. Image from www.3d.skImage Plane 3 provides an easy way to load images into ZBrush for use in texturing, either using ZProject brush polypainting, or with Projection Master as in the Texturing with Photo Reference tutorial .* For ZProject polypainting, quickly change the background Image without leaving Edit mode.* For Projection Master texturing, Image is automatically wrapped onto your model.
INSTALLATIONThe zip contains: ImagePlane_readme.txt - the readme file ImagePlane3.zsc - the plugin fileUnzip the zip file and place the ImagePlane3.zsc in your ZBrush 3 ...ZStartup\ZPlugs folder. Restart ZBrush. You should now have an Image Plane subpalette in the Texture palette, with a LoadImage button, ImgSize, Shift H, Shift V and Model Opacity sliders. Shift-click the LoadImage button for help.HOW IT WORKSClick the LoadImage button to create an image plane. If a texture is selected that image will be used, otherwise you will be asked to choose an image file. Image Plane /zapplink Plug-ins. UV Master. UV Master - Getting started [1 of 5] UV Master - Unwrap with Polygroups [2 of 5]
ZBrush UVMaster plugin tutorial 3 of 5. UV Master - Density [4 of 5] ZBrush UVMaster plugin tutorial 5 of 5. UV_Master_Documentation. UV Mapping. Eof's Sketchbook (base mesh to share Page 9/movie page 12) The thinking old man. I'm just on the finishing touches of this new model:'The thinking old man'The model will be a full textured and rendered project.
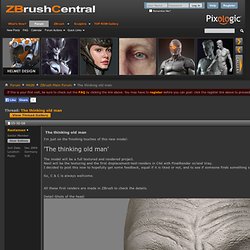
Next will be the texturing and the first displacement-test-renders in C4d with FinalRender or/and Vray. I decided to post this now to hopefully get some feedback, equal if it is liked or not, and to see if someone finds something serious that should be corrected before doing all the maps and render-work.So, C & C is always wellcome.All these first renders are made in ZBrush to check the details.Detail-Shots of the head: Whole model: And finally a harsh render to show even the finest wrinkles: Baking ZBrush Materials to a Texture Map. Create displacement maps to apply in modo.
Dis & Normal Maps alternative. Although I first wanted to finish my current work with using this obviously new type of gray-map, I post the way of how to archieve it now, before my work is finished, because I still work on perfecting the skin-shader and that will need some more time.In the meantime, I have a feedback of the Pixologic-team that it seems that even the ZBrush-devellopers didn't know so far that this gray-map-type can be created with ZBrush.Whatever, here is the way to it: (The text is taken from my original email to the Pixologic-team about this issue)Normally I produce my Displacement-maps in another way than Aurick posted some time ago.
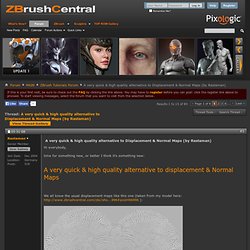
Anyhow, a few days ago I tried it the way Aurick wrote, but made a slight variation. Instead of placing a Morph-target at Subd-level 1 before dividing and sculpting, I had first finished my model, stored the Morph-target at the highest subd-level, deleted it again, went to subd-level 1 and stored a new morph-targed. The usage of this map-type is open for anything. Zbrush to modo (Displacement and normal maps) Texture Library. Alpha Library. Welcome to Pixologic's Alpha LibraryPixologic has created a library full of amazing Alpha materials from ZBrush artists who wish to share their work with the ZBrush community.
This library gives you one unique location to view, download, and begin sculpting using any of the alphas found in this library. See what ZBrush can do with your alphas. Enjoy the search. Close Learn how to create your own Alphas click hereLearn more about your ZBrush Alphas click hereDiscover your Alpha Palette in ZBrush click here If you wish to submit an alpha for the library to be evaluated by the Pixologic Team please email the files to library@pixologic.com with the following information. 1. Please name all files accordingly: (artist’s initials)_(name of alpha)_(two digit version number) Example: ph_daisies_01 Please no spaces, CAPS or special letters. Matcap Library. Welcome to Pixologic's MatCap LibraryPixologic has created a library full of amazing MatCap materials from ZBrush artists who wish to share their work with the ZBrush community.
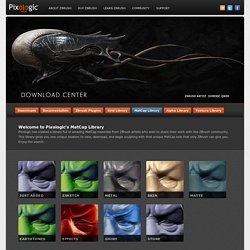
This library gives you one unique location to view, download, and begin sculpting with that unique MatCap look that only ZBrush can give you. Enjoy the search. Image Courtesy of Magdalena Dadela Close. Matcap repository. Dear Zbrush community,After I have found some time to play with the stunning ZB3, I realised the matcap feature is a extremely powerful tool for illustrations.
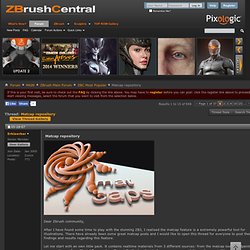
There have already been some great matcap posts and I would like to open this thread for everyone to post their own findings and results regarding this feature.Let me start with an own little pack. It contains realtime materials from 3 different sources: from the matcap tool, handpainted ones, and some from Mental Ray renders. Especially the handpainted ones are sooo much fun and can possibly give your illustrations your very own unique paint like look! Start up photoshop and paint your own mats, very nice! I hope to see more posted to this thread.As for the MR mats, please bear in mind that reflection and lighting is baked in, so obviously they will never be physically correct, but its more than enough for most illustrative tasks.
UV mapping. The application of a texture in the UV space related to the effect in 3D.
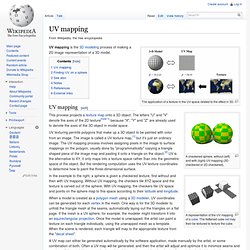
A checkered sphere, without (left) and with (right) UV mapping (3D checkered or 2D checkered). UV mapping is the 3D modeling process of making a 2D image representation of a 3D model. UV mapping[edit] This process projects a texture map onto a 3D object. The letters "U" and "V" denote the axes of the 2D texture[note 1] because "X", "Y" and "Z" are already used to denote the axes of the 3D object in model space.
UV mapping. Welcome!
You are new, aren't you? Free3dtutorials.com is the number one 3d tutorials site on the web. We provide you the best free CG tutorials in the universe. Become part of our creative community and “UV mapping ” by Ken Brilliant ZBrush does a great job of protecting the artist from too many technical decisions during the creation process.