
How to Make Stencils from Freezer Paper Cloth - Create Mixed Media. From Dreaming from the Journal Page by Melanie Testa (This tutorial was previously published in the book Dreaming from the Journal Page by Melanie Testa, copyright 2012; republished here courtesy of CreateMixedMedia.com.)
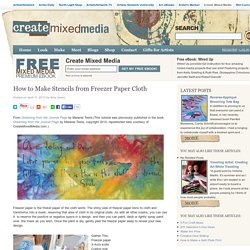
Freezer paper is the frisket paper of the cloth world. The shiny side of freezer paper irons to cloth and transforms into a mask, reserving that area of cloth in its original state. As with all other masks, you can use it to reserve the positive or negative space in a design, and then you can paint, daub or lightly spray paint over the mask as you wish. Once the paint is dry, gently peel the freezer paper away to reveal your new design. Gather This: Freezer paper X-Acto knife Cutting mat Iron Paint Dauber or sponge Pen 1. 2. 3. 4. 5.
Tips! From Dreaming from the Journal Page by Melanie Testa, 2012: Courtesy of www.createmixedmedia.com. To learn more about or purchase Dreaming from the Journal Page by Melanie Testa, click here. For more on stenciling, check out: How to do a fun acrylic painting of an Agate-inspired pattern.... - Jennifer Rizzo. Here’s a little known facts about me,I have a side to me that is a complete science geek.

I started collecting rocks when I was about 12 years, and then when I hit 14, I continued kind of secretly until my 20’s, when it wasn’t a very cool thing to do. It’s actually how I started making jewelry when I was around 14. I would go to rock shows(not the cool concert kind) and buy gem stones and findings and make creations in my parent’s dark basement for hours. I even subscribed to Rock and Gem magazine. Oh, what was that,what’s hanging out? I kind of like this project for how fun and messy it is too! I was very inspired by the patterns in both Blue Agate and Malachite I decided on the Blue agate for this canvas. It’s really easy, but very messy! Start by using your paint tubes and “drawing” lines on your canvas, one after the other in the pattern on your “inspiration” stone.
After you’ve drawn all of your lines, have everything ready. See how much paint your end up dragging off? Tissue Paper Watercolor Texture Tutorial. Tutorial: Create a textured background using aluminum foil. We will excuse Emma this week since Nora isn’t giving her time to scrapbook!
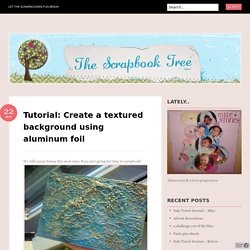
Instead, this is a technique I have been experimenting with and would like to share. It’s very easy and cheap, but the results are stunning. I have used it to cover my new art journal made from a recycled book, but you can also vary this idea to use as the background of a layout, card or ATC, to matte or frame a picture, to create dimensional embellishments, etc. It’s very versatile and you can make different textures and shapes with it to suit your purpose.
You will need: Acrylic paint in 3-5 varying shades -You can also use spray paint, markers, glimmer mist, or whatever else you have as long as it’s opaque and permanent. Paint brushes Glue or Gel Medium Aluminum foil A base to work from such as a book cover, cardstock, chipboard, etc. Deborah webster - Blog - Try a New Technique. A good way to inspire yourself and your art is to try a new media or technique.
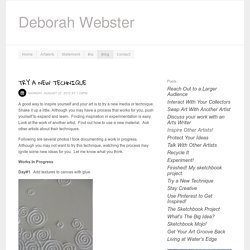
Shake it up a little. Although you may have a process that works for you, push yourself to expand and learn. Finding inspiration in experimentation is easy. Look at the work of another artist. Find out how to use a new material. Following are several photos I took documenting a work in progress. Works In Progress Day#1 Add textures to canvas with glue. These swirls are actually pressed paper pulp. Day#2,#3,#4 Cut droplets from recycled and handmade papers. My images are about the texture and movement of water. Day #5, #6,#7 Glue pieces on canvas paying attention to how each piece affects the movement of adjacent pieces so there is a flow and dance of textures.
Gesso Stenciling: 2 Ways To Create Texture. Most of you are probably familiar with Gesso.
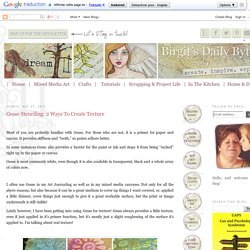
For those who are not, it is a primer for paper and canvas. It provides stiffness and “tooth,” so paints adhere better. In some instances Gesso also provides a barrier for the paint or ink and stops it from being “sucked” right up by the paper or canvas. Gesso is most commonly white, even though it is also available in transparent, black and a whole array of colors now. Birgit's Daily Bytes: The Big 20/20 Event: Day 5: Creating Texture With Gesso & Stamps. Welcome back to “The Big 20/20 Event” - I am so glad you’re joining us!
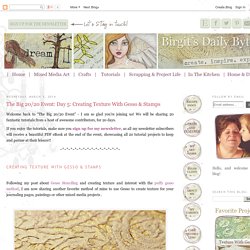
We will be sharing 20 fantastic tutorials from a host of awesome contributors, for 20 days. If you enjoy the tutorials, make sure you sign up for my newsletter, as all my newsletter subscribers will receive a beautiful PDF eBook at the end of the event, showcasing all 20 tutorial projects to keep and peruse at their leisure!! Following my post about Gesso Stenciling and creating texture and interest with the puffy gesso method, I am now sharing another favorite method of mine to use Gesso to create texture for your journaling pages, paintings or other mixed media projects . In my first gesso tutorial, we were scraping the gesso through a stencil to create texture, this time we’ll be making impressions in the gesso by stamping and drawing into the gesso.