
Untitled. Table of Contents A.

Exporting xGen files B. Importing xGen files C. xGen Directory Structure and Files Locations It's a good practice to be able to re-build a scene. This can be helpful when troubleshooting issues that arise as a scene gets more and more complex. A. The two ways to do this in xgen are by exporting the collection or description. 1. 2. Save the spline guides as curves: Modifier tab: select bottom modifier stack (clumping1), click Export guides.
The trick here is to keep the description name the same so that the ptex maps connect. Realistic Hair Tutorial using XGen & Redshift _by Obaida Hamdi. Thank you!

This will help us improve your ad experience. We will try not to show you such ads again. Realtime Hair Study, Andrew Giovannini. Basem Shenouda - XGen Curly Hair study . Creating Hair for Real-Time Projects. Ellie Porfyridou shared some important tips and advice, which will help you to build hair in XGen and export it in UE4.

Introduction Hey everyone, my name is Ellie Porfyridou, I am from Greece and soon to be graduate from Howest Digital Arts and Entertainment in Belgium. Facial Animation Studies with Andrew Klein. What are everybody's hair solutions? - Page 13. Quote: I know this is an old post, but the thread is still going.

I was wondering what plugins you use today or if you know any good approaches or starting resources there. Hair is such a detailed area. Hair and Fur Reel 2011 - Sandeep Khedkar. Neil Gaiman's The Price - An Animated film by Christopher Salmon. Many of the comments I’ve received in response to these Production Blog posts have included some very positive remarks about the behind-the-scenes details and processes I’ve attempted to convey.

With that in mind, I wanted to share the latest computer rendering of the “Narrator” (aka Mr. Neil Gaiman) character from The Price, and breakdown just how it was put together. As an artistic tool, computers are capable of creating truly astounding imagery; but as with all digital processes, you have to tell your box exactly what to do… and I do mean exactly. It is this aspect of CGI more than any other that causes those of us who attempt it to pull out the largest tufts of hair. Exasperation. So: the first step is to begin with an incredible digital model (please see Videoblog #04 for a peek at the superb work of Ryan Peterson). For help with this highly specialized and technical artistry, I was lucky enough to find the talented (and generous) Michael Hoopes.
We’ll start with the skin. Really Need Hair Rendering tips for Maya Hair or Shave in Mental Ray. Yeah, a lot of my trouble seems to be from the computer processing power I have available.
Just duel core computers, with 3-4 gigs of memory and on 32 bit windows, and we have about a weeks timeline to get everything out some how. Maxime, A likeness study. Suit Modelling & Texturing Adding some final details like Peach-fuzz and facial hairs.

Subtle but really enhance it. I still need to find a way to make old and dead skin pealing away from the subdermal layer. B/W version still looks the best so far. What are everybody's hair solutions? - Page 12. Cheers Oglu It was a while ago since I done this but will try to remember..

I basically created curves on one side of the head, varying in length and curvature. Female cinematic character. The model is solid, but there are other things which seem rushed.
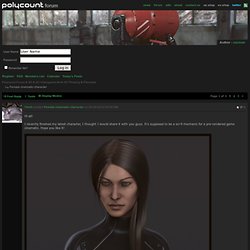
I'm not a fan of her hair, it looks too floaty, not oily enough, and her specular is too 'static', hair usually has more then a simple anistropic specular, usually two additive values that are of different colors, I don't see this going on. Try looking up for Kajya-Kay to see what I mean. Her face also fades in comparison, it looks blank, it's not defined well enough, the Diffuse is there but the micro details and specular don't read at all, not to mention, it looks she has a thick layer of dust on her face, this simply kills the looks.
You should try for an Diffuse Reflectance shader instead, something like Oren-Nayar to fake the 'roughness' at light incident angles Which reminds me, all of the pictures look like there is a layer of dust on them, people usually fake depth and 'realistic' images but giving it either a slight Chromatic Aberration or DOF. Hot Fuzz: Hair Revisited. In a previous post I briefly mentioned hair.
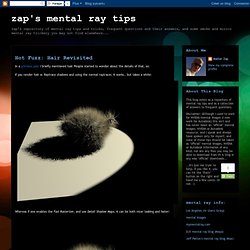
People started to wonder about the details of that, so: If you render hair w. Raytrace shadows and using the normal raytracer, it works.. but takes a while: Whereas if one enables the Fast Rasterizer, and use Detail Shadow Maps, it can be both nicer looking and faster: So the question then is... where do I turn this on? I admit some things can be hard to find, and sometimes they are renamed in the UI of a particular application... for example, the mental ray detail shadow maps are actually not named "detail shadow maps" in 3DS max, they are named "Transparent Shadows".
In Maya, however, they have their proper name and are found here: However, Maya has "special" shadow settings for Hair and Fur one may need to watch out for. Turning on the "Fast Rasterizer" is easier since it has it's proper name in most applications. And Maya: Hope this helps with the "Fuzzy sidekick" rendering. Djx blog » tips for rendering maya fur with mentalray. I've been working on a project involving the use of maya fur. It's the first time I have rendered fur using the mentalray renderer, so there was much to learn.
One of the difficulties I encountered was dealing with the illumination of near-white colored fur (like a polar bear).