
Messy French Twist Hair Tutorial. Here are a few frames of Martha and the process of her messy French Twist to inspire your next event from Irrelephant.
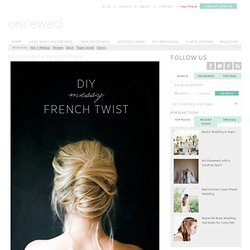
Keep your french twist modern by letting the imperfections fall and letting your natural texture take its course. The key to this look is the texture. Having silky clean hair is not going to do you any favors for this. Make sure the hair has grit but still has movement. I had such a hard time narrowing down a favorite, I’m including the finished hairstyle look on a dark and lighter background. Instructions 1. 2. 3. 4. 5. 6. Nightmares. 58938764_Francuzskiy__dvoynoy_puchok.jpg (JPEG Image, 500 × 566 pixels)
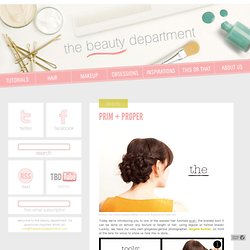
TIPPED OUT. All photos: Kristin Ess + thebeautydepartment.com post designed by kristin ess Lots of emails this week asking for a tutorial on Lauren’s temporary bright colors.

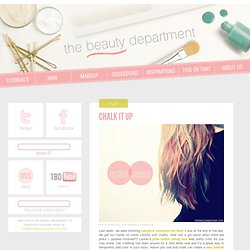
Here I’ve replicated the process for you in 7 steps on an extension. While I never recommend bleaching out the ends of your hair at home, if you want to do the fun colors yourself, maybe get the tips bleached out by a pro + then play with the temporary colors on your own. The best things about this color– you’re able to hide it in a bun for work if you need to, AND you’re only doing a couple of inches on the bottom so it won’t kill you to cut it off if you get over it quickly. TOOLS: highlighting comb, clips, foils, color brush, hair bleach with the appropriate volume (always seek a professional when using bleach), light pink color, dark pink color, light blue, dark blue, clear gloss. Step 1 Highlight the tips of the hair using hair bleach with the correct volume. Step 3 Shampoo and lightly condition bleach out of the hair. PRIM + PROPER. Photos: post designed by kristin ess Today we’re introducing you to one of the easiest hair tutorials ever– the braided bun!
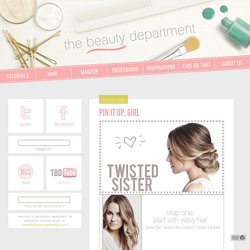
It can be done on almost any texture or length of hair, using regular or fishtail braids! Luckily, we have our very own gorgeous/genius photographer, Angela Kohler, (in front of the lens for once) to show us how this is done… Before you start, know that this hair style is just 5 simple braids, made into a bun shape. It makes things a little less complicated when you think of it like that. TOOLS: curling iron, 5 clear elastics, bobby pins, sectioning clips and hairspray is optional! CHALK IT UP. Photos: Kristin Ess, post designed by Kristin Ess Last week, we were shooting Lauren’s collection for Kohl’s and at the end of the day, we got our hands on some colorful soft chalks.
How can a girl resist when there are pinks + purples involved?? Lauren’s pink cotton candy bun was pretty cute! As you may know, hair chalking has been around for a little while now and it’s a great way to temporarily add color to your locks. Above you see that chalk can create a very similar look to dye without commitment. Twist the hair as you chalk. Try doing 2 colors on one strand! The best part about chalking is styling it. PIN IT UP, GIRL - thebeautydepartment.com - StumbleUpon. Our email box is literally flooded with requests for updos so here’s a fun one to get us all going!
This is always a favorite for attending an event. This updo looks gorgeous on any hair color but particularly amazing with hilighted hair because it gives the hair lots of depth and dimension. For lack of a better word, I love the way it becomes “swirly”. Best thing is; it’s easy to do, gorgeous and keeps your hair out of your way for the night. I made this a printable tutorial, so all of the steps are next to the photos. Tools you’ll need: curling iron (to prep the hair with waves), sectioning clips, teasing comb or brush, clear elastic rubber band, bobby pins, light to medium holding hairspray (to mist over at the end).
Day 2- braided crown. How To Style Maiden Braids. Last month I did a makeover story with Kelsie and had many requests for a maiden braid tutorial.
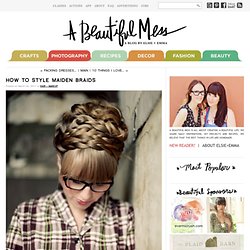
Yesterday she came in and we photographed these simple step by steps. Kelsie has extremely long and thick hair, but anyone with shoulder length or longer can do these braids (see my photo below for an example). Steps 1-2: Braid two strands on each side of a center part. Steps 3-5: Wrap braids around the crown of your head and pin in place with one pin each. Step 6: Arrange braids so that they cover the front of your head like a headband.
Steps 7-8: Pull the rest of the hair into a ponytail and pin it into a cute messy bun. Step 9: Add final pins and spray. Vintage 1950's curly hair tutorial ala Marilyn Monroe by CHERRY DOLLFACE. Pinup Vintage Inspired Hairstyle. 1940/50s hair tutorial. Vintage PinUp Hair Tutorial for Victory Rolls and Updo 1940s. Pin Up Girl Hair - Easy Victory Roll Hairstyle Tutorial - 1950's.