
Summer T Shirt Reconstruction! SmarmyClothes.com » Sewing. I’m super excited to announce that a project I’ve been dreaming about and working on for months is finally finished! The new WhatTheCraft shop is now officially stocked with my very first WhatTheCraft Sewing Pattern! People have been asking if they can buy my patterns for years, and now you can! The Cheeky Bikini is a low-rise, hipster cut underwear – cute, comfy, and quick to make! Plus, it doubles as a pattern for swim suit bottoms. For the price of a single pair of store-bought undies, you can have panties for eternity with this one pattern!
All WhatTheCraft Patterns are original patterns drafted by me. I’m planning on also offering the patterns in the SmarmyClothes shop, as well as in my Etsy shop in the very near future, I just haven’t had time now that Halloween season is upon us! T-shirt Reconstruction Queen. Bethany Sew-and-Sew: T-shirt Reconstruction: Nightshirt to Comfy Summer Dress. This reconstruction started with this nightshirt that I accidentally shrunk in the dryer.
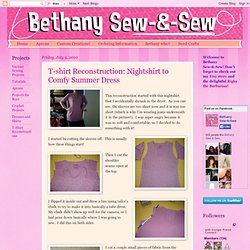
As you can see, the sleeves are too short now and it is way too short (which is why I'm wearing jeans underneath it in the picture!). I was super angry because it was so soft and comfortable, so I decided to do something with it! I started by cutting the sleeves off. This is usually how these things start! Then I cut the shoulder seams open at the top. I flipped it inside out and drew a line using tailor's chalk to try to make it into basically a tube dress. I cut a couple small pieces of fabric from the sleeves that I sewed onto the front top sections of the shirt (on either side of the buttons and button holes). After I sewed these pieces on, I rolled them over and sewed them to my seam allowance to form channels. I made straps out of the original sleeves and attached these to the back then pulled them to the front, through these channels, and tied them in a bow.
This dress is super comfortable. Boxy-to-foxy handstamped t-shirt reconstruction. About 6 mos ago, I bought this organic cotton t-shirt (from Alternative Apparel) for my husband, but the sizing wasn't quite right.

I've since had it floating around my studio, waiting for a reconstruction. In the meantime, I scouted various ideas for making changes to it - from loose tank tops to shirred halter tops - there are so many incredible ideas out there. I'm kinda embarrassed to admit that I went all Safe Sally on this reconstruct, and basically just tapered the arms and sides like I usually do for shirts that are too big on me. Once I had it stamped, I was too afraid I'd ruin it by gettin' crazy. Next time, right?!
Note: Um, I don't go around calling myself foxy. Polymer clay necklace by Liz Smith of Made in Lowell. Rib cage/Spine T-shirt Reconstruction Tutorial. I noticed that the link to the tutorial of my rib cage T-shirt (which I descided now is a spine T-shirt :p ) is no longer active so I made my own tutorial now.
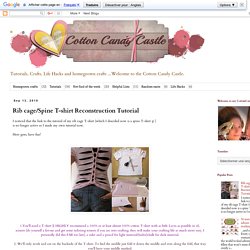
Here goes, have fun! 1.You'll need a T-shirt (I HIGHLY recommend a 100% or at least almost 100% cotton T-shirt with as little Lycra as possible in it), scissors (do yourself a favour and get some tailoring scissors if you are into crafting, they will make your crafting life so much more easy, I personally did this FAR too late), a ruler and a pencil for light material/(tailor)chalk for dark material. 2. We'll only work and cut on the backside of the T-shirt. 3.OPTIONAL: I always like my T-shirts without the seams (the collar and the bottom seamline), so if you like just cut them off. 4. 5.
Then draw lines between the center lines, not all the way to the center and the outside of the T-shirt though (see picture 6). 7. 8. 9. Stencil with freezer paper (harry potter tee) Yes, I am a nerd.

I came up with a brilliant idea for a Harry Potter t-shirt and I couldn't resist. "Expecto Patronum! " However, you can make whatever kind of design you want with a freezer paper stencil. It doesn't have to be Harry Potter related. (Although it would be awesome if it was.) I learned about the joys of freezer paper back in my early college days. Basically, freezer paper is backed with a plastic coating that will stick to soft surfaces when ironed, but it peels off cleanly and easily. DIY: T-shirt Surgery.
Image: flickr Do you have have tonnes of old baggy t-shirts crowding out your wardrobe and not sure what to do with them?

Chopping them up and reconstructing them into funky, sexy and hip clothing is hot right now.