Models. 3D printer stores. Arduino and the Raspberry Pi. I got a PI!
So I got a raspberry pi. It took almost 10 weeks to arrive, but it was definitely worth the wait. For those who don’t know, the Raspberry Pi is a cheap $35 computer that includes processor, memory, and a sd card slot for the hard drive. It also has a few hardware pins that can be used to drive external devices. Now to interface with a micro-controller… The most obvious external “thing” I wanted to hook up was the arduino. You plug the arduino into your usb port, upload some code, and suddenly you’re controlling a motor. Finally, you’ll want to interface the arduino with a computer, because it’s no fun having a microcontroller that can’t interface with the internet.
Commmand-line arduino? The raspberry pi only has 256mb of memory so you’ll probably want to upload your sketches via command-line instead of using their fancy UI. We’re going to use the serial header exposed by the GPIO pins to communicate with our arduino, so we’ll have to remove it’s use on the raspberry pi.
Extruder. Reprap » Wade’s Geared Extruder Visual Instructions. Prusa3. Software. Slicer. Motors. 3D Printers & 3D Printing. After building a Wolfstrap, designing my own printer, and building it, I had a couple of other design ideas going through my head.
After a while I thought to myself, there are quite a few designs out there and they all more or less are just a variant of each other. So why spend weeks, months or a year trying to make/develop one more? Challange I guess is a very valid point, but I decided for now to have a closer look at the Prusa i3 instead. I like the design that Prusa has come up with in regards to the single plate version. It looks sleek and is quite easy to build. After downloading the openscad files and checking out the ALU frame design I realised that this has got a lot of potential (for modifications and improvements, if you feel like it.) The most noticable change I have done is that I have got rid of the belts altogether.
Full Reprap Prusa Mendel Build Manual Documentation and Instructions - Next Day Reprap. A fully comprehensive step by step guide for building your Prusa Mendel 3D Printer Kit.

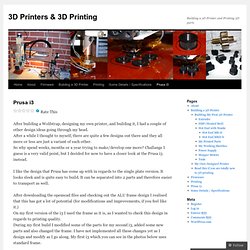
Getting up and running and 3D printing. If you wish you can download the full PDF Reprap Prusa Mendel Build Manual on our 3D Printer Downloads page. The following instructions will take you through every step to build and commission your printer. All the parts required are included in your kit. We recommend you read through the complete manual to familiarize yourself with the process before starting. BuildManual%20i3. 3D Printer by Cooking Hacks [ Prusa IT3 ] Imagine, Print, Go! Yes, still another 3D Printer... but just give us one minute to show you why this is interesting for a person who starts on the 3D printer world.
![3D Printer by Cooking Hacks [ Prusa IT3 ] Imagine, Print, Go!](http://cdn.pearltrees.com/s/pic/th/printer-cooking-hacks-imagine-57179998)
Some Facts: We give all the necessary components to mount it in just one kit. My i3 Build. My Reprap Prusa i3 build (Jan 2013) - A bit light on detail but better than nothing right?
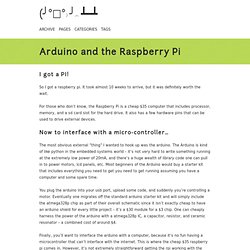
What is a Reprap Prusa i3? Its a 3d printer. It prints physical objects in plastic. For more information check out reprap.org The order of assembly might be a bit off (as is evident in some of the photos, I wasn't trying to document all the assembly steps, just trying to build it, I will do a tear down and rebuild and document a bit better when complete) so probably best to read through first so you don't miss stuff off like I did :). Assemble the Y frame using 4 short M8 threaded rods, 2 M10 (M10 preferred over M8) or M8 long threaded rods and 4 y-corners.
The M10 rods should have 2 M10 nuts and 2 M10 washers fitted between the y-corners for mounting to the z axis plate. Fit the y-idler on one of the upper short M8 threaded rods. Fit the y-motor mount on the other end. Fit two LM8UU linear bearings on one smooth rod... ...and one on the other... Fit the z axis motor mounts to the plate. Minimalistic Endstop for 8mm Shafts by rp_one_labs. Mechanical, ReprapUniverse.com.
Prusa i3 Rework Cablage electrique/fr. English • French Introduction | Nomenclature | Assemblage de l'axe Y | Assemblage de l'axe X | Assemblage de l'axe X et Z | Assemblage des moteurs Mise en place du système d'entraînement | Montage du plateau chauffant | Montage de l'extrudeur | Câblage électrique Les instructions qui vont suivre concernent le câblage de l’Arduino qui est la carte microcontrôleur qui reçoit les informations venant du PC (données concernant les pièces à imprimer, etc.) et du RAMPS qui est une carte additionnelle permettant de piloter les différents actionneurs et de recevoir les informations de différents capteurs.
Vous pouvez néanmoins utiliser d’autres produits comme la carte GEN7, etc. Les différents branchements seront détaillés et l’organisation des câbles sera laissée au libre choix de l’utilisateur. Pièces nécessaires : Full Reprap Prusa Mendel Build Manual Documentation and Instructions - Next Day Reprap. 78.47.92. Extended Z Endstop holder by f_perez. How to export a STL design file using Blender 2.6+ : Ponoko Community Hub. eMotion Tech - Reprap-France - Reprap-France - eMotion Tech. Using Cura/Python to generate Gcode. Thingiverse - Digital Designs for Physical Objects. Printrun.
Printrun is a set of G-code sending applications, written by Kliment.
Getting started with Cura : 3D Genius – The Home of 3D Printing. Download it hereCura is a freely-available program for slicing models to G-Code format.
It’s optimised for the Ultimaker 3D printer, but it works fine with any printer based on the RepRap model – and that includes just about all the ones that squirt molten plastic. Cura is available for Windows, Mac and Linux. Cura is much faster at slicing than most other programs, and the latest version provides both a handy set of tools to visualize your printable object and a dual-user mode – Quickprint, which offers preset options suitable for most everyday print jobs, and Full setting, which gives you the chance to tinker. We’ll look at the full settings in another tutorial. 1. The first time you open Cura, you’ll see the First time run wizard. Even if you’re the sort of person who wants to get straight on with playing, it’s worth taking the time to go through the few short setup steps, to guarantee that Cura will give you the best slicing results. 2. 3. 4.
RepRap. Un article de Wikipédia, l'encyclopédie libre.