DIY Red Valentino lace-trimmed t-shirt
of another simple, yet adorable Red Valentino t-shirt tutorial! I always keep my promises ;) * lace... 2$ * matching thread * pins & scissors
Recycled Glove How-to: Make a Chipmunk Softie
Gloves (like socks), while born to be part of a pair, often end their days in lonely solitude, separated from their mates by the forces of the universe that conspire at every turn to pull them apart. Alone, they sadly serve little purpose (aside from the occasional show biz appearance for only the most sparkling among them), and are left to languish in the backs of a drawers and bottoms of closets — that is, if they’re not disposed of all together. Ah… but it’s a new day. Thanks to the Penguin Group for sharing this project from Happy Gloves. Author Miyako Kanamori is a crafter who lives in Tokyo.
DO IT YOURSELF: T-Shirt Weaving
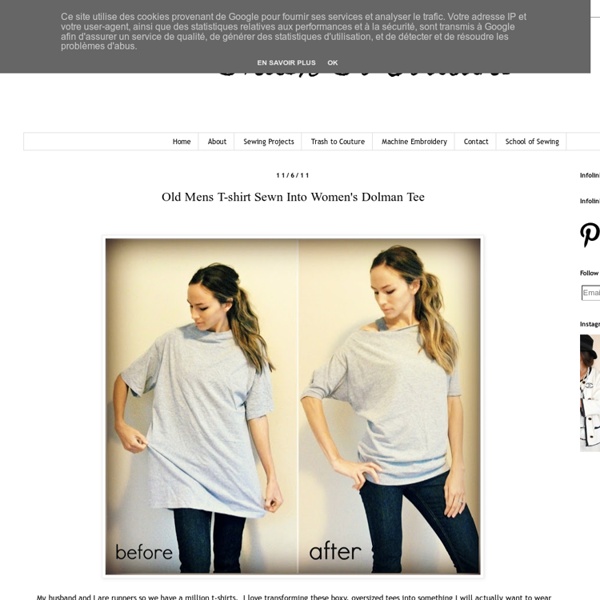
I have a lot of t-shirts. Long sleeved, short sleeved, too small, too big…. I especially have a lot of oversized t-shirts that I like to wear as tunic dresses. Because I have quite a few, I find it difficult to style them without being repetitive. So, inspired by books such as Generation T and Youtube tutorial experts like itsblitzzz and secretlifeofabionerd, I decided to try my hand at some t-shirt reconstruction.
how to add elbow patches to a sweater!
Elbow patches are one of my favorite trends this season! Last month, I shared how to hand print hearts on your jeans and we recieved many requests for a patch tutorial! I asked Amanda to show you how she would do it in this next feature.... Enjoy!
Wardrobe Revamp: 7 Fashionable Craft Projects
Today is the day I know you've all been anxiously awaiting: the premiere of Season 9 of Project Runway! (I know, new episodes of both PR and Design Star! Time to make some room on the DVR!)
Sun Jar DIY – Do it Yourself Sun Jar
UPDATE: This post originally ran on March 23 2011, but with summer winding down we wanted to bring it back up for some late summer inspiration! a fellow fp girl sent this to me a couple weeks back and i’ve been thinking about it ever since! i can think of a million reasons why these would be awesome… as apartment décor, as outdoor party décor, and – wouldn’t they be the best thing EVER for camping in general or at a festival? just let them sit in the sun all day, and they’ll last all night! i am absolutely going to make some to bring with me to bonnaroo this year.
inspiration and realisation: DIY Fashion + Home: DIY round-up: 34 revamp t-shirt tutorials
If you enjoy t-shirts as much as I do, and you enjoy revamp the basic plain tee into something more fun: you've got 34 ideas & tutorials all in one place today!
Joyful Ruffle Neck Top – Tutorial
Last week I showed you the top I made for my MIL’s B-day, remember? Well today is My Mom’s B-day! So Feliz Cumpleaños Mamá!!
25 Handmade Gifts Under $5
If your gift list is long and your budget is small here are some great Handmade Gifts that you can make. Keep in mind that handmade items are not just beautiful but special…
Sew, Cook, Laugh and Live: Lots of lace. My new no pattern required top! A tutorial
Ok, so I finally have the pics to prove that I have been doing some sewing! Here is my new “no pattern required” top. It really is so quick & easy to make a top like this. I didn’t even need to use the overlocker! I just used a zig zag stich to finish the edges as I think that sometimes, an ovelocked edge, can be too visible through lace.
The Forge: {she made it} jersey weave sweatshirt
did you all have a good weekend? we pretty much got snowed in so during nap time I thought i'd scratch this little diy off my to-do list... This was the inspiration for this diy. i've had it pinned on pinterest for an eternity. so when I came across $3 sweatshirts at wal-mart the other day i felt like it was just meant to be. i resisted grabbing more than two (i am so bad when it comes to good deals) brought them home and gave them both a good wash and dry. the other one is white and i already have something in mind for it... like it?
25 DIY Handmade Gift Tutorials Part 2
I love handmade gifts! I love to give them, I love to receive them, I love to make them. In our home May is a crazy month! We have Mother’s Day, our Anniversary and not just one but 2 birthdays.