
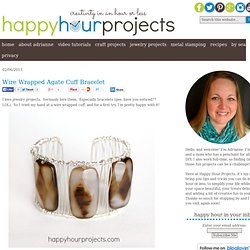
Wire Wrapped Agate Cuff Bracelet. I love jewelry projects.
Seriously love them. Leather bracelet tutorial by lebenslustiger.com, Anleitung für ein Lederarmband von Lebenslustiger.com. It is really fall now over here in northern Germany.
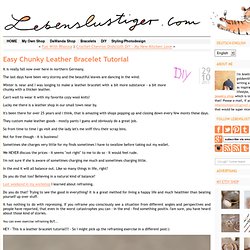
The last days have been very stormy and the beautiful leaves are dancing in the wind. Winter is near and I was longing to make a leather bracelet with a bit more substance - a bit more chunky with a thicker leather. Can't wait to wear it with my favorite cozy wool knits! Lucky me there is a leather shop in our small town near by. It's been there for over 25 years and i think, that is amazing with shops popping up and closing down every few monts these days. Bottle Bracelet. It seems like forever since I did an upcycle DIY project, so I'm very excited to share this new one with you!
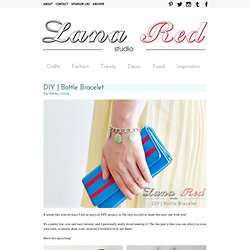
It's a pretty low cost and easy tutorial, and I personally really loved making it! The fun part is that you can alter it to your own taste, so please share your creations I would love to see them! DIY: Jump Ring Bracelet. Yesterday, I shared a photo of my bracelet on Instagram, and I said the tutorial was coming soon.
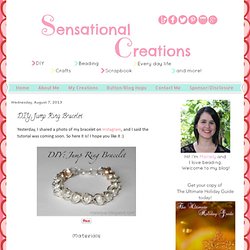
So here it is! I hope you like it :) Materials Jump rings. DIY: Pearl Bracelet. I absolutely love handmade jewelry!
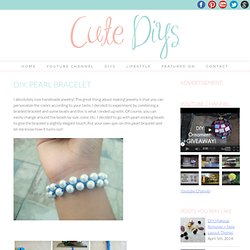
The great thing about making jewelry is that you can personalize the colors according to your taste. I decided to experiment by combining a braided bracelet and some beads and this is what I ended up with. Of course, you can easily change around the beads by size, color, etc. I decided to go with pearl-looking beads to give the bracelet a slightly elegant touch. Easy & Cute Heart Bracelet. DIY Necktie Bracelet - Morning Creativity. Neckties with stains doesn´t look good, but you can give them a new life as bracelets!
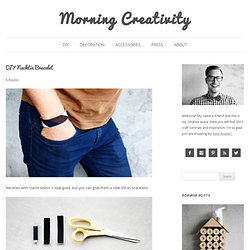
Supplies: A necktie, a pair of scissors, velcro (both hook & loops), a needle and some thread. 1. First, measure your wrist and then use a pair of scissors and cut the piece from the tie you want. Cut out a small square of both velcro hook and loops and place them on each end of the tie strip though on opposite sides. 2. Although the velcro came with tape, I still want to sew it to the tie strip to make sure the velcro don´t come off every time I take the bracelet off. 3. How to Repurpose Old VHS Tapes: 5 steps (with pictures) Edit Article Edited by Renette Sinata, Teresa, Flickety, Krystle and 1 other BookendsPackagingJewelryWall artScarecrowFunky wig VHS tapes––if you know what they are, it's possible you've got quite a few stashed somewhere at the bottom of a cupboard, awaiting tossing or… something!
If you're the crafty type, there are some really cool things you can do with these archaic icons. How To Tuesday: My Sweet Josephine. 28Jun/11 After seeing Kristin's friendship bracelet giveaway on Idle Wife, I've hauled out my old bracelet books and thread from when I was a kid.
Naturally I've been furiously making all sorts of bracelets. After making six friendship bracelets in two days I decided I needed a new pattern. Following an extensive google session I found these beautiful recycled t-shirt bracelets and vowed to make them my own. Celine Inspired Knot Bracelet. I have been lusting over the Celine Knot bracelet for months and have been extremely unlucky in finding it.
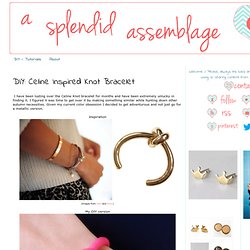
I figured it was time to get over it by making something similar while hunting down other autumn necessities. Given my current color obsession I decided to get adventurous and not just go for a metallic version. Inspiration. Popsicle Stick Bracelets: DIY Tutorial. This month's Etsy Fort Worth Upcycle THIS!
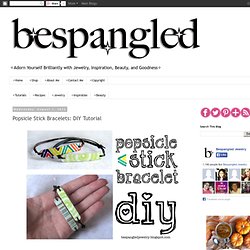
Craft Challenge 'secret ingredient' is popsicle sticks. I have been making popsicles like crazy (and eating them like crazy) so I could use the sticks for this project...you know, so they would be officially 'upcycled'. I'm really excited about the way these cute little bracelets turned out, and I can't wait to show you how I made them! TOOLS & SUPPLIES: • popsicle sticks (1 stick will make 2 bracelets) • craft knife • ruler • power drill with 1/32" drill bit • fine sandpaper (120-240 grit) • round needle file (optional) • container with water • wide rubber bands • cylindrical drinking glass (around 3" in diameter) • paintbrush • toothpick •Krylon Crystal Clear gloss finish spray (optional) • 32" 1mm leather or cord (cut into 2 16 inch pieces) • acrylic paints • *scrapbook paper (small scraps, at least 3/4" x 2 3/4") • *Mod Podge * You can either paint the wood with your own special design, or decoupage using the scrapbook paper and Mod Podge.
...love Maegan: DIY Bracelets & Anklets: Rose Gold Chain and Copper Wire Initials and Hearts w/Pearls Fashion + DIY + Lifestyle. On a hunt for some chunky curb chain to use for another DIY project I had in mind, I found and bought this very thin copper chain of the same shape but very tiny in size. While it’s not right for the original project I had in mind, I think it’s lovely all the same and looks really pretty next to the copper wire I found at the hardware store a few weeks ago.
The delicate bracelets and anklets are surprisingly sturdy, even with just bent copper and no closures. I added the pearls for contrast, but it’s entirely up to you… Here’s what you’ll need… * Rose gold chain I used 3.6mm Flattened Curb Chain* 20 gauge Copper wire* Wire cutters* Faux pearls * Use your wire cutters to snip off a few inches of copper wire. * String a few pearls or beads on, because it’s easier to do it before you create your design — and make sure your ends are curved in.
DIY / Cassette Tape Bracelet. Boys’ Hardware Accessories. DIY Macrame Bracelet. Growing up by the beach in Southern California, the ability to knot a macrame bracelet was practically a right of passage. Although those days are long behind us, we’ve never forgotten the ever-so-simple square knot technique. This time, however, we’re replacing hemp and wooden beads for more updated elements like colorful nylon cord and glossy metal charms.
Happy knotting! You’ll need: Start by cutting the knotting cord into two 30 inch, two 20 inch and one 10 inch lengths. Center the 30 inch cord under the two middle strands. Pull tightly and slide the knot up to the top. Finish the 2nd half of the square knot by folding the left cord over the middle strands and under the right cord. Pull tightly and repeat the steps – left, right, left, right . . .
To finish the knots, thread one of the cords onto a needle and sew up the center of 3-4 knots along the backside. Repeat the same step on the other cord. After sewing up both knotting cords, trim away any excess. Henry HappenedHenry Happened. Como hacer un conjunto pendientes y pulsera con papel de aluminio y botella de plástico. Descargar en PDF Translate to English Hola a todos, hoy os comparto otra idea muy barata y sencilla para hacernos una pulsera y unos pendientes. Son ideales también para hacer con niños y para el día de las madres o para hacer un regalito Antes de comenzar, deciros que si podéis guardéis los envoltorios de las chocolatinas, caramelos y bombones porque tienen colores muy bonitos que nos pueden servir ya que quedan muy originales.
Aquí véis los pendientes y después la pulsera. How to Turn an Empty Water Bottle Into a Stylish Cuff Bracelet. Photography by Carlo Mendoza This simple craft idea is a great way for your wee ones to put those empty plastic water bottles to good use, while adding a little extra flair to any outfit. We love that it’s quick, easy and oh-so budget friendly.
What you’ll need: • Plastic water bottles • Scissors • Fabric • Fabric markers (optional) • Craft glue Directions: 1. Cut of the top and bottom of the water bottle (Smartwater bottles work the best) until you have one large smooth piece. 2. For more great wearable craft ideas, check out this necktie headband and these stackable t-shirt bracelets. Bracelets From Plastic Water Bottles. Featured by Craftgawker on 8/16/12 (link). This one was quite a learning curve. I’ve seen a fair amount of water bottle / soda bottle bracelets and figured it couldn’t be too hard. This is what not to do: 1) use Mod Podge, 2) try using heat to seal it, unless you’re better with an extinquisher than me; 3) use paint on any item that’s likely to spring back towards you when you let it go, unless you want paint all over you; 4) work in an area heavily contaminated with animal fur; 5) wait till after you’ve made the bracelet to think about closures.
Having put all that to one side this is what did work: Plastic bottles are surprisingly resistant to being cut, due mostly to their ability to squirt out of your hand while trying to grip them. You want two of these of the same size. Then you get a bit of duct tape: I recommend the newly available sheets rather than the rolls. At this stage you can open the bracelet like a book. Wrapping a Bracelet.
Upcycle: Leather belts, purses and jackets! Thrift stores are full of old leather belts, jackets and purses that are so far out of style / size / this decade (!) That no one really wants them. So they're often insanely cheap.