
SoulSamurai: Manly Knitting II: The Return. I've spent some time experimenting with different ideas, and I've figured out a way to solve the problem I had with my watch strap, namely that it was very difficult to push the watch buckle's prong through the strap to close the buckle.
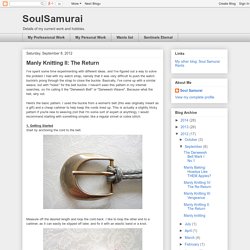
Basically, I've come up with a similar weave, but with "holes" for the belt buckle. I haven't seen this pattern in my internet searches, so I'm calling it the "Derweesh Belt" or "Derweesh Weave". Because what the hell, why not. Here's the basic pattern. I used the buckle from a women's belt (this was originally meant as a gift) and a cheap carbiner to help keep the cords lined up. 1. Measure off the desired length and loop the cord back. Bring the two strands back to the buckle. 2. Now tighten: hold or anchor the spine strands and pull the woven loops towards the buckle while pulling the weaving strands to remove the slack. 3. As you can see the weaving strands have now crossed sides. 4.
Фенечка-косичка. Привет!
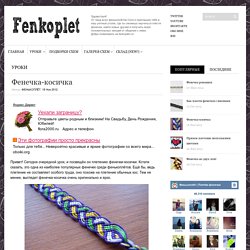
Сегодня очередной урок, и посвящён он плетению фенечки-косички. Кстати сказать, это одна из наиболее популярных фенечек среди фенькоплётов. Ещё бы, ведь плетение не составляет особого труда, оно похоже на плетение обычных кос. Тем не менее, выглядит фенечка-косичка очень оригинально и ярко. Фенечку-косичку можно плести из прядок разных цветов, оттенков или цветов в окантовке. Итак, для начала возьмём 12 нитей по 1 м каждая. Перед началом плетения первую и вторую прядь нужно «перемешать». Теперь начнём плести. Следующий ряд будет состоять из таких же узлов вправо, но мы не трогаем крайние нитки.
Следующий ряд — откладываем по две крайние нити (связываем третью и четвёртую, пятую и шестую). Теперь откладываем зелёную прядку и вспоминаем про серую. Те же нитки оплетаем и остальными тремя нитками серой прядки. Теперь отложим жёлтую прядку. DIY,leather wrap bracelet full tutorial,Lederarmband Anleitung,Chan Luu wrap bracelet tutorial. Hi there!
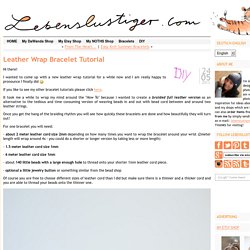
I wanted to come up with a new leather wrap tutorial for a while now and I am really happy to pronounce I finally did If you like to see my other bracelet tutorials please click here. It took me a while to wrap my mind around the "How To" because i wanted to create a braided full leather version as an alternative to the tedious and time consuming version of weaving beads in and out with bead cord between and around two leather strings.
Once you get the hang of the braiding rhythm you will see how quickly these bracelets are done and how beautifully they will turn out! For one bracelet you will need: - about 2 meter leather cord size 2mm depending on how many times you want to wrap the bracelet around your wrist (2meter length will wrap around 4x - you could do a shorter or longer version by taking less or more length) DIY Leather Wrap Bracelet. More info and instructions about this great tutorial you can find in the source url - above the photo.

DiyAndCrafts.com is a collection of the best and most creative do it yourself projects, tips and tutorials. Sweet lemonayde: Wrap Bracelet Tutorial. Breezy Friendship Bracelets. The best summer project around?
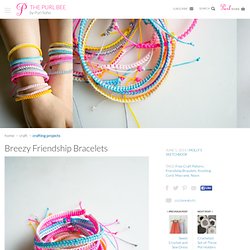
Friendship bracelets... So portable, so cute and so easy! And you don’t need to be intimidatingly crafty to make them. In fact, even if you have two left thumbs, these Breezy Friendship Bracelets are perfectly do-able. Over the past few years, we have featured several knotted bracelet designs here on the Bee (click here to see them all), but this season's version is the easiest and breeziest. The Breezy Friendship Bracelets also have a new streamlined, adjustable closure for easy on and off. (1) macrame how-to. How to Make A Macrame' Bracelet (or Necklace) Taking a long road trip this summer?
Well, we know how boring those can be. That's why we're gonna show you how to make some awesome hemp bracelets. It'll keep you awake and you can keep the driver awake. Plus, hemp is for both guys and girls, so guys, get our your hemp too and let's get ready to hit the road! For more how to's, be sure to subscribe to our show on iTunes and stop by our website, Threadbanger for more tips and tricks on DIY fashion. 1. 2. 3. DIY Woven Bead Necklace: Le.Fanciulle. After a little inspiration from Diva (seen in this post), I decided to try out something similar with a whole lot of beads I bought (initially reserved for S and my craft day, but I couldn't wait that long...
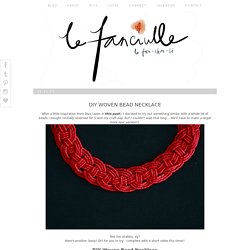
We'll have to make a larger more epic version!). Not too shabby, ey? Here's another (easy) DIY for you to try - complete with a short video this time!! DIY Woven Bead Necklace Step 1: Rustle up your bits and pieces. Step 2: Time to weave! Separate your hank into 4 equal parts, then lay them out flat, taping them to the table. It should look something like this if you use 4 strands! Step 3: Once you've finished the weave, it's time to secure the ends. Step 4: Attach one of those hooky things, then thread the pen nib on to hide the ugly knot!
Et voila! Style it with a button-up shirt, with the necklace just peeking out from below :) xx T.