D.I.Y: Recycled T-Shirt Scarf // Gettin' Crafty!
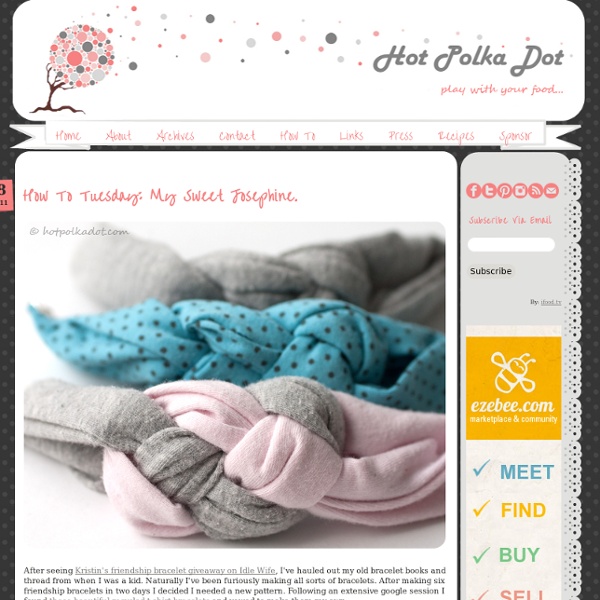
D.I.Y: Recycled T-Shirt Scarf 1} Gather a few old t-shirts you don't wear anymore; thrift them or buy new -- but choose thin, soft (preferably worn out) t-shirts. Find two t-shirts of different colors that go well together. 2} Lay the shirt flat on the table or floor. 3} Cut 1 1/2 inch strips, remove the hemmed edges. Cut them as long as possible; I went from the bottom of the front of the shirt all the way to the end of the back on some pieces.
V and Co how to: shag pillow
*no animals or plants were hurt in the making of this project. *one really stupid person did get hurt in the making of this project, but she would like to mention that even though the needle penetrated...no swear words passed her lips. it's was a modern day miracle. i love how this pillow turned out. i made it in green for two reasons: 1. it's still kind of cold here, and still kind of brown...will be for a little bit longer so i wanted some GREEN and springy looking happiness in my home. 2. it's the only color of jersey i had on hand, and living in the middle of nowhere doesn't let me just jump in the car and go to a store that i can find jersey fabric at (which btw this fabric was found at jo-anns but i would suggest amazon if you can't find what you are looking for, that's where i get a lot of mine when i can't find stuff) now lets get started: cutting:
Grandma's Garden- Crayon Art
It's hard to find a good present for our grandma (actually, she's my mom, but Anya's grandma). "I have everything," she says always. Ok, we will not buy a present, we will make it! My mom has a beautiful garden in Russia.
Anastasia Drawing & Dreaming: visiting Koskela
Mel and I visited Koskela's Sydney showroom after the Horses Birthday Fete , a couple of months ago. The industrial space flows on from Megan Morton's studio and 'The School' as well as'Kitchen by Mike' restaurant which opens up into the courtyard. Its very impressive!
Project 21 Week 23 – Crayon Alphabet
I have been really excited about this project for a while, ever since I spotted it here. I thought this was the cutest idea, and immediately rushed off to research where I could find nice cheap shadow boxes and crayons. Flash forward a few weeks once I had assembled all my supplies, and this is what you get: I chose the letter B to start in honor of my little guy Basel, my adorable long-haired dachshund puppy.
The Boy Trifecta: The Grandview Bag Tutorial Part 2 - el fin
I know on Wednesday I said I'd have this up "tomorrow", but it's still technically Thursday SOME places, right? That counts. Ok, so when we left off, we had finished the first pleat and first ruffle. Lets keep going.
Sweet DIY Votives
Here’s what you’ll need: 1. Measure the height and circumference of your jar, and cut strips of fabric to roughly fit (approx. 1cm wide – doesn’t have to be perfect). 2. In your small cup, pour in some glue and dilute it with a bit of water (about 1:2), mix well. It should be the consistency of slightly thicker water.. yes, I know I’m being vague but it shouldn’t make much difference to the end result. 3.
The Gramophone [Funnelophone]
Acoustic amplifiers are pretty cool, but my favorite style is the Gramophone ... they just look cool ... especially when real metal horns are used. That being said, have you seen the asking prices for these creations? I thought the $185 model on Etsy was painful ... until I saw another for $495 ... OUCH! I briefly looked online for metal horns, but those were starting at $50. I then tried to source a horn from a friend, but he rescinded permission to "borrow" it once he learned of my plans to "mutilate his instrument."
For bhavya, with love
My little sister has this empty wall in her apartment that she wanted something for. I know she loves bright colors (especially red) and I decided to put together something fun and whimsical that she can play around with. It took me only a couple of hours to run to the store and pick out the fabric, hoops and stretch and hang this lovely piece. And the best part is that she will have a ton of fun placing the hoops in a dozen different ways and finding out what works for her the best :)
Denim Sunburst Textile Art
Here is one of my projects that was featured on Craftgawker a while back: Denim Sunburst Textile Art The process of making the wall hanging is very simple, yet very time consuming. I simply cut old denim jeans into small rectangular pieces of all different sizes.
wine cork stamps « home sweet homemade
The other night I was sifting through the greeting cards I’ve received through the year to use the pretty fronts for making Christmas tree ornaments. Soon I had a pile of discarded plain backs. Whatever could I do with these to avoid the dreaded recycling bin? Hmm. How about applying some pretty stamped designs? And use them for more Christmas tree ornaments!