
Raspberry Pi Documentation. Power Up Your XBMC Installation with These Awesome Add-Ons. Genesis Addon for XBMC & Kodi. Genesis Description: Visit TVADDONS.ag for support Forum:Source:Website:Download: Get Addons for Kodi You can easily install any of the addons listed here in one click to your Kodi by using the Addon Installer tool, which is essentially an app store for Kodi, but everything's free.
Disclaimer Kodi is a registered trademark of the XBMC Foundation. Navi-x - Media Streaming Addon for XBMC & Boxee. REPOSITORY MOVED TO Download the TVADDONS.ag Repository to Stay Updated!

DISCLAIMER: Navi-X is not connected to or in any other way affiliated with XBMC, Team XBMC, the XBMC Foundation or Team Little Black Box. Furthermore, any software, addons, services or products offered by Navi-X will receive no support in official XBMC channels, including the XBMC forums and various social networks. An Installation Guide. [UNSUPPORTED] Advanced Launcher - Applications Launcher Addon for XBMC. Last Version : 2.5.8 (Helix, Gotham, Frodo, Eden & Dharma) forkable on GitHubThis add-on is no more supported.
![[UNSUPPORTED] Advanced Launcher - Applications Launcher Addon for XBMC](http://cdn.pearltrees.com/s/pic/th/unsupported-applications-102360488)
Advanced Launcher allows you to start any Linux, Windows and OS X external applications (with command line support or not) directly from the Kodi GUI. Advanced Launcher also allows you to modify and reorganize all your kODI favourites stuff as you want. Finally, Advanced Launcher gives you the possibility to edit, download (from Internet resources) and manage all the meta-data (informations and images) related to these applications and favourites. screenshot 1 : Advanced Launcher's items information display with Cirus Extended v3 skin.screenshot 2 : Nintendo DS launcher using DeSmuME emulator (Windows) with Metropolis skin. Addon Features : screenshot 3 : Pc games launcher using .lnk files support (Windows) of Advanced Launcher with Cirrus Extended skin.screenshot 4 : Comics reader launcher using qcomicbook application (Linux) with .cbr files with Aeon Nox skin. Version 2.5.8.
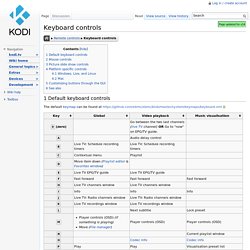
Keyboard controls. 1 Default keyboard controls The default keymap can be found at 2 Mouse controls 3 Picture slide show controls 4 Platform specific controls 4.1 Windows, Live, and Linux ⊞ Win (Windows key): Contextual menu 4.2 Mac.
Turn Your XBMC Media Center into a Video Game Console. Pi Jarvis is coming together! : raspberry_pi. Raspberry Pi Jarvis. How I built a. This is an all in one desktop computer, based on the Raspberry Pi.
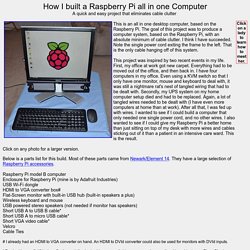
The goal of this project was to produce a computer system, based on the Raspberry Pi, with an absolute minimum of cable clutter. I think I have succeeded. Note the single power cord exiting the frame to the left. That is the only cable hanging off of this system. Gaming and Emulators for the Raspbery Pi. BerryBoot v2.0 - bootloader / universal operating system installer. For people short on SD cards: Berryboot is a simple boot selection screen for ARM computers like the Raspberry Pi, that allows you to put multiple Linux distributions on a single SD card.
In addition it allows you to put the operating system files on an external USB hard drive instead of on the SD card itself. Download link Berryboot for the original Raspberry Pi and Pi Zero: berryboot-20160209-pi0-pi1.zip sha1sum: f8cfc1b4f57e0b6886569091ca7e277d33ffee0f Download link Berryboot for the quad-core Raspberry Pi 2 and Pi 3: berryboot-20160930-pi2-pi3.zip sha1sum: 7f44898dcca58cd4c1562273a44121c90e3543ab To install: extract the contents of the .zip file to a normal (FAT formatted) SD card, and put it in your Raspberry Pi. This can be simply done under Windows without any special image writer software. If your Pi is connected to the Internet BerryBoot will try to detect your location based on your IP-address, and set the right timezone automatically.
Raspberry Pi as low-cost HD surveillance camera. S Raspberry Pi Lesson 11. DS18B20 Temperature Sensing. Options for using Raspberry Pi for Digital Signage. Posts about using the $35 Raspberry Pi for a digital signage project tend to generate a lot of reader interest, and some work I’ve been doing has required me to poke around a bit to see what all is out there.
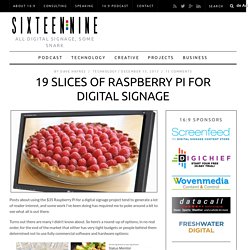
Turns out there are many I didn’t know about. So here’s a round-up of options, in no real order, for the end of the market that either has very tight budgets or people behind them determined not to use fully commercial software and hardware options: Screenly WireLoad – which has developers in the UK and Sweden – says its Screenly content management service is free for open source developers and $10/month for a Pro version you don’t have to be a nerd to use. Raspberry Digital Signage: easy digital signage with a Raspberry Pi. Raspberry Digital Signage is an operating system designed for digital signage installations on the Raspberry Pi, which can handle both web and multimedia content.
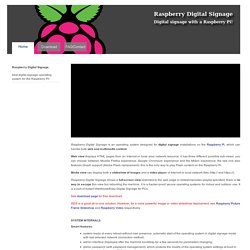
Web view displays HTML pages from an Internet or local area network resource; it has three different possible sub-views: you can choose between Mozilla Firefox experience, Google Chromium experience and the Midori experience; the last one also features Gnash support (Adobe Flash replacement): this is the only way to play Flash content on the Raspberry Pi. Media view can display both a slideshow of images and a video player of Internet or local network files ( and Raspberry Digital Signage shows a full-screen view restricted to the web page or slideshow/video playlist specified; there is no way to escape this view but rebooting the machine.
It is a hacker-proof secure operating systems for indoor and outdoor use. The RetroPie Project. Update 6.4.2016: RetroPie got a dedicated website.
You can find it at We keep this page solely as “historic” document about the beginnings of RetroPie. The content of this site is not up-to-date anymore and documents how RetroPie was presented during its very beginning. Welcome to the RetroPie Project. This page provides information about all the pieces of the projects, the goals and should give you an understanding of what the RetroPie Project is. The RetroPie Project started with the idea of turning the Raspberry Pi into a retro-gaming console and evolved ever since. Pictorial Buying Guide for A, B and B+ Started by Abishur, re-written by MahjonggThere have been some people asking for a comprehensive buying guide… apart from the one on the wiki apparently So here is an unofficial pictorial buying guide.
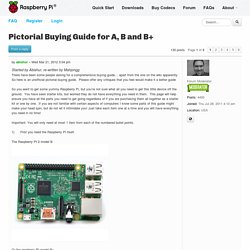
Please offer any critiques that you feel would make it a better guide So you want to get some yummy Raspberry Pi, but you’re not sure what all you need to get this little device off the ground. You have seen starter kits, but worried they do not have everything you need in them. This page will help ensure you have all the parts you need to get going regardless of if you are purchasing them all together as a starter kit or one by one. If you are not familiar with certain aspects of computers I know some parts of this guide might make your head spin, but do not let it intimidate you! Important: You will only need at most 1 item from each of the numbered bullet points.
Amazon.co.uk. How to install XBMC / Kodi on to a RetroPie setup : raspberry_pi. Solar Powered Raspberry Pi. Turn a Raspberry Pi Into an Ad Blocker with a Single Command. Raspberry%20Pi%20-%20Dimensions%20A4%20Sheet%20-%20Jude%20Pullen.pdf.