
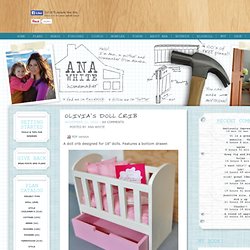
Build An Olivia’s Doll Crib. PDF version.
Build A Wood Dress Up Storage Rack. PDF version Creating a dress up center for your little princess (or prince) is easy with these straight forward plans.
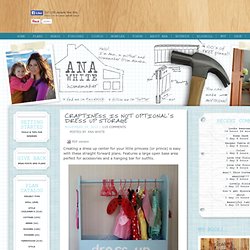
Features a large open base area perfect for accessories and a hanging bar for outfits. Handmade from this plan >> Dimensions Dimensions: 36" x 36" x 12" Materials and Tools Shopping List: Build Wood Bunk Beds For AG & 18" Doll. Today was my daughter's friend's birthday.
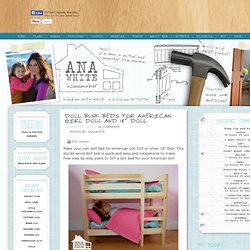
The Birthday Girl has been talking quite a bit about getting her first American Girl doll, so Grace and I thought we'd make her a bunk bed. Free Wood Doll Bed Plans - Jeff Greef Woodworking. Build A Wood Doll Farmhouse Bed Tutorial.
Barbie. Cloth Doll Sewing Patterns. 18 DIY Toys, Stuffed Animal Patterns & More: How to Make Games for Kids. There are currently no images from other crafters. close Terms & Conditions You must enter into this Agreement if you want to submit digital images or other content to Prime Publishing through Sharing Customer Images (the "Service").

As used in this Agreement, "we" or "Prime Publishing" means Prime Publishing, LLC. and "you" means the individual or entity submitting materials to Prime Publishing. Any individual or entity that wants to use the Service must accept the terms of this Agreement without change. Dollhouse Printables. DOLLSHOUSE. Free Stuffed Animals/ Softies Projects. Sock Animals: Free Patterns & Tutorials for Sock Monkeys, Puppy's, Pigs & More. Baby Bib As A Horse Blanket. Intro To Scale for Dollhouse Miniatures - Video. Sock Monkey. How To Sew Sock MonkeySewing Pattern: Download pattern here.
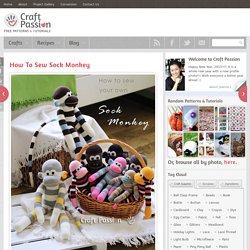
It contains the eyes, ears and pattern for drawing the sock.Materials: Make: 1 (adult size) 1. Sock (crew length), 1 pair (I used striped sock so that it is easy to get the alignment right.) 2. White felt 3. Button eye 7/16″ [11.5mm], black, 2 (for toddler monkey, use 3/8″ button) 4. Embroidery Floss, yellow 5. Preparation Prepare all the materials needed as described above. Turn the sock to wrong side, align sock as per photo below. Draw pattern on the sock with erasable fabric marker. WHIMSY LOFT. This is a very simple Tutorial to make a Sock Owl.

I’m using the leggings sock… the one that goes from your ankle up to your knees. See photos below from left to right. Measure 5″ from the rubber and cut. We only need this part, the rest can be kept for other toys ;-). Turn the sock around and sew a straight line on the rubber part. Ones done, go to the other side (where we cut just now), and fold the opening into 3 section like the photos. The section that I am holding in the photo is about 1 cm and it’s the tail of the owl. Then continue to sew the other section (the legs sections should be longer that the tail). Make A Castle Out Of Felt & Cardboard. I am a big fan of handmade toys.

This castle and tower are made of felt, embroidery thread, scrap cardboard and an oatmeal canister. I got my felt on sale. My total cost: four dollars! Assuming you already have a 50 cent skein of embroidery floss and the scrap cardboard on hand, you too can make this for almost nothing! How recession friendly is that?! The lighter colored castle in the photos is about eight years old and has stood up unbelievably well over time. How To Make A Fabric Dollhouse Video Tutorial. Fabric Dollhouse Tutorial. I made my daughter a fabric barn for Christmas and several people asked me for a tutorial.
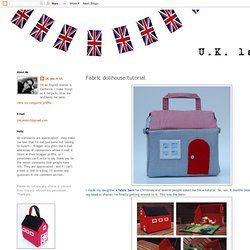
So, um, 8 months later (yes, I'm hanging my head in shame) I'm finally getting around to it. This was the barn: This time around I wanted a smaller, lighter version, that my kids could carry around. The barn was made of plywood, covered in batting and fabric. For this version I'm replacing the wood with plastic canvas (the plastic sheets sold at craft stores for doing cross-stitch on) . What you will need: ..........:: Fabric for the interior: 9 inches by 21 inches and two pieces 6 inches by 9 inches (I'm being generous with the seam allowances here, as the actual size needed will depend on which batting you use) Pocket Peggy House Tutorial. Well, at first I really was stumped when it came to scraps.
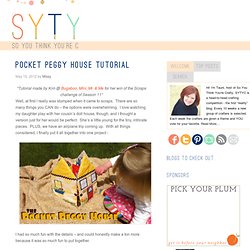
There are so many things you CAN do – the options were overwhelming. I love watching my daughter play with her cousin’s doll house, though, and I thought a version just for her would be perfect. She’s a little young for the tiny, intricate pieces. PLUS, we have an airplane trip coming up. With all things considered, I finally put it all together into one project - I had so much fun with the details – and could honestly make a ton more because it was so much fun to put together. Before you start assembling anything, you’ll need to cut out squares for your walls and triangles for the roof.
Which pieces of scrap compliment each other the best? After perusing your scraps and planning the walls and roof, you can start cutting the base pieces. Felt Fairy House Tutorial. This little fairy house was an impromptu sewing project for two sweet girls (sisters) we were lucky enough to meet for a play date this afternoon.
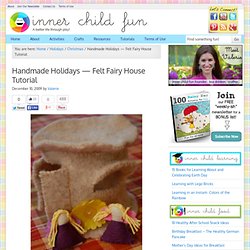
In mind was this fairy house from Imagine Childhood. Ours was made from this felted wool sweater, some other pieces of felt, a tiny bit of yarn, some buttons, and a few flowers from a lei kit. It was a great hit with the girls, and of course it was super-frugal (and fun) to make! First, cut out your pieces of felt from a felted wool sweater. If you don’t know how to felt a wool sweater, click here. Next, pin the rectangular piece around the circle piece as shown.