
How To: Make a Fitted Sheet. My baby is growing up, Sob!
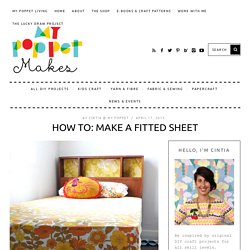
Emma has grown out of her toddler bed and has graduated to a single bed (you call them twin in the States). We were lucky to enough to inherit this cool vintage one from a family member in great condition. I didn’t have any single size bedding so rather than hitting the stores, it was the perfect opportunity to make use of all those thrifted vintage sheets I’ve been collecting, the only hitch was vintage sheets are all flat, which is a pain in the backside. No drama, with a few easy steps, all flat sheets can be converted to practical fitted sheets. Make an Enderman Plushie from Minecraft. Hello, in this Instructable I'm going to try to teach you how to create your very own Enderman plushie.
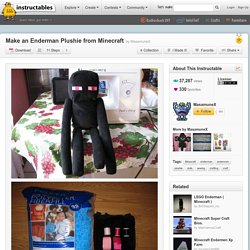
You will also be able to apply these same techniques to create other Minecraft creatures and quite possibly, unforgettable holiday moments. Here is a list of the materials that I used. Surely you can substitute these for other brands, quantities, and types of materials. . ***Unfortunately I discarded the receipt which had the item numbers for the Fuscia and Pink ribbons that I used. Also I already had light pink thread so you will have to match the ribbon colors and thread to the best of your abilities Materials List (most of my items were purchased at Joann Fabrics which always have coupons which you can use to drastically bring down the prices of these items) TUTORIAL: Straight Sided Triangular Cosmetic Bag. OK.
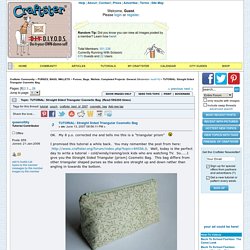
My 8 y.o. corrected me and tells me this is a "triangular prism" I promised this tutorial a while back. You may remember the post from here: Well, today is the perfect day to write a tutorial - cold/windy/raining/sick kids who are watching TV. So.....I give you the Straight Sided Triangular (prism) Cosmetic Bag. This bag differs from other triangular shaped purses as the sides are straight up and down rather than angling in towards the bottom. Friday Finds – A list of 30+ free tutorials and patterns for wallets and pouches. Staying with the theme of the last few weeks Friday ‘lists’ today I bring you a collection of free tutorials and patterns for wallets, pouches, clutches and purses.
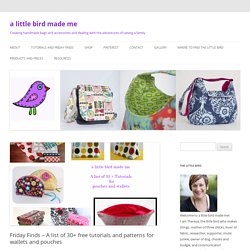
With the wonders of the English language what is considered a ‘purse’ in some countries is a ‘wallet’ in others, and a ‘tote’ in others. No wonder some non-English speakers struggle to learn to speak English fluently – many English-as-a-first-language speakers have the same trouble! I love little purses/pouches/wallets. A Tutorial - How to Draft a Pattern and Make a Zippered Purse with a Flat Bottom. Fusible Fleece Knitting Project Bag — Therm O Web. The new year is a time to get organized right?
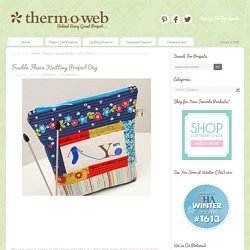
It’s Amy here today from During Quiet Time, sharing a Knitting Project Bag. It’s a convenient and super cute way to tote your latest knitting project and keep it organized; pattern, yarn and needles all in one place! Let’s get started! To begin, I fussy cut this cute “Yarn” print from an alphabet panel. I used SpraynBond Basting Adhesive to hold it in place on a 15″ square piece of StitchnSew Sew In Fleece. I used the popular “quilt as you go” technique to piece the front of the bag. With right sides together, I stitched a piece along the upper edge. Next, I quilted this piece. I continued working in this manner, working around the center block in a log cabin quilting style till the front of my fleece was nearly covered. Project Bag Obsession » the pretty little fiber co. I don’t sew very much.
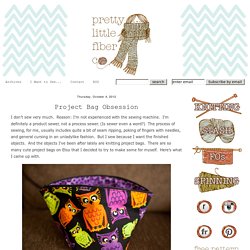
Reason: I’m not experienced with the sewing machine. I’m definitely a product sewer, not a process sewer. (Is sewer even a word?) The process of sewing, for me, usually includes quite a bit of seam ripping, poking of fingers with needles, and general cursing in an unladylike fashion. But I sew because I want the finished objects. Zippered Pouch Tutorial. It’s November and that means Christmas is coming.
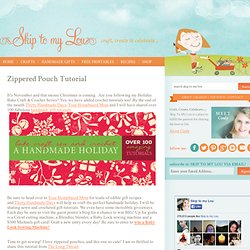
Are you following my Holiday Bake Craft & Crochet Series? Yes, we have added crochet tutorials too! By the end of the month Thirty Handmade Days, Your Homebased Mom and I will have shared over 100 fabulous handmade gift tutorials. Be sure to head over to Your Homebased Mom for loads of edible gift recipes and Thirty Handmade Days will help us craft the perfect handmade holiday. I will be sharing sewn and crocheted gift tutorials. Triangle Zipper Coin Purse. If you look closer to the main photo, I sewed 2 different positions for the zipper, one on the triangle slope (left) and one at the center of the triangle (right).
Both of them are basically made from the same method, the only different is how to sew the sides of the purse (step-by-step photo #14). Triangle Zipper Coin PurseMaterials: 1. Fabric – 2pcs. of 5″ x 5″ 2. Lining fabric – 2pcs. of 5″ x 5″ 3. Zipper end covers – 2pcs. of 2″ x 1 1/2″ 4. Cut fabrics & batting according to the dimension above. Draw a diagonal line on the center of the fabrics with ruler and erasable fabric marker. Pin batting on the wrong side of the fabrics. Stitch diagonally on the right side of the fabric with sewing machine.
Finished diagonal quilting on both sides of the purse fabrics. Cover both zipper’s ends with the 2″ x 1 1/2″ fabrics. A Renegade Tote Bag Tutorial – Happy Birthday, Carol! A Renegade Tote Bag Tutorial – Happy Birthday, Carol!

Last summer I posted a popular DIY Summer Totebag with a link to the tutorial I used. WHAT IS THAT YOU SAY!!!???! That tutorial is no longer available!!??! Cuddle Baby Self-binding Receiving Blanket. Hello fellow Cuddle fabric lovers!
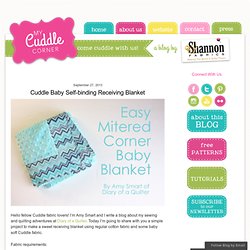
I’m Amy Smart and I write a blog about my sewing and quilting adventures at Diary of a Quilter. Today I’m going to share with you a simple project to make a sweet receiving blanket using regular cotton fabric and some baby soft Cuddle fabric. Fabric requirements: Baby Bunch Bouquet - Martha Stewart Kids' Crafts. Droopy Ear Sock Bunny. As promised in my previous sock bunny sewing tutorial, here comes the kawai-i version – the “Droopy Ear Sock Bunny”. This bunny can sits on its own, it is great as toy for kid and as well as for home decoration. Hope you like it and made some for your loved ones. Carolina Patchworks · Curved Piecing Tutorial: The I-have-way-too-many-quilts-to-make-and-too-many-deadlines-and-have-no-time-to-pin-because-I-need-these-done-yesterday Method.
Today’s post is part of the Pile O’ Fabric Totally Groovy QuiltAlong! Welcome to my I-have-way-too-many-quilts-to-make-and-too-many-deadlines-and-have-no-time-to-pin-because-I-need-these-done-yesterday Method of curved piecing. In general, people seem to be terrified of curves in quilting. So one of my earliest patterns was Scrappy Circles which allows for some, ahem, errors in your curved sewing as well as sewing curves without pins. It’s a great practice for more precise curved sewing. Easter Egg Cross-Stitch Towel. There are currently no images from other crafters. close Terms & Conditions You must enter into this Agreement if you want to submit digital images or other content to Prime Publishing through Sharing Customer Images (the "Service").
As used in this Agreement, "we" or "Prime Publishing" means Prime Publishing, LLC. and "you" means the individual or entity submitting materials to Prime Publishing. Any individual or entity that wants to use the Service must accept the terms of this Agreement without change. 1) Eligibility. 2) Definitions. 3) License Grant for Materials. Do something crafty... I know I'm not the only person that does a bit of embroidery now and than... so here's a little holiday DIY project that doesn't require a lot of time, money, material or a long attention span.
In other words - my kind of project. This part is for the first timers:) You'll need - vanishing fabric marker, embroidery floss, embroidery needle, embroidery hoop, a bit of plane sturdy fabric, lil' sharp scissors and an hour. 1. How To Make Pagoda Lantern. I came out with the idea of this Glass Jar Pagoda Lantern after being frustrated with the traditional Paper Pagoda Lanterns which I used to carry and walk around the neighborhood with my kids during Mid-Autumn Festival for many years. I dislike the paper type for 2 reasons, they get burn easily (this is dangerous especially to kids), and changing the tiny birthday candle in it isn’t fun at all as they burn and melt so fast.
Before I can really enjoy this special occasion, the lanterns either got burnt or the candles are consumed. So, I designed this improvised version of my Pagoda Lanterns, which won’t burn (if handled with care), don’t have to change the candle so frequently (using tea light candle), can be hung or placed on table, and most importantly, it can be used repeatedly . You can use electronic tea light candle to replace the wax candle to vow better safety. Skill needed: beginner. In this tutorial you will need: 1. Preheat the iron to low setting.
This is side view. No-Sew Book Cover for your eReader or Tablet. This is the most important and time consuming part of the project. Seriously. I spent 15 minutes making the cover, and two days picking out the book. Here are things to look for. 1. Right size. Clover and Violet: Kindle Cover {tutorial} As promised, here is my Kindle Cover tutorial {sorry for the delay…we had some friends come visit, and I didn’t coordinate my time before their arrival very well – but we had a blast!}. Supplies: 1 Charm pack or assorted scraps {for outside} 5/8 yard print Velcro Elastic {choose a color to match the reader, not the cover – I used black} Buckle {optional} First, measure your reader, my Kindle Fire measures 7 1/2″ x 4 1/2″. To determine the measurement, double the width and then add 2 1/4″ {note, the Kindle Fire that I have measure about 1/2″ thick. If your reader is flat or nearly flat, remove 1/2″ from the width.
For the height, add 3/4″. Handmade Gifts for 2011! Ok – so for the sake of keeping it real around here I have to confess. iPad Case Tutorial (with Handle Variations!) Jen Carlton Bailly is back today with a fun, new tutorial (remember the His + Hers Pillows?!). Geek Chic iPad Case. Hello, everybody! Simply Designing with Ashley: PB Knock-Off Hanging Ghosts. I love Pottery Barn, but I don't always love the price. Pin Cushion Jars (fill with buttons, notions……..or candy!!)