
Render Elements Examples. 3DOcean. 3D model of the camera 2 3D Model Download,Free 3D Models Download. Interior Design. Free Professional High Quality 3D models: Domestic Appliance. Archive3D.net - Free 25 000+ 3D models. Free Download. No registration. Kanal von ChaosGroupTV. Render Passes. Manual/Render/Passes. From BlenderWiki Render Passes are the different things the Blender Render Engine must calculate to give you the final image.
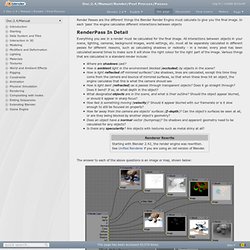
In each 'pass' the engine calculates different interactions between objects RenderPass In Detail Everything you see in a render must be calculated for the final image. All interactions between objects in your scene, lighting, cameras, background images, world settings, etc. must all be separately calculated in different passes for different reasons, such as calculating shadows or radiosity - in a render, every pixel has been calculated several times to make sure it will show the right colour for the right part of the image. Where are shadows cast? The answer to each of the above questions is an image or map, shown below: Each RenderPass puts out an image or a map. RenderPasses that produce Images can be directly viewed in a viewer, or, if they are the only pass that is rendered, saved as the render image.
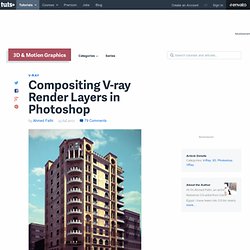
Selecting RenderPasses. LEGRENZI STUDIO - forum - View topic - VRay 1.5 SP3 - VRayEnvironmentFog Tutorial - Caustics [ENG] Re: VRay 1.5 SP3 - VRayEnvironmentFog Tutorial - Caustics [ENG] This short tutorial shows steps to obtain green shpere rendering.Run 3ds max and set scene in cm, that will help us in understanding caustics setting units.
![LEGRENZI STUDIO - forum - View topic - VRay 1.5 SP3 - VRayEnvironmentFog Tutorial - Caustics [ENG]](http://cdn.pearltrees.com/s/pic/th/legrenzi-vrayenvironmentfog-10797239)
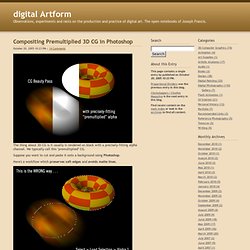
Fig. 03 - File units. Now create scene elements: Plane, Standard camera, Geosphere and Spotlight. Compositing V-ray Render Layers in Photoshop. In this tutorial Ahmed Fathi takes a look at how to composite together V-ray render layers using blending-modes and masks in Photoshop.
Once completed, this process allows you to change or tweak any aspect of your image in seconds without having to re-render a thing! Ahmed also covers a few extra post production techniques such as Chromatic Aberration and Depth Of Field, as well as how to emulate a Cross-processed look. Republished Tutorial Every few weeks, we revisit some of our reader's favorite posts from throughout the history of the site. This tutorial was first published in July of 2010. Additional Files/ Plugins:Download the Project Files for this tutorial Step 1 As this is a compositing tutorial, not a lighting/rendering tutorial, I'll assume that you have at least a basic knowledge of V-ray, and that you are able to render out your own scenes already. Step 2. Compositing Premultiplied 3D CG in Photoshop.
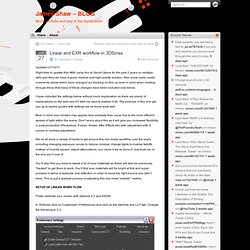
The thing about 3D CG is it usually is rendered on black with a precisely-fitting alpha channel.
We typically call this "premultiplied" CG. Suppose you want to cut and paste it onto a background using Photoshop. Here's a workflow which preserves soft edges and avoids matte lines. The wrong way goes something like this: you load the alpha channel as a selection, cut the CG off of its black background using this selection, and paste it onto a background image. Do that and you'll end up with a gray matte line around your solid edges, and a gray haze in your motion blur.
Let's try it a different way. First, create a new layer above your beauty pass and fill it with pure black. Next, Use the alpha channel to cut out this black color. Free 3D Models for Maya and 3DS MAX. Linear and EXR workflow in 3DSmax. Updated 27/10/11.
Right time to update this! With using this at Squint Opera for the past 2 years on multiple stills and films we have a good, reliable and high quality solution. Also some really useful comments below which have changed our thinking on this, so bear in mind when reading through these that many of these changes have been included now below. I have collected the settings below without much explanation as there are plenty of explanations on the web and it’ll take me days to explain it all.
The purpose of this is to get you up to speed quickly with settings we’ve found work well. Bear in mind your renders may appear less contrasty than usual due to the more efficient spread of light within the scene. We’ve all done a variety of hacks to get around this non-linear workflow over the years including changing exposure curves to reduce contrast, change lights to inverse falloffs instead of inverse square, adjust attenuations, you name it we’ve done it.
3D Model Download,Free 3D Models Download. 6. Appliances. Welcome to V-Ray (starting page) This help index as well as all files accompanying it is copyright (C) 2001-2010 by Chaos Software Ltd.
All rights reserved. No part of the V-Ray documentation can be reproduced without explicit permission from Chaos Software Ltd. V-Ray and the V-Ray logo are registered trademarks of Chaos Software Ltd. in Bulgaria and/or other countries. Microsoft, Windows and Windows NT are either registered trademarks or trademarks of Microsoft Corporation in the United States and/or other countries. Autodesk, 3D Studio, 3D Studio MAX, 3D Studio VIZ, 3ds Max and Discreet are either registered trademarks or trademarks of Autodesk, Inc. Last update: May 2010 For installation instructions, please see the Installation and Licensing system sections below. For an overview of what's new in each build, please see the What's New section below. Your community resource for 3ds MAXScript or SketchUp Rubyscript.
Jack's Secret Stash - Seamless Reality Textures.