
Adafruit Industries, Unique & fun DIY electronics and kits. AirPi Air Quality & Weather Project. Skyduino. SEMAGEEK. Cellbots. Arduino. Snootlab. Python: interfacing with an arduino. So what is an arduino?
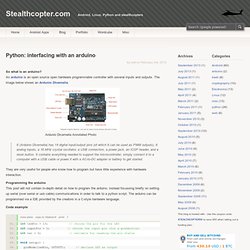
An arduino is an open source open hardware programmable controller with several inputs and outputs. The image below shows an Ardunio Dicemella. Ardunio Dicemella Annotated Photo It (Arduino Dicemella) has 14 digital input/output pins (of which 6 can be used as PWM outputs), 6 analog inputs, a 16 MHz crystal oscillator, a USB connection, a power jack, an ICSP header, and a reset button.
It contains everything needed to support the microcontroller; simply connect it to a computer with a USB cable or power it with a AC-to-DC adapter or battery to get started. They are very useful for people who know how to program but have little experience with hardware interaction. Programming the arduino This post will not contain in-depth detail on how to program the arduino, instead focussing briefly on setting up serial (over serial or usb cable) communications in order to talk to a python script. Code example Arduino LED switch circuit off Arduino LED switch circuit on import serial. Raspberry Pi. Raspberry Pi to Arduino shields connection bridge. Article Index Go to Index1.

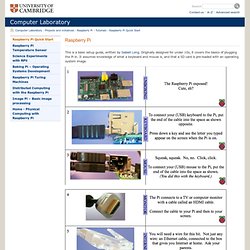
The Shield. 8 Digital pins.Socket for wireless modules.RX/TX pins.i2C pins (SDA, SCL).SPI pins (SCK, MISO, MOSI, CS). Raspberry Pi avec Node.js et Arduino - Doc’ Alex. Dps/piui. Raspberry Pi. This is a basic setup guide, written by Isabell Long.
Originally designed for under 10s, it covers the basics of plugging the Pi in. It assumes knowledge of what a keyboard and mouse is, and that a SD card is pre-loaded with an operating system image. Physical Computing with Raspberry Pi. Welcome to the world of physical computing with the Raspberry Pi!
The Raspberry Pi is a small, inexpensive, low-power computer aimed at getting children interested in Computer Science. It is, however, a very flexible machine, and its capabilities have made it very popular among makers and hobbyists, who see the Raspberry Pi as a cheap way of accessing a relatively large amount of compute power. This website aims to teach you how to sense and control the physical world using computer programs running on the Raspberry Pi. Here you will learn how easy it is to interact with the outside world, and how this opens up limitless possibilities for exploration. A wide range of sensors, motors, robots and USB devices can be connected, of which only a few are introduced here. For more ideas, help and inspiration, visit our forums. The tutorials on this site make use of the Python programming language. Raspberry Pi Supercomputer Guide Steps. Return to View video at: Prof Simon Cox Computational Engineering and Design Research Group Faculty of Engineering and the Environment University of Southampton, SO17 1BJ, UK.
V0.2: 8th September 2012 V0.3: 30th November 2012 [Updated with less direct linking to MPICH2 downloads] V0.4: 9th January 2013 [Updated step 33] First steps to get machine up 1. I originally used: 2012-08-16-wheezy-raspbian.zip Updated 30/11/12: 2012-10-28-wheezy-raspbian.zip My advice is to to check the downloads page on raspberrypi.org and use the latest version. 2. You will use the “Write” option to put the image from the disk to your card. Raspberry Pi: now what? Raspberry Pi, Python & Arduino. After the other night’s wonderfully slow detour into Processing, I thought I’d try the Raspberry Pi’s “native” language of Python to control an Arduino.
This worked rather well, though I don’t have a slick GUI for it yet. pyFirmata is the magic that allows an Arduino running Firmata to talk to Python. It’s fairly easy to install under Raspbian: Get the required packages:sudo apt-get install python-serial mercurialDownload the pyFirmata code:hg clone cd pyfirmata sudo python setup.py install (If this succeeds, you can delete the pyfirmata folder.) Using pyFirmata is a bit different from other Arduino applications: Analogue reads and PWM writes are normalized to a 0 .. 1 range, and not the standard Arduino 0 .. 255 and 0 .. 1023.You really need to start a separate iterator thread to stop old readings overflowing the serial bufferSince the Arduino is read asynchronously, make sure that the pyFirmata connection is fully initialized before reading from ports.
Send the author to the moon! Digital Fanatics. Adapteva.