
PH probe. Sorry for the following poor reply... but better than nothing?

A) Have you decided on the pH sensor that you will be using? If so, posting the details might inspire/ enable answers. A URL to its web-home for specs, etc would be useful b) I am no expert, but I THINK that you CAN tell op amps to shift their outputs. The demo circuits on the web are "tuned" for pH 7= 0 volts. higher = positive, lower = negative are set up that way becuase it is convenient... Hope this is.... 1) Right! 2) Encouraging. Sorry I can't be certain or more informative. Oh yes. When I've tried to work with op amps and things like the Arduino, I've stumbled on the following "What if".... Let us know the answers when you find them!
pH meter. A pH meter The probe[edit] The probe is a key part of a pH meter, it is a rod like structure usually made up of glass.
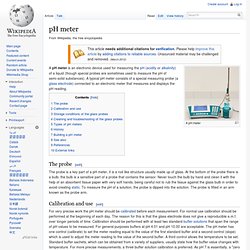
At the bottom of the probe there is a bulb, the bulb is a sensitive part of a probe that contains the sensor. Never touch the bulb by hand and clean it with the help of an absorbent tissue paper with very soft hands, being careful not to rub the tissue against the glass bulb in order to avoid creating static. To measure the pH of a solution, the probe is dipped into the solution. Calibration and use[edit] For very precise work the pH meter should be calibrated before each measurement. Storage conditions of the glass probes[edit] When not in use, the glass probe tip must be kept wet at all times to avoid the pH sensing membrane dehydration and the subsequent dysfunction of the electrode. A glass electrode alone without combined reference electrode is typically stored immersed in an acidic solution of around pH 3.0. Light Triggering - Growing plants with the RelaySquid.
Here’s another project I’ve always wanted to do … it’s a self-contained, automated plant growing terrarium.

There are 2 plant growing lights, 1 bug deterrent light, and a heat lamp, all controlled with the RelaySquid. The hardest part of this one was just getting all the supplies from different stores. I had to find the plant bulbs from a green store in the neighborhood, the light fixtures from Home Depot, and the white connector from another hardware store. Soil Moisture Sensor - Gardenbot. The Soil Moisture Sensor You are building a cheap soil moisture sensor so the brain can read the amount of moisture in the soil. The version we are building is very low tech, but it is also very cheap and easy to build.
It consists of a block of packing foam with a couple of wires shoved into it. And the great thing is that it's possible to use reclaimed materials in much of it's construction. If you cruise around the web, you will find many other types of soil moisture sensor -- some home-made, some commercial. . * Check it out! Supplies: (see the parts page)galvanized steel wire -- 12 gage or equivalent packing foam block (e.g. inside a product box for home electronics) -- the slightly flexible kind is better (less brittle than styrofoam)soldering iron and solderlead wires The general idea is that we want two probes -- metal rods, kept about equal distance apart, that we can bury in the soil.
Notes: Here is a diagram for constructing the actual probe. Step-By-Step. Pressure Sensor. The Pressure Sensor uses an MPXV7007DP piezoresistive transducer designed to measure positive and negative pressure.
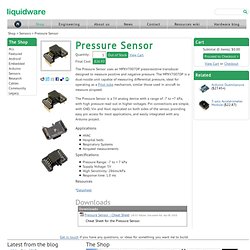
The MPXV7007DP is a dual-nozzle unit capable of measuring differential pressure, ideal for operating as a Pitot tube mechanism, similar those used in aircraft to measure airspeed. The Pressure Sensor is a 5V analog device with a range of -7 to +7 kPa, with high pressure read out in higher voltages. Pin connections are simple, with GND, Vin and Vout replicated on both sides of the sensor, providing easy pin access for most applications, and easily integrated with any Arduino project. Applications HVAC Hospital beds Respiratory Systems Airspeed measurements.