
Cutting paper snowflakes. How to make a gift bow. Paper Flowers – Anyone Can Do That. Japanese Kusudama, this tutorial is featured on Craftuts Anyone can do that, I assure you.

The proof: I can, just take a quick look at my result below. And, believe me, I am neither meticulous nor particularly patient. How to make gift bags from newspaper. When I bought something at a store recently, the clerk handed me my purchase in a bag made from a newspaper.
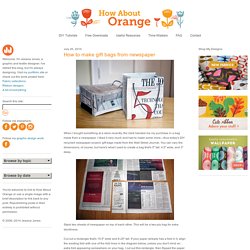
I liked it very much and had to make some more—thus today's DIY recycled newspaper project: gift bags made from the Wall Street Journal. You can vary the dimensions, of course, but here's what I used to create a bag that's 5" tall, 4.5" wide, and 3" deep. Stack two sheets of newspaper on top of each other. This will be a two-ply bag for extra sturdiness.
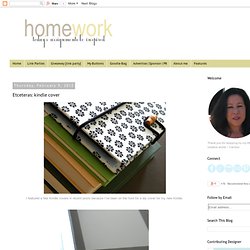
Easy Origami Envelope. If you’d like to make these cute little “Flap Lock” Origami Envelopes–all you’ll need is a piece of square paper…any size. I used Christmas scrapbook paper. 1. Fold the paper in half to form a triangle. Make sure your edges are even. 2. 3. fold the right corner about 1/3 of the way to the left. Kindle cover. I featured a few Kindle covers in recent posts because I’ve been on the hunt for a diy cover for my new Kindle.
Most of the covers that I’ve seen required sewing and I wasn’t sure I could pull that off. How to make an Origami Aquilegia flower. Inspired by Yulia Brodskaya. I can't get over how amazing these are.
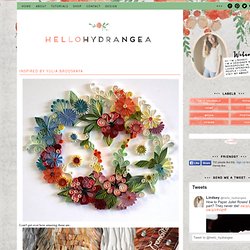
I wouldn't be surprised if Yulia invented quilling. She is a 28 year old artist from Moscow who creates beautiful designs from vertical pieces of thin paper and her website is full of inspiration in color, line, shadow and technique. You don't have to be a fellow quiller to wish you were like this great lady. Even though her pieces would be amazing if they were drawn, it was the fact that they are 3d that caught my attention. I imagine one of her expert pieces would take hours, which I do not have... When my husband and I were engaged, I bought wooden letters to spell out 'save the date' and covered them with different patterned paper. (I couldn't resist showing our cute picture) The letters were already covered (I know, I didn't post a diy... I picked out 4 colors of paper that went with the colors in the pattern and had them cut into 1/2" strips.
Sew a bag with the free bag pattern. Patterns ? Needle?nThread.com. Weblog. Altered matchboxes are easy and fun to make!
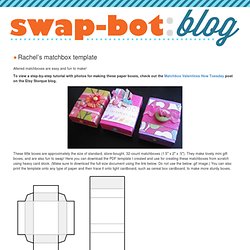
To view a step-by-step tutorial with photos for making these paper boxes, check out the Matchbox Valentines How Tuesday post on the Etsy Storque blog. These little boxes are approximately the size of standard, store-bought, 32-count matchboxes (1.5″ x 2″ x .5″). They make lovely mini gift boxes, and are also fun to swap! Here you can download the PDF template I created and use for creating these matchboxes from scratch using heavy card stock. (Make sure to download the full-size document using the link below.
Download Rachel’s matchbox template. Instructions: Print out template on card stock at 100%. Optional: Want to include a little card or mini zine in your matchbox? Want even more matchbox fun?! Here is a newer Envelope-style matchbox template: The inner drawer of this matchbox is exactly the same as my original Matchbox Template above, but the outer wrap differs significantly. Download the Envelope-style Matchbox Template PDF here. Also… Wall-Mounted Magnetic Spice Rack. Spraypainted wheat pillows. As seen last week on sytyc...here are my wheat pillows and the easy steps on how to make them!
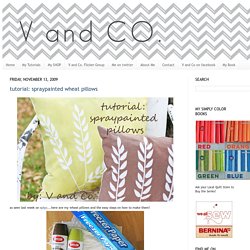
You will need:spray paint ( i had ivy leaf, and brown)freezer paper.muslinscissorspencil first cut some muslin. Create “magic” folding wooden photo cubes. Have you ever seen those little desktop photo cubes that fold and unfold to reveal more and more pictures on each side?
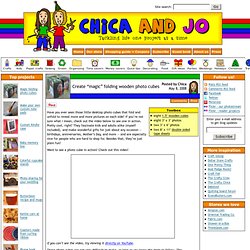
If you’re not sure what I mean, check out the video below to see one in action. Pretty cool, right? They fascinate kids and adults alike (myself included), and make wonderful gifts for just about any occasion — birthdays, anniversaries, Mother’s Day, and more — and are especially nice for people who are hard to shop for. Besides that, they’re just plain fun! Want to see a photo cube in action? If you can’t see the video, try viewing it directly on YouTube. These photo cubes are not very difficult to make, as long as you know the steps to follow. Gather the supplies The first thing you’ll need to build this photo cube is 8 wooden cubes that measure 1.5″ on each side.
Before you start, be sure to check the edges of your wood cubes and sand lightly, if needed (we like these flexible sanding sponges. GoOrigami. Easy Origami Envelope.