Low Poly Mask by kongorilla I'm going to say something your friends have been afraid to tell you: You could stand to lose a few polygons. Here's a blank canvas for the new you. Or your Halloween costume. Or maybe your audition for store mannequin. Or your general purpose anonymity needs. Sometime in the future I hope to make a full head version, but I wanted to post what I've gotten done so far in case someone could use it for Halloween 2012. I'm going to make a mask with dark paper, and use glow-in-the-dark tape to highlight the edges - I'll be Wireframe Man! EDIT: Since originally posting this, I've seen comments by people stating they intend to make the make the mask using materials other than paper. EDIT: 10/31/12 - Thanks for all the email messages, comments and photos I've been getting! The mask comes in two flavors: "black lines" and "faint lines", which has light blue lines, giving a cleaner look to the final product when used on white paper. Print the mask on stiff cardstock or bristol.
Hinged Wooden Snowman Family Follow along to learn how to make this personalized hinged snowman family. Step 1: Cut The first thing I did was cut my pieces of wood. I used a 1 x 4 that was in nice shape so it didn't require much sanding. I started by determining the length of the tallest snowman, then I adjusted the other sizes by about 2 inches each. I just did the measurements visually, so I don't know what they were exactly, but I believe the tallest one was about 18-20 inches. Step 2: Position I measured 3 1/2" from the bottom and placed the hinge. Step 3: Drill After marking the hinge holes, I used a drill to make a pilot hole in each slot. Step 4: Secure I put in the screws temporarily, so I could test the size and functionality. Step 5: Paint Then I took it all apart and applied several coats of paint. Step 6: Paint I also applied a light coat of white spray paint to the hinges. Step 7: Sand When the paint was dry, I sanded the corners. Step 8: Hinges Then I put the hinges in place. Step 9: Test Check the alignment.
Flowers Welcome to flower week – five days of simple and delightful flower projects. I could probably do three weeks of flowers because there are so many different ways to create them, but I’ve limited it to five of my current favorites. Before we get started, let me make a few disclaimers: 1. 2. 3. Okay, so let’s begin. Here’s what you’ll need: :: paper {either cover or text weight} :: florist wire :: scissors, pencil, glue gun STEP ONE: cut irregular circle This circle is approximately 8 inches, but you can do any size you wish. STEP TWO: cut spiral Start at the outside edge and cut in a spiral fashion to the center. I like a sort of bumpy shape so that the petals end up a bit irregular If you aren’t so sure about your cutting skills, feel free to draw your spiral before cutting. To add a little interest to my bouquet, I used a variety of yellow scrapbook papers {my favorite is that yellow dot} STEP THREE: roll your blossom start at the outside edge and coil tightly STEP FOUR: release coil
Fiori giornale I have seen various versions of Faux Rosewood Wreaths in just about every store and catalog for the upcoming season; most with a price tag running upwards of $40 or more. Some are crafted of paper and other of real wood shavings. Last year I made a few rolled flower gift toppers from recycled book pages and they remind me so much of the curled wood roses I thought they would make a good substitute. Materials Needed:Foam Wreath FormRecycled Book PagesLots of Hot GlueRibbon to Hang The full step by step tutorial I posted last year can be found {here}.Basically you layer three book pages together and draw a spiral circle. Starting with the outside of the spiral, roll the paper inward to create the flower shape. Give the wreath form a light coat of white {or light color} spray paint to help camouflage any see-through spaces. It seriously takes quite a few roses to fill the entire wreath, however I think the finished project has such a unique look. {Simply Lovely}
DIY Personalized Envelope Lining Sending snail mail is so much fun, I miss the days when you send letters to your friends and you purchase a stamp and wait days for them to receive it. From now on I want to make an effort to make cute little cards, letters and envelopes to send to my friends and family because it does really make a difference. The other day I sent a birthday card and personalized the envelope and it turned out pretty sweet, so I thought I would share with you guys how to create your own personalized envelope lining What you need: Print outs of your favorite photographs An envelope Scissors A glue stick Step one: undo one of the envelopes, so you can see it’s template. Step two: cut the top half of the envelope like so, keeping together the middle center and the top fold over. Step three: draw a 1 cm line around the top fold and half a cm around the two sides and trim. Step four: place your template on top of your chosen print and cut. Step five: glue the back of the printed cut out. Share
Custom Covers for your Harry Potter Novels I am a big fan of the Potter series. I really wanted a nice set of collector's styled editions for my shelves, but I'm not too keen on the deluxe editions that have been released. They are also pretty pricy, and considering that I already own copies of all the books, it seemed a little indulgent to spend so much on another set. So I decided to re-cover my hardback copies of the standard editions with my own "deluxe" design, to add a bit more style to my bookshelves. I am also using this project as an excuse to have a play with laser transfer foil, which I've never used before. The laser transfer foil only works with Laser printers, or photocopies. This technique can be applied to any hardback book, and I'm tempted to make some similar styled covers for some other series I have.
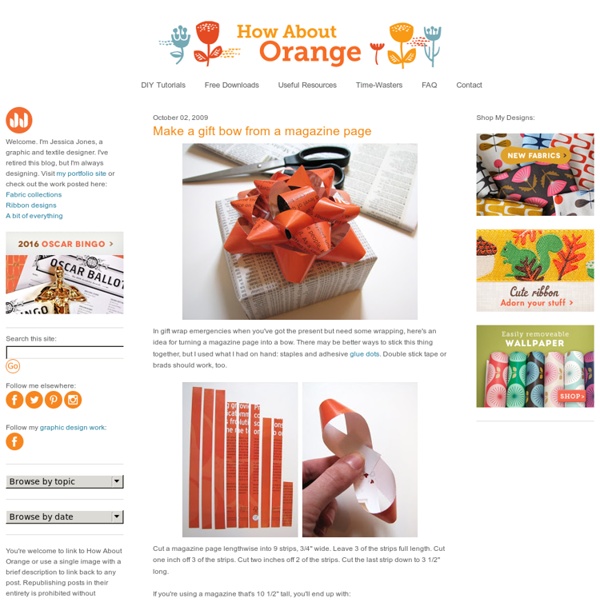
Envelopes Making envelopes from magazines was one of my favorite crafts as a kid… right up there with friendship bracelets and bedazling (don’t judge). So today when I came across a stack of magazines I knew exactly what I needed to do with them. I feel like I just rediscovered an old favorite song (the one that you used to play over and over and over again and then promptly forgot about for about 6 years. Cue the nostalgia!) Heads up on the addicting nature of this one. What you need: - Envelope (Pick any size you like–just make sure it fits within a single page of your selected magazine. 1. If you’re looking for more magazine craftiness, head over to How About Orange and learn how to make origami bows! Like this: Like Loading...
Busta regalo giornale When I bought something at a store recently, the clerk handed me my purchase in a bag made from a newspaper. I liked it very much and had to make some more—thus today's DIY recycled newspaper project: gift bags made from the Wall Street Journal. You can vary the dimensions, of course, but here's what I used to create a bag that's 5" tall, 4.5" wide, and 3" deep. Stack two sheets of newspaper on top of each other. Cut out a rectangle that's 15.5" wide and 8.25" tall. Fold a flap 1.25" down from the top. Cut two pieces of cardstock or chipboard to 4.25" x 1", then glue them on the widest two panels just under the top fold. Put glue on the outside of the 0.5" tab and bring the left-most panel over to form the body of the bag, aligning the cut edge of the panel with the folded edge of the flap. Upend the bag so the 2" flap is now up. Put glue on both flaps and fold them inward to form the bottom of the bag.
How to Cut Quill Pens from Feathers This is a document written in flux. I'm still experimenting even as we speak (1 June 1999), and as I figure more things out, they will be reflected on this page. Quite a lot of this material is an attempt at reconciling conflicting reports on how to cut a quill. This is a page about how to cut feathers into useful quill pens. I won't say that if you follow The Instructions Here that you'll get a working pen to your liking, half the battle is really knowing what you like. I'm going to cover equipment, prep, cutting, and then re-cutting of nibs in this page. Equipment This is the stuff I use to cut quills. 1. First, a bit about feathers. I buy my feathers from local Hobby Lobby, Ben Franklin, or even Michael's; and whatever hobby shop that's filled with odd baskets, dried flowers, leather lacing, candles galore, and beads is the place to hunt down feathers. Above is a picture with one of the average feathers I've found by a ruler so you have some idea of minimum length and tube thickness.
EDDIE ROSS - No Wire Hangers! (Well, Maybe Just One) Here's a Christmas wreath so darling and dear, even Miss Crawford would approve. Take one of these... and bend it into the form of a circle. Then, grab your glue gun and as many round ornaments in varying sizes as you can find. You'll need about 80 in all. To secure the metal cap to the ball, dab a little hot glue and press. Next, untwist the end of the hanger, then string one ornament at a time, making sure to alternate the placement and colors as desired. Check out the final result!
quotes and quotations from the wise on all matters creative Change happens, that is for sure, and not just in our modern, 21st century era. It seems that the stress of the new affects most people in every age. So the trick is not to resist it, but to go with it. See also action, business, the future, managing, progress*, resistance*, time, vision Quotes ‘If you don't like something, change it. — Maya Angelou ‘Change is in all things sweet.’ — Aristotle ‘Loss is nothing else but change, and change is nature’s delight.’ — Marcus Aurelius ‘Keep constantly in mind in how many things you yourself have witnessed changes already. ‘Observe constantly that all things take place by change.’ ‘We must change in order to survive.’ — Pearl Bailey ‘To exist is to change, to change is to mature, to mature is to go on creating oneself endlessly.’ — Henri Bergson ‘If the people don’t want to come out of the park, nobody’s going to stop them.’ — Yogi Berra ‘Those who have changed the universe have never done it by changing officials, but always by inspiring the people.’ — J.
How to Make Marble Paper Cut paper into sizes smaller than the standard 8 1/2-by-11-inch sheet. Use 24-pound paper or thicker, card stock or watercolor paper. Watercolor paper works best for this project. Fill an aluminum baking pan with about an inch of water. Place it outside or in an area covered with a drop cloth. Drop generous amounts of acrylic paint on top of the water, applying multiple drops in a range of coordinating colors across the surface of the water. Mix the colors gently with the stirrer or a toothpick. Gently place a piece of paper on the top of the water and then carefully lift off. Add more paint after three or four sheets. Place the dipped paper on newspaper to dry or hang it on a line with paper clips.
sewing 101: making a pouf Add a burst of color to your room with this crafty pouf! At 17” wide and 10” deep, it’s large enough to serve as floor seating or a foot stool. (And if you have pets, I have a feeling they may want to make this their new favorite spot!) This project is a little challenging to sew, but it’s not too difficult, so if you’re comfortable with the basics of sewing, give it a try. I love the idea of making a set of these poufs in a range of sizes, for a sculptural stack of cushions that will become a room element in their own right. CLICK HERE for the full how-to after the jump! Finished Dimensions: 17” diameter by 10” tall What You’ll Need ¼ yard each 12 coordinating fabrics (I used quilting cottons) 1 yard muslin 3 pounds fiberfill stuffing 2 large buttons (approximately 1 ½”) 2 flat metal washers, slightly smaller than your buttons 12” upholstery needle (get this where upholstery supplies are sold) fishing line sewing thread hand sewing needle sewing machine sharp scissors iron 1. 2. 3. 5. 6. 7. 8. 9.