
- StumbleUpon. Tutorial: Easy Sponge Gradient. Happy Sunday! Get the look - how-to create your favorite makeup looks. - StumbleUpon. Top 10 Websites To Watch Movies Online For Free. We all love the idea of watching movies with just your Internet connection and a computer and no strings attached.

Although some of you may think that this is not legal, i would say "why not try something ill-legal today". There are lots of websites which provide to watch movies online, no need to sign-up and in few clicks you are into the movie arena. Most of these sites don’t host the files due to legal disputes but they contain links to the sources, where we can get our hands dirty. We have Updated the List as per the current ratings, which are turning differently. There are some new websites included, this is the new list for year 2015. IceFilmsTube This website offers you complete HD experience for all the movie.
DIY: Dry-Erase Calendar. Since joining the Pinterest world, I have found so many things that I want to make!

One that caught my attention was a dry-erase calendar. So, I decided to make one for my office out of green paint chips. For the Love of: Mason Jars. <div class="greet_block wpgb_cornered"><div class="greet_text"><div class="greet_image"><a href=" rel="nofollow"><img src=" alt="WP Greet Box icon"/></a></div>Hello there!
Recycled Grocery Totes. Ready to go green?

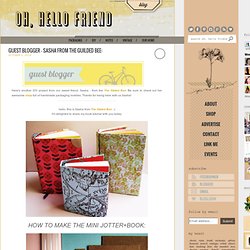
Then say goodbye to your old grocery bags by melting them into something cute. Afterall, plastic is the new plastic, right? Guest blogger - Sasha from The Guilded Bee: Here's another DIY project from our sweet friend, Sasha - from the The Gilded Bee.

Be sure to check out her awesome shop full of handmade packaging lovelies. The Gunny Sack: {Everything} In A Jar - Handmade Gifts. With just a little over 10 weeks until Christmas, it is already time to start thinking about gifts! The more gifts that can be taken care of ahead of time, the easier the holiday season will be. How to Mystery Braid a Leather Cuff. {Valentines day} pixel-y popup card. I‘ve been scratching my head trying to come up with a card for my hubby {AKA the non-romantic type}.
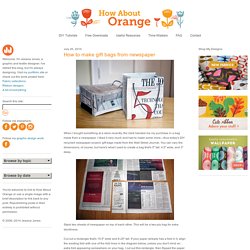
I finally decided to make this pixely popup heart card! They are really minimal (which I love) and take about 20 minutes to make (that includes the card, insert and envelope). You can even make some pixely confetti to put inside the card (if you are a big kid like me!). Full instructions and printable templates below! (BTW I remember seeing something similar in a popup book years ago. How to make gift bags from newspaper. When I bought something at a store recently, the clerk handed me my purchase in a bag made from a newspaper.

I liked it very much and had to make some more—thus today's DIY recycled newspaper project: gift bags made from the Wall Street Journal. You can vary the dimensions, of course, but here's what I used to create a bag that's 5" tall, 4.5" wide, and 3" deep. Stack two sheets of newspaper on top of each other. This will be a two-ply bag for extra sturdiness. Cut out a rectangle that's 15.5" wide and 8.25" tall.
Perfect Summer Bangle. Here's a fun tutorial on how to make a message bangle that's one-of-a-kind, done in the sun, waterproof and weatherproof.

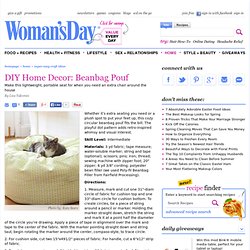
Even after several trips to the beach, it won't fade or wash off! Essentially, it's the Perfect Summer Bangle. Used in this tutorial: Inkodye Red Prepare. All you'll need for this project is a raw wooden bangle (we got ours from DIYBangles.com), a black paint marker, plastic wrap, and some Inkodye! Transcribe. Perfect. Pour. Brush. Wipe. This to That (Glue Advice) DIY Home Decorating - How to Make a Beanbag Chair at WomansDay.com - Womans Day. Whether it’s extra seating you need or a plush spot to put your feet up, this cozy circular beanbag pouf fits the bill.

The playful dot pattern adds retro-inspired whimsy and visual interest. Stay-at-Home Artist: stencil with freezer paper (harry potter tee)... Yes, I am a nerd.

I came up with a brilliant idea for a Harry Potter t-shirt and I couldn't resist. "Expecto Patronum! " However, you can make whatever kind of design you want with a freezer paper stencil. It doesn't have to be Harry Potter related. Holder for Charging Cell Phone (made from lotion bottle) My husband and I both have cell phones.

And both of us have phone chargers. And that means lots of obnoxious cords. You never know when one of us may be moving phone cords around, to give our phones an extra charge while we’re chatting away……… or trying to charge our phones up before running errands or something. Needless to say, those phone cords seem to be everywhere…..and are generally in the way and hanging all over the floor.
(Okay, and how about when you’re in a hotel or visiting family/friends. I was looking around on the internet for a solution and found this. Turning Photos into Canvas Prints! Modge Podge Tutorial. 31 Insanely Easy And Clever DIY Projects. 100 Websites You Should Know and Use.
In the spring of 2007, Julius Wiedemann, editor in charge at Taschen GmbH, gave a legendary TED University talk: an ultra-fast-moving ride through the “100 websites you should know and use.” Six years later, it remains one of the most viewed TED blog posts ever. Time for an update? We think so. Below, the 2013 edition of the 100 websites to put on your radar and in your browser.
To see the original list, click here. And now, the original list from 2007, created by Julius Wiedemann, editor in charge at Taschen GmbH. 70 Best Photoshop Photo Manipulation Tutorials. Creating photo manipulations using Photoshop isn’t as easy as you see here. But it’s a passion for many designers out here including me. One should have lots of patience and creativity to turn a simple photo into an amazing visual art. Sky is the limit when you open image in a photo editing too. Just imagine a different world and put the character over there. You simply have to experiment and play with different effects by making use of huge free brushes and textures collection to create your own world. Here we tried to pick and showcase 70 best photo manipulation tutorials of all time. For those, who don’t know what is Adobe Photoshop? The next generation, representing two decades of excellence.
DIY Bracelets - Honestly WTF. DIY Braided Bead Bracelet - Honestly WTF. DIY Macrame Bracelet - Honestly WTF. Growing up by the beach in Southern California, the ability to knot a macrame bracelet was practically a right of passage. Although those days are long behind us, we’ve never forgotten the ever-so-simple square knot technique. Life Hacks @imageBlog. Geeky DIY Women Shoes.
- StumbleUpon. Midnight in Paris Woody Allen’s latest places starving writer Owen Wilson in Paris with his fiancée, Rachel McAdams. Searching for inspiration for his incomplete novel, Owen begins taking strolls around the city at night where he discovers an unexpected group of people. I wish I could be more specific, but it would ruin the surprise. Know that it is brilliant, witty and full of mystique. 92% on Rotten Tomatoes (RT). How to cut glass. I posted a picture about 1 week ago on Instagram, Facebook and Twitter of me cutting glass using just string. Nary Manivong : Fashion Designer, NY Fashion Designer, NY Fashion Week, Fashion week New York, Dressed the movie, Mercedes Benz Fashion week. Judah Method - Bleaching Experemnet on the Behance Network. Design Seeds&: For All Who Love Color. Mod Retro Vintage Clothing &Indie Clothes.
67 Cheap Date Ideas for the Recession-Era Romantic - Global One TV. By Kyle O'Connor on April 29, 2009 When you’re in the middle of the worst recession since the Great Depression, it’s not always easy to come up with the cash to impress your date. 25 Handmade Gifts Under $5. If your gift list is long and your budget is small here are some great Handmade Gifts that you can make. Wind Map. An invisible, ancient source of energy surrounds us—energy that powered the first explorations of the world, and that may be a key to the future. This map shows you the delicate tracery of wind flowing over the US. The wind map is a personal art project, not associated with any company.
25 Ways To Make Money Now! Lucid Dreaming. By lucid dreaming, you can gain complete control over the one place that no one will ever care about: your imagination. Just The Facts Lucid dreaming is a scientifically proven phenomenon.
While some get into lucid dreaming in order to treat chronic nightmares, or to experience all facets of the human experience, approximately 99.8% of people use it as a tool for cheap and interactive 3D porn. A lucid dream is a dream in which the dreamer is aware that he or she is dreaming, and he or she can even choose to control and manipulate his or her dream. Dream, dream, dream. How to Tie A Turban Headband : Strawberry Koi. 30 Very Funny Books. Mason Jar Love. Mini DIY Round-up. Things we make, bake and photograph: Things I'm loving this week: mason jars.
The Dapper Toad: DIY Terrarium Tips. Earth Day Terrariums. Separation of Germs. Michael ann made.: making time to craft. Mason Jar Crafts. A Floorboard Jewellery Stand. What you’ll need: DIY Dixie Cup Garland. Sign Language. ASL Dictionary : abandon. COUPONS & SALES. Jewelry Stores, Fashion Jewelry, Costume Jewelry, Online Costume Jewellery Shops - Gofavor. Most favorited all-time. SparkCollege: Dorm Life. How to Make a Simple Bow.
Easy as 1 2 3. Everyday Mom Ideas: Scrap Paper Tree Centerpiece Tutorial (Featured guest blogger) Splash dyed for spring. Fashion friday- turban headbands. Ombre Nail Tutorial by Anna Delores Photography.