How to Make a Simple Bow
These little bows are so simple and fun-- I make them all the time. They are so versatile-- you can wear them as shoe clips, hair clips, broaches, whatever you want! I've also attached them to headbands. (Photo from last year when I was obsessively watching Mad Men and attempting the bee hive hairdo. Looks a bit like Marge Simpson if you ask me. ;) ) How to Make Simple Bows: Step 1: First you need to cut a rectangle of fabric with a little sliver of fabric to set off to the side. Step 2: Next you need to fold the fabric onto itself, lengthwise. Step 3: Now fold the fabric in the other way to to middle. Step 4: Stitch those bad boys together. Step 5: With a curling iron, straightener, or iron, press the sides of the little sliver of fabric together. Step 6: All done!
OH SO PRETTY the DIARIES
Fade to Black Manicure
Like this: Like Loading...
Sign Language
American Sign Language (ASL) Manual Alphabet (fingerspelling) Desktop Wallpaper: 1280x1024 pixelsInstructions: Right click on the picture and select "Set as Background" from the drop down menu. American Sign Language (ASL) Fingerspelling Copyright Lifeprint.com. Copyright Lifeprint.com. Copyright Lifeprint.com. Copyright Lifeprint.com. For a much higher resolution of the above file, visit "wallpaper 2." For a copy of the above chart as a Microsoft Word document: Fingerspelling Chart (.doc format) "I love you" handshape: ILY "I love you" ASL handshape (version) © 2007 Lifeprint.com Adapted from Gallaudet Type Font The Gallaudet font is copyright (c) 1991 by David Rakowski. For the rest of the alphabet, see: "Dr. All of the sign language graphics on this page are copyrighted. "Copyright © William Vicars, sign language resources at Lifeprint.com"
Charlie McDonnell | Charlieissocoollike | Official Website
Faux Diamond Tipped Nails
I’ve been dying to try out this new deep teal polish by Sephora by OPI for a few weeks now and am so excited to finally do so. I really love the color! It appears very dark, almost black even, but has a fantastic blue hue which happens to work really well with silver glitter. Here’s what I used: * 2 coats of My Personal Serpent Sephora by OPI and I love that this is an effective, safe, environmentally conscious brand. * Carefully apply a layer of chunky silver glitter to your tips like a French Manicure. * One coat of your favorite top coat {mine is Chanel extreme brilliance} fills in the thick edge and smooths out your nail. …but admittedly, difficult to photograph! Have Fun! Find all of my Nail Art Tutorials Here
SparkCollege: Dorm Life
Dorm Life According to several really important-sounding studies, first-year students living on campus perform better academically than those who live off campus. Perhaps it’s because students living in dorms are closer to the things they need, like the library and the computer labs. Or maybe it’s because the meal plan that comes with most dorms takes the pressure off having to forage for food, giving students more time to study. Should you live in a dorm your first year? Studying can be difficult in a dorm, because socializing often takes priority over grades. All of these advantages don’t erase the fact that dorm life can be challenging. The Dorm Not all dorm rooms resemble dark, damp prison cells. You don’t have a lot of choice when it comes to where you’re going to live. Here are a few examples of the different types of college dorms or living arrangements you might encounter: All first year. Types of Rooms Most first years will have at least one roommate. Communal Bathrooms Noise Rules
Faded Floral Manicure
photos + post design by Kristin Ess Who doesn’t love a soft, faded floral pattern? You can basically do this mani in any color combo you want– we chose a spring-y palette. Here’s how you get the look: YOU WILL NEED: Nail polish remover, 4 small paint brushes, a plate or something to put your polish drops on, a white nail polish + 3 of your favorite polish colors that look good together. Place a dot of each color on your plate. Good luck with your pretty faded florals and as always, tweet us a picture when you’re done! (Special thanks to Kimberly, our new nail intern for showing us this technique!!) Tags: DIY, faded florals, floral, floral nails, flower nails, flowers, how to, kristin ess, mani, mani monday, manicure, nail art, nail polish, nails, polish, polished, spring, the beauty department, thebeautydepartment.com, tutorial Related posts:
Everyday Mom Ideas: Scrap Paper Tree Centerpiece Tutorial (Featured guest blogger)
Hi there! I'm Sharon from Two Girls Being Crafty, and I am so delighted to be today's guest blogger on Everyday Mom Ideas! Thank you so much, Julia, for having us. My co-blogger, Tristin, and I create fun and inexpensive crafts that anyone could do. Our goal is to inspire. Today I would like to share with you all our newest craft. This simple project uses scrapbook paper leaves to create a bright and cheery Spring ambiance for your home. First, drag out your unseemly healthy assortment of scrapbook paper scraps. Cut out a template of your leaf from the cardboard (you can also use chipboard or card-stock). Take your floral wire and cut strips anywhere from 5"-8" long. Lay down some newspaper next to your workspace. Now for the fun part! ...or make them funky. And you're done! Thanks again, Julia, for having us here today!
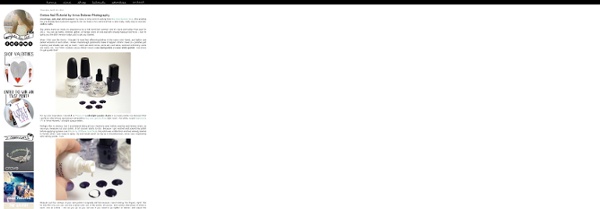
Cheetah Printed Nails
photos + post by Kristin Ess Cheetah print nails have been around for some time now but we’ve never actually done a tutorial on them. We got a lot of requests after last week’s Mani Monday heart tutorial, so we’re going for it! TOOLS: 2 toothpicks, black nail polish (American Apparel “Hassid”), gold nail polish (American Apparel “Gold Flash”), clear coat. PREP: Use any color your want on the base of your nails. Take your toothpick and tap it on the table or counter a few times to flatten out the tip. Nail strips are great in cheetah print as well, but so often the stores run out of that pattern. Tags: black, cheetah, DIY, gold, how to, kristin ess, leopard, mani, mani monday, manicure, monday, nail dotting, nails, pattern, print, the beauty department, thebeautydepartment.com, toothpick Related posts:
Easy as 1 2 3
So you guys know that I'm a big dork right? Yeah like it's a big secret or something... this chick here (pointing at myself)... she's a DORK!! I was talking with Jeanne the other day.... ok by talking I mean emailing... John goes nuts when I say "I was talking to so and so" he always responds... "oh really, you were on the phone??" (he knows I don't like talking on the phone) "umm no I mean I was ichatting, or emailing" "that's not talking..." So you tell me dear readers... is ichatting and emailing talking ... or is talking only on the phone or in person??? OK that was totally not where I was heading with this post... back to me being a dork and talking with Jeanne. Her response: "The vest sounds... interesting. So Jeanne... this one is for you!! Slice your tshirt straight across right under the arm pits (lay flat on a table and cut through both layers). OK you're done! So the idea for this came from a friends blog post (thanks Vanessa!)... Like this post?