
Make Yourself a Floral Pencil Skirt. I came across this gorgeous thing the other day: and immediately thought - Buy.
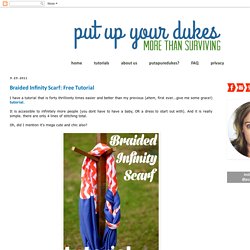
Buy now. I must buy this, now. Unfortunately, the link on Fashiolista led me nowhere, and in this brief kerfuffle another thought was allowed to sneak its way into my mind, which was - no. Don't buy. So I decided to sew myself a very similar skirt, instead. A Tutorial by Jen from Upcycled Education. Put Up Your Dukes: braided scarf tutorial. I have a tutorial that is forty thrillionty times easier and better than my previous (ahem, first ever...give me some grace!)
Tutorial. Felt Flowers / felt flowers. Google Translate. Vintage-looking painted sign from salvaged wood. Today I have a little tutorial for you.
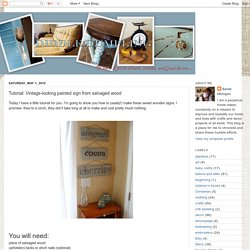
I'm going to show you how to (easily!) Make these sweet wooden signs. I promise- they're a cinch, they don't take long at all to make and cost pretty much nothing. You will need: piece of salvaged wood upholstery tacks or short nails (optional) hammer acrylic paint (background color) black acrylic paint (or other color to fill in letters) large paint brush small paint brushink jet printer twine Sharpie Marker or other dull, rounded tool This project started with a pile of cedar fence pieces that we've had sitting in our backyard for ages.
I loved how grey and weathered they had become from sitting outside. Next, distress the wood to your liking. Next, choose your paint. Faux Stained Glass. All Thumbs Crafts A craft tutorial blog for the un-Martha: where those of us who are all thumbs and don't have a big budget can still create some nice craft projects.
Thursday, March 17, 2011 Faux Stained Glass Please note this blog is no longer updated. Tutorials for Recycling T-Shirts - StumbleUpon. So way way back, in June, I wrote this Studio Organization post, about starting the process of organizing my studio by cleaning out the closet full of junk.

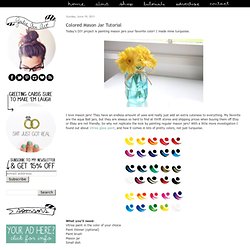
Well, it's September and...let's just say the closet is a work in progress. Colored Mason Jar Tutorial. Today's DIY project is painting mason jars your favorite color!
Crafty. Art From Everyday Objects: Paperclips + String. So today I thought it would be a fun challenge to work with paperclips.

You can’t get much more mundane than a paperclip! After much thought, I came up with paperclip earrings. If you have paperclips and some pretty cotton string, you can create these beauties. They’d probably look pretty cool as a necklace too. Here is a diagram to show you where to open the paperclip to create this triangular shape. You are basically unbending the clip at all three of the curves. Once you’ve got the triangular shape, you need to glue the ends together. Fig 1: Winding the string around // Fig 2: Starting to wrap the string around the earring, secured with Liquid Stitch.
Do-it-Yourself DIY String Wedding Lanterns Yarn Chandeliers. Jessica of Wednesday Inc shows us how to make those gorgeous twine chandeliers from the inspiration shoot she shared with us this morning.

Using balloons, glue and twine, you can also make these lanterns for your wedding – and then bring it home and use it as your very own mid century lampshade. What you will need are: balloons, glue, yarn, tray for glue, corn starch 1/2 cup of Corn starch, 1/4 cup of Warm water, clear fast drying spray paint, hanging lamp cord or fishing line (depending on your desired final product), and a lighting kit if you’re looking for a fully functional lantern. DIY Doily&Lamp - StumbleUpon. Print Hula Hoop Rug Page. Cathedral window pin cushion {tutorial} I found a great way to try a cathedral window with one simple useful square!
Sew. Beltmaking 101. Finally–the long-awaited beltmaking tutorial!
Way I make my fabric-covered belts has been learned from a mix of trial-and-error and vintage manuals. The supplies are simple, and making a simple pass-through belt is quite easy. I have, however, included instructions for how to add a pronged buckle to a belt and add eyelets. I hope you enjoy, and as usual feel free to ask any questions in the comments! Supplies: 1″ wide stiff belting (available at JoAnns), 1/4 yard fabric at least 45″ wide, buckle for 1″ belt (see sources at the end), pattern paper, thread, scissors, ruler, pins. Begin by measuring your waist and adding 6″ to 8″ inches to the length (I tend to err on the side of more, especially for a belt using a pronged buckle).
Cut the belting the length of your waist plus the extra. Using the paper pattern, cut one layer of your fabric. Fold the fabric around the belting, wrong sides out. Gently work the seam to the center of the belting width, and press seam open. V and Co how to: jersey knit bracelet. I don't know what it is about this time of year that makes me just want to have my bare feet in the sand, be watching the sun setting into the ocean, and breathing in the warm salty air of the beach...as i get older, more and more i find myself missing that place i used to go to almost every.single.day. as a teen.
(my skin doesn't miss it. as a matter of fact, i now wish i listened more and DID put SPF on my face...hindsight is 20/20). my mom calls me from her walk on the beach almost every morning... *sigh*yeah, i get a little homesick around this time of the year. heck on my pinterest my "dreaming of summer" has the most pictures in it. ah yes. i miss my ocean. case in point. this bracelet, brought a flood of memories, not because i used to have one like it but because i can totally see me wearing it by the beach, not caring that it's gotten salty and wet, because i can totally make another one in like less than 5 minutes flat when i get home.
*sigh* okay... 16 Headband Tutorials. As a busy mom of three little boys, I don’t always have time to do my hair. (Like, never, actually! I try to sneak in sessions with my flatiron while the boys are distracted with a cartoon… IF I have to leave the house. If I don’t, my hair looks like the bus driver from South Park’s… i.e., bird’s nest. Hmm, a bird’s nest headband sounds kind of cute and funny, actually!) Simply Vintagegirl Blog & Blog Archive & Tutorial: How to Make... 29 May 2010 These elegant fabric flowers are very simple to make . . . and only take a few basic supplies. The finished product is delightfully lovely, and at times can look like a real flower! Every flower will turn out differently and that is part of the beauty! If you haven’t used those tea lights in a while, now’s the time!
I hope you enjoy making these as much as we do . . . below are instructions with pictures on how to make your own. Supplies: Gathered Clutch Tutorial. Anna of Noodlehead is sharing the most beautiful gathered pouch tutorial. What a perfect gift! Anna has plenty of gorgeous gift giving inspiration at her blog. Don’t miss her tutorials! Most favorited last 7 days - page 2.
Sew a Full, Gathered Skirt , Part One: Make Your Own Pattern! Make This Skirt! Part Two of the Gathered Skirt Tutorial. ), which showed you how to draft a simple pattern for the blue skirt above, which is similar in style to the . Now, here are instructions for the easy-peasy construction.First, a note about fabrics. Vintagepillowcaseskirt. How to bleach jeans (acid wash jeans)
Last week, me and Britt tried to bleach our jeans. Here's a step-by-step tutorial for this extremely simple activity so you can try it as well. Courageshirt. Do-it-yourself Hand Painted Deer Print T-Shirt. Poured mason jar candle « Something Turquoise {daily bridal inspiration}