
Gift Ideas / Bracelets. Old Hollywood Glamour ~ Lace Halter Bustier DIY. * Black Bustier* Black Lace* Black Satin Ribbon * Needle/Thread/Scissors * Line your lace up with your bustier cups… make sure the pretty edge of the lace in on the outside closest to your arms.

Decide how much lace you need by measuring or just eyeballing it and make sure to leave a little extra so the panels can overlap in the center. * Cut two pieces of lace at least 12″ long to be safe. One for each side. * Flip your bustier inside out. . * Carefully hand-stitch the lace to the inside of your bustier cup, right below the seamed edge… or about 1/4″ down. . * It should look something like this lying flat. * Try your garment on. . * Readjust your lace to make sure it’s crossed over neatly and with your needle and thread carefully hand-stitch the edges of your ribbon to your lace. . * Trim off the extra lace at the top… this is a personal decision. . * Stitch your two panels together only at the center, not all the way up {though I suppose you can if you wish} * Trim the excess lace in the cups. DIY Braided Bead Bracelet. It’s been awhile since our last bracelet DIY.

I don’t know about you, but our wrists have been begging for another colorful addition for months now. So after playing with some materials that were already on hand, we’ve created a tutorial for a braided bead bracelet, which is a not so distant cousin of the hex nut and wrap bracelet. Because honestly, you can never have too many . . . You’ll need: Cut the waxed linen cord into a 26″ and 19″ piece. Tie a knot about half an inch down from the loops. Start braiding the strands. Push the bead against the base of the braid, and cross the left strand over the middle. Keep a finger at the base of the braid, holding the beads in their place and keeping the braid tight. Finish the bracelet with another inch of braided cord, measuring it against the wrist. DIY Friendship Bracelet.
DIY Clay Jewelry Dish. It’s hard to believe that I have yet to find the ideal system for organizing my jewelry.
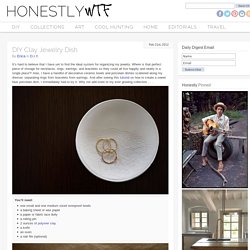
Where is that perfect piece of storage for necklaces, rings, earrings, and bracelets so they could all live happily and neatly in a single place?! Alas, I have a handful of decorative ceramic bowls and porcelain dishes scattered along my dresser, separating rings from bracelets from earrings. And after seeing this tutorial on how to create a sweet faux porcelain dish, I immediately had to try it. DIY Turban. We’ve recently received several requests for a turban DIY and so, your wish is our command . . .
Before you start, tie your hair in a bun or ponytail. Fold a large square scarf in half into a triangle.
US-3.jpg (JPEG Image, 800 × 533 pixels) DIY Braided Hex Nut Bracelet. We’re nuts for nuts.

Is there a more versatile and inexpensive DIY component than a hex nut from the hardware store? You can imagine our excitement when we first discovered Philip Crangi’s Giles & Brother Hex Collection. Honestly, nuts braided into jewelry is WTF genius! With a few items that we always seem to have lying around, we tackled the technique and made our own spine-like braided hex nut wrap bracelet. You’ll need:3 strands of cotton butcher’s twine cut into one yard pieces18 small brass hex nutsa bit of dexterity! Gather the 3 strands of twine and tie a knot at the top, leaving about 2 inches of slack. Keep your thumb at the base of the braid, holding the nut in its place.
Repeat the steps, by threading the rest of the nuts to the outer pieces of twine before they are crossed over. The bracelet should wrap around your wrist at least two or three times. Good luck!! (top image from here, rest of images by Honestly…WTF) 24 - THE DIRTY - Dirty Laundry - {the blog} Friendship Day is 8/7.
So I'm going to try my hand at making some friendship bracelets for a few of my friends that have helped me SO much with Dirty Laundry over the past several weeks. I'm going to try to make some snazzy ones! P.S.- I made this... Sodapop design - Part 2. Ich steig demnächst ins Big Business ein.
Hab ich mir gestern mal so überlegt. Und als ich so da saß und in meinen Geschäftsträumen schwelgte fiel mir auf, das mir das allerwichtigste für meine Pläne noch fehlte. Nein, nein, ich rede nicht von einer sensationellen Geschäftsidee, einem gewinnenden Wesen oder genug potentiellen Kunden … das hab ich doch alles :) Ich spreche von Visitenkarten. Und weil ich ja eine Frau der Tat bin, hab ich mir mal schnell welche zusammengeklöppelt. Und ich finde, für mal eben so aus der Not heraus: gar nicht übel. Das wollte ich euch doch unbedingt noch zeigen: die iPhone Hülle is da! Kennt ihr Lisa Storms? Knitting Crochet Sewing Crafts Patterns and Ideas! Summer bracelets DIY.
When M. came home from her camp with school, she showed me this yellow bracelet she made with 'scoubidoo' strings.

One of her friends taught her how to make these and of course I wanted to have a go at it too. Instead of scoubidou string I used strips of fabric for one and leather - what did you think?! - shoelaces in offsetting colors for another one. I believe both resulting bracelets look really nice. The possibilities in terms of material to braid with are endless. So, in case you 're in need of a fun summer project here's a how-to in 16 pictures with a short description below. This is what you'll need for an adult size leather bracelet. Steps: 1. This is the kind of craft you could easily do with kids - have them cut strips of fabric, no need to worry about the strips being straight and regular, and teach them how to braid.