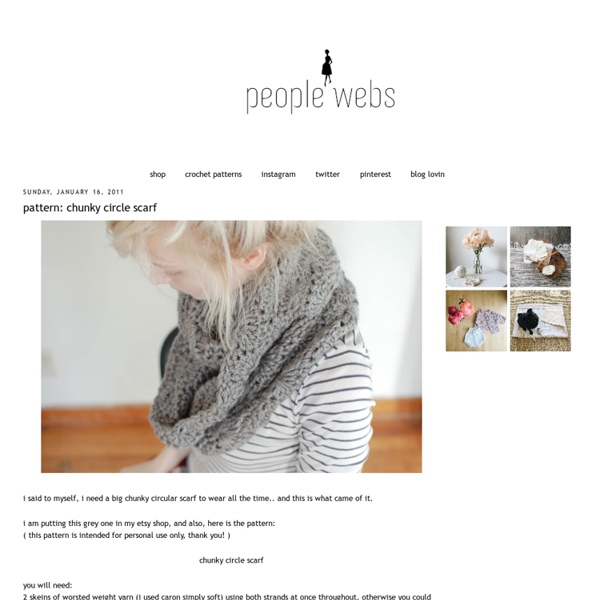
Pattern: chunky circle scarf
http://peoplewebs.blogspot.com/2011/01/pattern-chunky-circle-scarf.html
Carefree Cowl Knit Along - The Carefree Cowl Tutorial!
this is a bit of a fun post for me today! i did something i've never done before. i wrote out a little knitting pattern. now...first off, i am by no means a knitting designer. i simply just couldn't find what i was looking for on ravelry after hours of hunting. i had a skein of the yarn i used for the gap-tastic cowl left over and was dying to whip up another cowl with it. i wanted something warm, not too long (take flight off the girls..wink wink), but not too short (needed to cover my v-neck top openings) and i wanted texture but a quick knit. i was also looking for something that had a bit of drape but was also sturdy enough to stand up on it's own. i sketched out the illustration beside the pattern below and voila, the carefree cowl was born! i love it and it's rolly polly goodness. my newest cowl was made for our carefree cowl knitalong. Carefree Cowl Pattern
{capture the moment}: Embellish It! Senior Challenge
Embellishments are the finishing touch that can bring a project from mediocre to amazing in just a matter of minutes, but they also can get to be expensive, especially some of the more intricate versions available on the market today. This month I have challenged the senior design team to take the path that Michelle Wooderson has explored lately (such as demonstrated in her posts HERE and HERE) and create their own embellishments with supply basics in their stash. Not only is Michelle's whole idea fun & economical, it also allows you to customize color & style to give you coordination possibilities for nearly any type of project. I thought I would start you off with my new little exploration, the world of crocheted flowers. There are several big-name manufacturers that carry these little homespun beauties, but they can run anywhere from 50-75 cents each and the color selection can tend to be quite limiting. If you would like to see my list of PTI/DMC numbers, you can access it HERE.
How to tie a Four-in-Hand
STEP 1 Fold the scarf in half and place the scarf around the back of your neck with a loop on one side. STEP 2 Pull one of the ends through the loop. STEP 3 Twist the loop. STEP 4 Pull the other end of the scarf through the loop. STEP 5 Adjust the scarf for fit so it lies flat on your chest.
DIY Fringe Scarf
Everyone needs a go-to fringe scarf in their fashion repertoire. Here’s an easy way to make your own. What You Will Need: -Old T-Shirt -Good Scissors Step 1: Go through your old T-shirts and find a daring print or color combo. For a cleaner look, choose a solid.
A Grey Loop
It feels like such a long time ago that I knitted this for my daughter. In fact it was only in March, but time has been a funny thing this past year, seemingly standing still and thundering past simultaneously. Recently time and life have been falling back into a more familiar and comforting rhythm. I've decided to take full advantage of this by catching up on things I'd let slide...this dusty blog being one of them.
DROPS Pattern Library: Crochet patterns
DROPS pattern library contains patterns, and it keeps growing every day! The DROPS designers want you to see how these different techniques will look when applied to a knitting or crochet project. This is a very useful tool when you are looking for inspiration for own designs. Remember that by switching between yarn quality thicknesses and by picking a different knitting tension you will be able to create a new aspect to the design. Have fun!
DIY Skirt
Getting our craft on again :) My sister Ann and I always like to do a crafty project when we get together, so this time is was a simple homemade skirt. We used this tutorial and it was really straightforward. One helpful hint: when it says to stretch the elastic while you are sewing the fabric on, do it! It will allow the skirt to fit better and more comfortably. You can also make one for a smaller cutie pie in your life or make some great baby shower gifts!
Button Statement Rings
It’s September and that means it’s time to add another statement piece to your collection…. obviously! I heart almost every piece Nicole Richie designs for House Of Harlow 1960, especially her oversized rings. As amazing as these rings are they’re also an easy DIY.
tentenknits: 5th Avenue
Patricia and I have a friend we call Diva Jess. She's works in the fashion industry and always gives us the scoop on what the trends are. She came into the shop like a storm a few weeks ago and told us that we HAD to cast on righthisverymoment for an infinity scarf. "They're Everywhere!", she said.
Lacy Crocheted Earrings
Author Gene in SoCal Introduction Liven up an old pair of hoops with this simple pattern.
How To…Make a Versatile Skirt
photo credit Skirts and dresses are still hot for fall, and what could be better than a cute new skirt that you crafted yourself? This project is perfect for first-timers, it’s straight forward and pretty forgiving for those who aren’t sewing aces just yet. Materials:
beltmaking 101
Finally–the long-awaited beltmaking tutorial! way I make my fabric-covered belts has been learned from a mix of trial-and-error and vintage manuals. The supplies are simple, and making a simple pass-through belt is quite easy. I have, however, included instructions for how to add a pronged buckle to a belt and add eyelets.
Related:
Related:
