
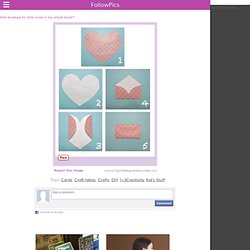
D.I.Y Inspiration from ScrapHacker.com. Heart Bookmarks :) Du behöver: Kuvert (återanvänd gärna gamla kuvert), ett ark med vitt papper (för mallen), sax, penna, lim och ett mönstrat papper.
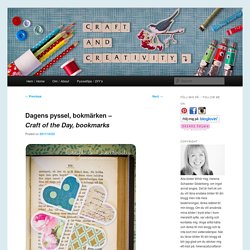
Inspiration till detta pyssel kommer från The Creative Homemaker. Fler varianter på samma tema finns här och här. Gör så här: Vik ett enkelt vitt papper diagonalt. Rita en en hjärtbåge i hörnet av papperet, som på bilden. You will need: Envelope (why not reuse old envelopes?) The inspiration for this craft comes from The Creative Homemaker. Simple Homemade DIY Gifts. Cards, Letters, Magazines, Etc. Recycling Crafts.
Wind-up paper butterflies are my fave (guest post from amelia) I had a baby so I’ve invited some fave guests to take over for me while I spend time with the little guy.
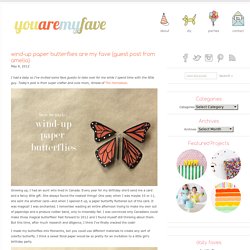
Today’s post is from super crafter and cute mom, Amelia of The Homebook. Growing up, I had an aunt who lived in Canada. Every year for my birthday she’d send me a card and a fancy little gift. She always found the neatest things! One year, when I was maybe 10 or 11, she sent me another card—and when I opened it up, a paper butterfly fluttered out of the card. I made my butterflies into Monarchs, but you could use different materials to create any sort of colorful butterfly. Materials: You’ll need heavy cardstock, 24 gauge wire, silicone rubber bands (I found mine in the hair aisle at Walgreens) needle-nose pliers, scissors, tape, a paintbrush, a black marker, and a white ink pen.
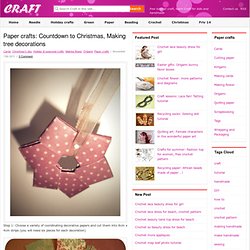
Step 1: Measure and cut your wire. Step 2: Find the center of the longer wire. Step 5: Find the center of the shorter wire, and wrap it around the base of the paintbrush. Paper crafts: countdown to christmas, making tree decorations. Step 1: Choose a variety of coordinating decorative papers and cut them into 8cm x 4cm strips (you will need six pieces for each decoration) Step 2: Fold each piece in half lengthways, and then fold the corners inwards (with the folded edge along the bottom) Step 3: Fold each piece in half so the folded corners are together Step 4: Insert the points of one piece into the ‘pockets’ of another (you should have a double-sided pocket next to the folded corners)
Paper Flowers – Anyone Can Do That. Japanese Kusudama, this tutorial is featured on Craftuts Anyone can do that, I assure you.

The proof: I can, just take a quick look at my result below. And, believe me, I am neither meticulous nor particularly patient. You could even say I’m the opposite. MAGAZINE ENVELOPES. 18K+ Well I got this idea from our friend Nina.
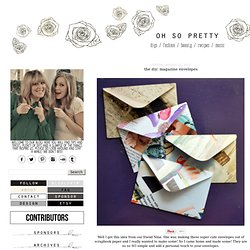
She was making these super cute envelopes out of scrapbook paper and I really wanted to make some! So I came home and made some! They are so so SO simple and add a personal touch to your envelopes. You will need: An old magazine, scissors, an envelope, a glue stick and a Sharpie. Tear out some magazine pages that you like. Carefully pull the envelope apart. Trace the envelope on a magazine page. Cut the envelope shape out. Turn the envelope over as well as the magazine cut-out. Unfold everything and separate the magazine cut-out from the envelope. Glue the bottom flap down to the two side flaps. Little envelope for little notes in my smash book?! FollowPics little envelope for little notes in my smash book?!
Source: this image Tags: Cards, Craft Ideas, Crafts, DIY, I<3Creativity, Kid’s Stuff home Best tutorial on how to make distressed wood signs. crochet beginner projects | 30am 10 30am beginner crochet wendy lord cable beginner crochet ... DIY Wedding Gift Canvas Art--do this but with our 10 year picture in the background Butterfly Craft...cool have lots of those wooden things!! Bottle cutting Belle Inspired Tutu Dress-belle, disney princess, tutu dress, costume, halloween; measurements. Make Paper Baskets & Gift Bags/Boxes. Crafting With Old Books: Repurposed Books. Paper crafts for gifts: mini book photo tutorial. Mini Book Photo Tutorial My advanced bookbinding class last spring took on the big project of coptic stitch books and so to reward them for all their hard work and patience as I worked out the kinks of teaching a group of people a very tricky stitch, I made everyone in the class these fun little accordion books!
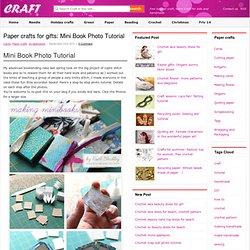
Here’s a step by step photo tutorial. Details on each step after the photos. You’re welcome to re-post this on your blog if you kindly link back. Click the Photos for a larger size. Materials: • Scraps of thin decorative paper for covers,• filler paper (this can be regular computer paper or sketch paper)• thin cardboard for the covers (the kind on the back of a sketchpad will work fine)• glue (I use PVA but any white glue would work fine) 1. 2. Photo: 2000 - 2021. Book Discovery.