
Lined Canvas Diaper Box. Hamper. Made a laundry hamper for Emily's room this week.
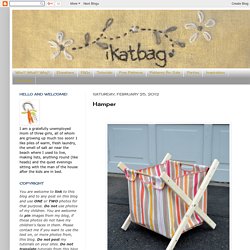
I've seen these everywhere, except they're big - and I wanted a smallish one for a specific corner of her room, and I was very, very tired of our plastic Walmart laundry baskets, so I got out my tools and sewing machine and made one. If you've never seen these before, they're very nifty things because they are roomy enough for lots of laundry but they can fold up (even with laundry inside) and be toted around. The fabric bag is buttoned on at the top and strapped down underneath so you can remove the bag completely and toss that in the wash, too.
The wooden X-frame is such an easy and useful basic structure for so many projects - apart from this laundry hamper, you can also use it for camp chairs, camp beds, tents and so many other things. This is what I used: First, drill all the holes according to the plan: Click HERE to download the plan. Important: All dimensions of the fabric bag, including the straps, are the FINISHED dimensions i.e.
Deco murs. Crafts To Do. After seeing several projects floating around on Pinterest I decided to try the sharpie method for customizing a pair of his + her mugs (this set is super cute + this one is particularly beautiful).
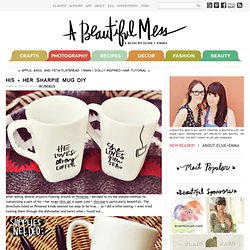
The directions listed on Pinterest kinda seemed too easy to be true... so I did a little testing. I even tried running them through the dishwasher and here's what I found out... Here's the method: All you need is a sharpie (any color) and a porcelain dish that you want to permanently alter. You can even use super cheap mugs from the dollar store to create gifts or party favors. Just draw on the surface of your mug and bake it for 30 minutes at 350 degrees. After I made my dishes I tried scrubbing them with a kitchen sponge and soap. Anyway... that was my fun little weekend project. EDITED TO ADD: Although many people (including me) have had success with this DIY project we have received many comments from readers who said the marker washed off. Fleece Dog Bed Tutorial. Loki got a new bed today and the weather held out for photos, so you all get a new tutorial!
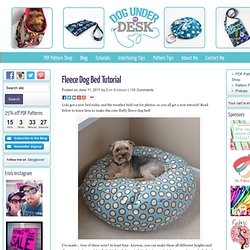
Read below to learn how to make this cute fluffy fleece dog bed! I’ve made… four of these now? At least four. Anyway, you can make these all different heights and diameters (π is your friend). Loki already loves it, he’s sleeping on it right now under my desk. You’ll need 1 1/4 yards of fleece. I cut the 26″ square first, then folded in it fourths. (If you buy 1 1/3 yards, you can squeeze out 28″ circles, but not much more than that.) Now, sew the long pieces together on the short side, right sides together, to make once long piece. Now mark the halfway points on both circles. Now take one circle and place it right sides together with the long piece, matching the center seam to the center point. Sew in both directions starting from this center point/seam to 4″ from the other center point. This diagram will help: Sew the other circle in the same manner.
Uses for Maps. Map coasters.
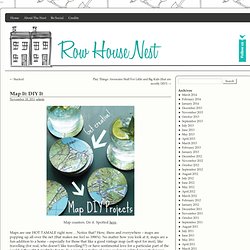
Do it. Spotted here. Maps are one HOT TAMALE right now… Notice that? Here, there and everywhere – maps are popping up all over the net (that makes me feel so 1990′s). No matter how you look at it, maps are a fun addition to a home – especially for those that like a good vintage map (soft spot for moi), like travelling (for real, who doesn’t like travelling?!?)
This might be the easier one: candles and vases wrapped with a little map paper. Don’t have any wrapping paper? Crafty Friday. This craft project was inspired by something almost identical I saw in a fancy shop here in NYC. It cost almost $500, and I thought to myself, "hey, I can make that". And so I did! Start by printing out butterflies. I found mine online, simply google butterfly prints and millions comes up. Cut them out. Hot-glue or super-glue a small branch to a vintage saucer. Fold the butterflies a little, so they look more alive and simple hot-glue them all to the branches. Photos by Alexandra Grablewski. Créer un rideau à volants. Un rideau original à créer soi-même pour une touche déco personnelle, déclinable dans plusieurs tissus et plusieurs couleurs selon le style choisi… Matériel nécessaire : du tissus (au format du rideau pour le fond)des bandes de tissus de la même largeur que le rideaudu filune machine à coudredes anneaux, des crochets ou des bandes de tissus (pour la suspension) Un rideau original à créer soi-même pour une touche déco personnelle, déclinable dans plusieurs tissus et plusieurs couleurs selon le style choisi… Une idée pour un rideau de douche, tout en transparence pour une chambre romantique, coloré pour une chambre d’enfants ou avec quelques volants pour le salon… Si besoin, le tuto est à découvrir sur A boy, a girl & a pug sinon cliquer sur les images pour découvrir les originaux.
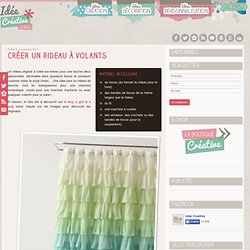
Difficulté : Pas bien compliqué avec une machine à coudre, une bonne idée pour des débutantes en couture.