
Sara
Daily Marketing. Pearltree 2. Japanese Packaging Templates - Best Used With Card Stock or Color Paper. How to make a hairbow holder - Celebrities, Kids Clothing, Influential Mom Blogger. Make a Ringlet T-shirt Scarf for Fall. This little ringlet scarf made out of old t-shirts is so fun for fall!
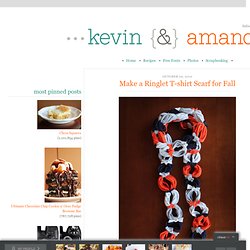
There’s no sewing involved (hallelujah!) , and you can make it while sitting in front of the TV in less time than it takes to watch a really good, trashy show on E. Pop Up Card . Just Piece of Paper . Amazing Flower. Fabric Printing with Citra-Solv. Yarn Wreath with Felt Flower Tutorial. Kodachrome Curtains - Updated! Now with lampy goodness! So, it's been a while since I've made anything Craftster-worthy, but my husband and I busted out the Dremel tool a few days ago and we made this: It's a pair of curtains made out of old Kodachrome slides!

I'm really interested in photography, and will buy old cameras in antique and thrift stores in order to develop film that's inside of it. From time to time, I'll find collections of old slides and will buy those, too. Last fall, driving back from vacation, we stopped at an antique store outside of Kansas City and I found a box of a ton of old slides, mostly Kodachrome, from the 50s and 60s. Sleek word clock. Ric Rac Rosettes. My brother-in-law just returned home from a mission in Brazil last week & brought his sisters these adorable rosette necklaces...
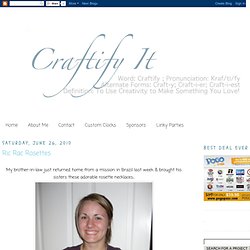
I instantly fell in love! Thanks for modeling Emily:) With a closer look, we discovered the rosettes were made of ric rac! Create * Sell * Buy * Share - Buy Handmade Paper Crafts and Paper Arts. Finally, as promised, the tutorial!
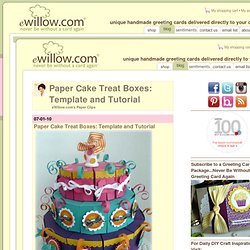
Yes, it really did take me two days to get this ready. I hope you enjoy it. Be sure to create a FREE studio on eWillow.com and upload photos of your cakes when you are finished. You can even sell them, too! Click HERE for more details. Also, to help spread the word about eWillow.com and to build our community, please link to this tutorial and share the news that eWillow.com is FREE to use. Macgyver Challenge: Old Board Games. Cool Copper Projects Warm metallic hues are easy to love but often pricey.

When you create the look... Easy Doily Bowl Craft a decorative bowl from a doily picked up from a flea market, antique... Camper Birdhouse Encourage birds to stay awhile with an adorable vintage birdhouse. Summer Fun: Microwaved Ivory Soap. When I came across the idea to microwave Ivory soap on The Cyber School Mom Diary’s fantastically comprehensive Supermegatotally Thrilladelic Not Bummer Summer list, I was instantly intrigued.
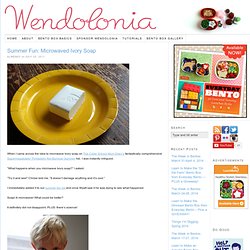
“What happens when you microwave Ivory soap?” I asked. “Try it and see!” Chrissi told me. “It doesn’t damage anything and it’s cool.” Recycled Pillow Box Favors. You know that I save toilet paper rolls.
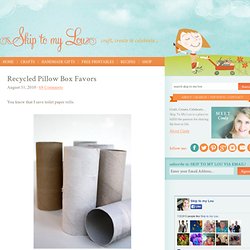
They can be made into so many things — mummies, rockets, Uncle Sam hats, flower party favors………………. even cute pillow boxes perfect for a little favor! Fold in one side of the end. Then fold in the other side. Repeat on other end. Open back up and give the toilet paper roll a bit of paint. Autumn leaf bouquet. I don’t know what it’s like in your neighborhood, but when I step outside here in Oakland, I sense it right away: Fall is in the air!

I’m lucky enough to have a few turning trees on my street, so I don’t miss out entirely on the brilliant autumn colors I remember from growing up in NH. Speaking of brilliant autumn colors, I’m thrilled to share this stunning maple leaf rose bouquet DIY from a fellow Kate — clay, fiber and paper artist Kate Hust. Kate first learned how to make these a few years ago from a retired art teacher in her community, and now they’ve become an annual tradition when fall rolls around. Her instructor taught her to wrap the leaves really tight, so they looked like rose buds, but Kate has modified the technique a bit to suit her own tastes: She likes to find the really big leaves and make them with large open “petals.”
She’s clearly perfected the craft, and I’m so happy that she’s decided to pass the tradition on to us. {every}nothing wonderful: Tutorial: Repurposed Envelopes (From Magazines to Mailing) Note: If you like this idea, be sure to check out how to make paper ruffles to add to your envelopes!
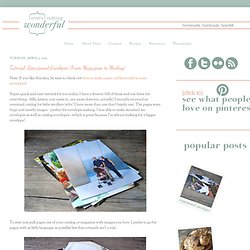
Super quick and easy tutorial for you today. I have a drawer full of these and use them for everything - bills, letters, you name it...my mom does too, actually! Paper Fortune Cookie Favors. #01 Flowers expended to wall art using paper rolls - Growing Up Creative. How to Make An Eco-Friendly Bag. How to make Paper Clay. I fell in love with sculpting with paper mache during my first project five years ago.

However, I never really found a recipe that was worth the time and effort and mess that it took to get what I wanted. As a result, I used Celluclay for most projects. However, I recently stumbled upon an incredible blog called, Ultimate Paper Mache where Jonni (the artist and blogger) shares all sorts of tips, tutorials and recipes to help anyone on their way to successfully paper mache-ing. Creative little daisy: Have you priced vintage blue canning jars lately? Wanna make your own really cheap? I bought these probably five years ago at an antique/consignment store.
I think I paid about 12 dollars for a set of four. Now you can expect to pay at least that for just one. Quotes, quotes, & more quotes. 1295 310 581 431 1428 127 489 267 1627 164 459 862 307 609 250 2265 1445 855 184 172 736 311 2320 94 362 1102 596 186 1558 787 867 572 291 100 175 290 369 349 1430 2591 642 817 194 1908 227 270 2031 443 2536 479 3100 70 601 1568 146 670 2719 1213 1368 616 710 383 879 1909 2950 364 95 1309 470 464 94 1023 307 726 1540 132 283 664 90 1232 423 88 859 457 846 1951 61 131 51 34 2922 226 644 60 1122 553 947 39 853 More in this collection ... Loading more. Speed painting - in un istante solo. Painting on water. Seller How-To: Packaging Ideas. Since I started working for Etsy I turned from a full time seller to a full time buyer.
(Ok, maybe I’m exaggerating. I’m not shopping all the time…Sometimes I’ve spent all my money and I’m just adding to my favorites.) My very favorite thing about buying on Etsy is getting packages — it’s like a little mini party each time, thanks to the thoughtful packaging Etsy sellers put together! Ribbons, stickers, stamps, extra little goodies, oh my. What a delight! So, dear sellers, why not show this off in your item listings?! Want some more tips? Cup of Rosee by jewelera, $18.50 View item |View Shop |Add to Etsy Favorites. Printable-envelope-template-1.pdf (application/pdf Object) Plaster moulds for ceramics for sale in Near Wadebridge, Cornwall, UK. Barnsley, S.yorkshire Various We have a rhea and emu egg both professionally drawn with only 1 small hole in base ideal for decorating for Easter - Emu eggs are dark green and can be carved as they have several different coloured layers: Rhea egg £5 - Emu egg £8 Harrogate, North Yorkshire Oswestry, Shropshire Offers I have a miscellaneous selection of craft items including ready to sell items, blanks, moulds, stencils, furniture which requires painting, decorated pots etc.
Telford, Shropshire £20 ovno This is a super waterfall picture on board which is absolutely stunning.It is 47 inches high and 31 inches wide The only reason im selling it is due to change of decor. Dereham, Norfolk. SMALL CRAFT BUSINESS. Ideal for internet trading or craft fairs etc. in Lancashire. An ideal money making hobby or small business. We have made these cards for 20 years and are now retired and moving to Australia. Each card is on quality embossed triple fold card. STALL FEES. Creative Crafts Association Craft Fairs. The Creative Crafts Association have been organising Fairs for 25 years throughout the North West. Samlesbury Hall Food & Craft Fair - Festival in Samlesbury, Samlesbury - Visit Lancashire.
Lancashire - Stallfinder Ltd. UK stallholders events fundraising and party plan. Craft Fair List. Can Art: A Way To Recycle Some Tin Cans. & Blog Archive & Stamp Carving tutorial- Tutorial Sellos de goma. English. Repurposed Hardcover Book to Notebook Tutorial. No-Carve Stamps. Mobile Uploads on we heart it / visual bookmark #16510849. Business networking event at Fired 4 U. I invite you to join us for another networking evening in the relaxed and creative surroundings of my studio. Lino Blocks. 2105-778HollyHobbie.pdf (application/pdf Object) Get a quote to send your parcel using ipostparcels NOW! Splendor: Make Your Own Pinwheels. Under The Table and Dreaming: DIY Faux Curled Rosewood Wreath {Made From Rolled Recycled Book Pages}
I have seen various versions of Faux Rosewood Wreaths in just about every store and catalog for the upcoming season; most with a price tag running upwards of $40 or more. Gift Ideas for Poor Creative Souls (9) Posted by: Cathy on Sep 18, 2011 Tagged in: Untagged. Boden Boulevard Necklace Knockoff & Flamingo Toes. Wine cork bath mat - Craftynest. Domestic for Dummies: Fall Pinterest Project: DIY Coasters. Pinterest Finds: Holiday Crafts with Children's Fingerprints & Footprints. Tutorial & Whipperberry. Felt Monster Tutorial.
DIY Footprint Butterflies. Mason Jars crafts. 5 Halloween Pumpkin Whole Pumpkin Decorating Ideas. How to make hard candy jewels. How to Make a Bird out of a Plastic Straw (with pictures) How to Crochet with Pop-Tops. How to Make Crayon Monogram. DIY Family Memory Calendar. DIY best of: office. Seed Paper Tutorial.
16 Homemade Valentines Ideas — my blessed life™ New England Through Yummy Moms Eyes: Tutorial: Photo Wood Blocks. Knock it Off! The Orimono Pillow & mad mim - Sewing and other craftiness from Miriam Tribe. How to Make Garland. Colored Pencil Jewelry. Bottle Cap Locket. DIY {doily canvas bag} & ashleyannphotography.com. Hey Look - Event styling, design inspiration, DIY ideas and more: DIY GIFT IDEAS. Little Miss Momma: Scrunch Fabric Flower Pom Pom Headband TUTORIAL. ORANGE RIND VOTIVES. How to Make Chalkboard Paint In Any Color {A Beautiful Mess}
How to Make a Magazine Reed Box. Landee See, Landee Do: Festival of Trees: Folded Paper Trees. 10 Beautiful Fabric Flower Tutorials. You knew i was going to make one. Useful Items You Never Knew You Could Print Out - The Ultimate Guide. Do-It-Yourself, Upcycled Polymer Clay Flower Vases. Felting Project: A Rug! Recycled Craft Ideas. Guest blogger - Sasha from The Guilded Bee:
Lemonade Makin Mama: Express yourself in porcelain. HOW TO: Create a Home Made Wax Seal (16 Pics) For the Love of: Mason Jars. Salvaged patchwork bulletin board. Crafts by Carolyn - Exploding Box. Fork Bows - How To Tie A Bow Using A Fork. DIY Organization Solution - Grocery Bag Holder. Under The Table and Dreaming: Lemon Sugar Hand Scrub {for Mom} Wire Wrapped Tree Of Life Ornament. - StumbleUpon. Inspired Entertaining: DIY Chalkboard Wine Glasses. Girly duct tape wallet/clutch. Rolled paper flowers {tutorial}
Pop up flower - Arts. Tutorials for Recycling T-Shirts. I feel melty. Make a Lunch Box from a Milk Jug.