
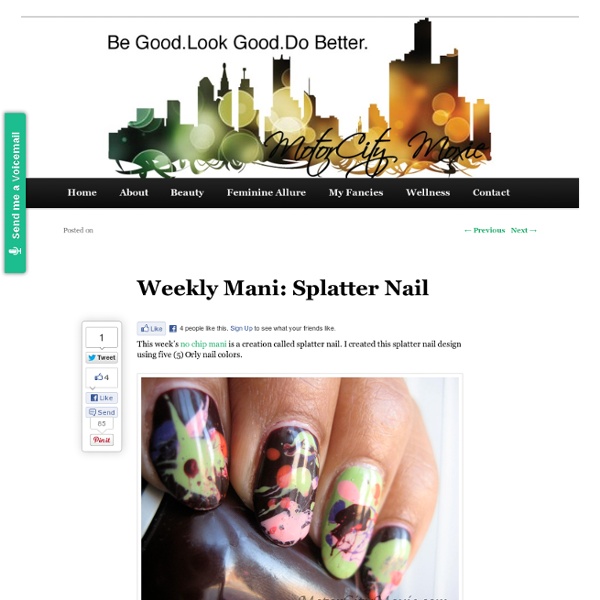
The Digi Nails – A Hybrid Manicure I’ve been seeing lots of outrageous nail art lately on pinterest. One hot new product that’s really caught my eye is adhesive nail polish strips. I love the funky designs and bold colors with these products, but they’re usually a little spendy for me. I have a great alternative and I’m super-excited to share with you a really fun, new way to use digital scrapbooking supplies! We are going to give ourselves a little hybrid manicure. To begin with, you will need the following: light color nail polish (white, light pink, cream, pale green, light turquoise, you get the idea….)rubbing alcoholsmall cup (I used a medicine cup.)digital supplies (laser print or copy)nail polish topcoat 1) Before getting started, quickly measure your fingernails. 2) Open a new Photoshop document and create for yourself 10-15 boxes that are a little larger than your nails. 3) Find some great papers that you’d like to have on your nails. 4) Print your page. 5) Paint your nails with your light colored nail polish.
Tutorials I don't create tutorials for every manicure I do, but if I have, this is where you'll find them! Explore the manicures and tutorials attached with them by clicking on the images below! If you try it out, let me know, I'd love to see your recreations. If there are any past manicures you'd like to see a tutorial for, drop me a line!
Tutorial: Easy Sponge Gradient Happy Sunday! Today, I wanted to show you guys how I did the Tropical Gradient from earlier this week. It's very easy and I like that it has that seamless look. You'll need: -two or more polishes. Here, I've used Zoya Sooki and Zoya Arizona* -disposable cosmetic sponge wedges -nail polish remover and qtips for clean up Start out by painting your nails with your base coat and your base color. You might want to cut the sponges down to size, to make it easier to use. Bounce the sponge against your nail. When you're finished, apply your top coat and carefully clean up the skin around the nail with your polish remover and qtips. A few tips: -Creme finishes seem to work the best. Here's a diagonal manicure that I did with Zoya Wednesday* and Zoya Tracie*: Was that simple or what? Thanks for checking out this tutorial! *indicates a product that was sent to me for review. Tutorial: Easy Sponge Gradient
Follow the Trend With Colorblocked Nails! Why not try it out on your nails instead? You can keep it simple within the same color family or go bold and crazy—whatever suits your mood! Step 1: Get Your Supplies Together To start, make sure you have all of your supplies handy. Step 2: Paint a Base Color Start with your favorite basecoat and paint your nails the base color. Step 3: Start Taping Next, pull off a small piece of Scotch tape (you won’t need more than an inch at a time) and put it against your hand and pull it off several times until most of the stickiness is gone. Once your base layer is dry, it’s time to start the colorblocking. Step 4: Apply the Second Color Carefully paint your nail so the exposed part is your second color and make sure to paint over the tape so you have clean lines. Step 5:Remove Tape to Reveal Precise Triangles Wait about thirty seconds after you paint over the tape and carefully pull the tape up to reveal a clean little triangle! Step 6: Marvel at Your Work Step 7: Tape (Again) and Paint (Again)
Mermaid Nails Share this image Share It Pin It For our trip to Costa Rica, I wanted fun nails that had an almost tropical vibe. Share this image {Essie's Mint Candy Apple & Martha Stewart's Aquamarine Glitter} {Paint two coats of the nail polish} {Add top coat along the bottom half of the nail} Share this image {Dip a separate brush into top coat and then into the glitter} {Apply glitter to the bottom half of your nail} {End result} How to…Get Zebra Print Nails photo credit Here at Every College Girl, one of our most popular posts of all time is our tutorial on how to get cheetah print nails. I love the look; it’s so simple and fun, and animal prints are getting hot again. To follow along the same vein, I decided to do a similar animal print nail tutorial. What You Need… White nail polish Black nail polishClear top coat nail polishThin paintbrush (from craft/dollar store), dotting tool (from beauty supply store), or toothpickNail polish removerQ-tip Directions… Start by applying the top coat. Mix It Up… I love this look with different colour combinations. What Do You Think? Did you try our cheetah print tutorial? You might also like
STICKY SITUATION photos + design by Kristin Ess It’s really hard to get clean lines when it comes to putting stripes on manicures. I’m going to share a little DIY secret– nail polish on scotch tape. You’ll need polish, scissors + scotch tape.Apply polish to your tape. When you’re done, apply them to a pre-polished nail with the sticky side down. Tags: DIY, do it yourself, geometric, how to, kristin ess, mani, mani monday, manicure, nail, neon, stickers, the beauty department, thebeautydepartment.com Related posts: Pigment Tutorial Part 1 | Nevertoomuchglitter's Weblog Here it is, finally! The Pigment Tutorial! For our purposes, pigment is a dry coloring material that can change the color or texture or a nail polish. Some pigment is loose, and some is pressed (think loose eyeshadow vs. the kind in the compact.) Pigment can make a drastic change in the color of a nail polish. First, some pigments: TKB Trading Yellow 5, MAC, Fyrinnae. Pressed eyeshadows can also be a good source of pigment. However, there is one type of pigment that you should NEVER be putting on your body. Artists pigment. So, if you’ve got your non-toxic pigment, what else do you need? A little teeny spoon (I got this at a Japanese coffee shop) and silicone baking tins. Last, you need a spare bottle of clear nail polish. The most basic pigment mixing is with clear polish. Left to right: MAC Teal, Fyrinnae Aztec Gold, Fyrinnae Boytoy, MAC Green Brown. Next, get ready to mix! 1. 2. 3. Voila! Here’s one coat (over the bright yellow I had on before!) With a coat of Seche. Like this:
Cute nails c: 321 226 447 192 141 223 1185 96 115 113 220 310 201 51 366 26 116 101 499 108 29 192 266 80 606 172 88 60 150 384 86 187 44 63 33 75 27 63 82 55 33 895 200 416 145 913 224 164 119 201 70 680 812 1246 86 381 101 263 35 1651 262 230 136 654 614 150 260 2384 25 256 42 182 149 189
>How-To: Newsprint Manicure | A Pretty Penny I saw this newsprint manicure over on The Daily Nail and thought it was adorable (especially for bookworms and word lovers like myself). I did a little Google detective work to see how to recreate it, and was surprised at how easy it is! All of the tutorials I found called for vodka or other clear distilled spirits, but we were fresh out. I used isopropyl alcohol instead, and it seemed to get the job done. I tried a quick and dirty version this afternoon to share it with you: Like this: Like Loading...